Find us on Google+ Inventor Tales

Saturday, May 30, 2015

Importing and Exporting Your Autodesk Inventor Settings

A few weeks ago, I had an opportunity to write for the CAD Setter Out.  In that post that you can find here, I wrote about some of the settings that I like to change in Inventor's Application Options.  These are settings I change on any new install of Inventor I'm going to use.

These are my settings of choice.

Not too long after writing the post, I found myself working offsite for a few weeks.  The computer I was using wasn't mine.  It was a loaner.

So I did what I always did, I set up my Inventor installation just the way I wanted.  All was good the first day. 

But when I returned the next day, after rebooting the computer, I found that my Inventor installation had returned to default.  I had to reset everything!  And while this too a few minutes, it was a nuisance. 

The IT department knew it was likely something in the windows profile, but they had their own set of challenges: 
  • They were in the middle of upgrading some of their own systems, so they had limited time for me
  • My issue only took a few minutes for me to fix, so it was far from a "show stopper". 
  • I was only going to be onsite for a short time.  
Given those factors, it's understandable why they didn't jump on my issue.  

That meant finding a way to do the best I could with what I had. 

Thankfully, I was able to draw on a trick that made this issue much less challenging.

I thought it might be worth sharing.  I hope you agree! 

All you have to do is export your settings to an XML file.

So let's get started! .

The first step is to setup your Application Options just the way you want them.  This is just like you've likely done before.

Remember, these are found on the Tools ribbon. 
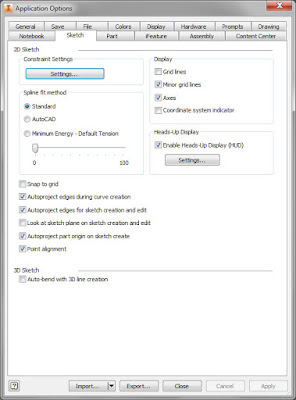
Some of my preferred Application Option settings

But now, select the Export button.  Choose a location and save the XML file with your default settings to a safe place.   In my case, I just saved it to a folder on the desktop of my machine.
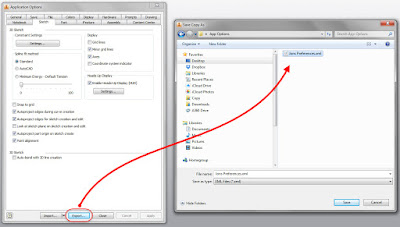
Exporting the settings to a preferred location


You might consider putting it on a USB stick, or on a cloud account like Dropbox, Copy, or A360 Drive.  You could even e-mail it to yourself.  As long as it's someplace you can find later.

After my computer had restarted, and Inventor had again returned to default, I was able to go back to my application options and import my preferred settings.  In a few minutes, Inventor was set back the way I liked it!
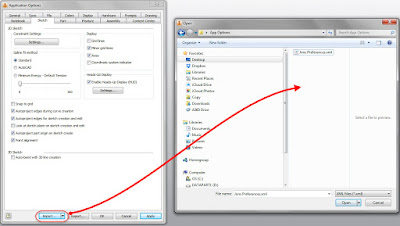
Importing the settings back into Inventor
What's the big benefit?   You can walk up to any machine and bring your settings with you.  It can make setting you machine up much easier.

In my case, it gave me a quick way to restore my settings until the IT department was able to tweak my user profile, rendering the issue moot.

I must add one disclaimer however, or else I'd be doing you a disservice.  I've not tempted this particular fate myself, but I have on good authority that this doesn't work well for migrating customizations.

In short, new tools, ribbons, and options may exist when a new version of Inventor is released.   A settings file from a previous version may not know how to address these new settings.  As a result, they may not work correctly.

So in other words, just use it across the same version, and all should be fine.

In any case, keep this in mind in your own uses.  Any time you need to bring in your preferred settings to Inventor, have this at the ready, and you can have your preferred settings at your finger tips!

Also, if you expand the flyout under the import button, you'll see Use AutoCAD Related Settings, which will set Inventor's appearance to mimic AutoCAD, such as having a black background in the modeling environment .

There's also Use Inventor settings.  This resets Inventor to its default settings.  Good things to know if you're experimenting with settings!
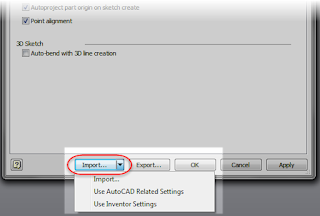
Inventor's alternate settings

So take these settings and see where you can use them!  Maybe it can help you! 

Monday, May 25, 2015

Preparing Your Autodesk Inventor Project File for Inventor 2016

In an earlier post, I discussed installing your new suite of Autodesk software.  But then comes configuration.  There are things that have to get setup and configured.

After installation, on of the next things I like to do is migrate my Inventor project file to make sure it's set up for the new software release, in this case Inventor 2016.

Every installation is a little different, so first, I'm going to discuss a few things that are unique to my installation.  You may not encounter all these, so you might change a few steps based on your own installation.

It all revolves around one thing.  I have to run multiple versions of Inventor, as far back as version 2012.  That means maintaining previous versions of  template files and the Design Data folders.

In order to accommodate this, I need to use a project file for each version of Inventor I run, that allows me to point each version of Inventor to its own template and design data folders.


That means copying and pasting of template and design data directories in Windows explorer.  I also copy my custom material and appearance libraries to this directory.

And by the way, it's a good idea to make a backup copy of these files.  You'll have options to try a few things if you want, and recover from any mistakes.  "One and done" is what we aim for in a migration, but reality has a way of getting in the way of the best laid plans.


Once the design data and templates are copied, it's time to copy my project file.   I'm renaming it to Arduinna 2016.ipj so I know which version of Inventor it belongs to.


All of this goes pretty quickly.  It's just the standard Windows copying and pasting.

Once that is done, it's time to tell Inventor 2016 to start using the project.

Inside of Inventor, choose Projects on the Get Started tab.


Once the dialog box opens, browse out to the directory the copied the project file. Select it and select open.  The project will read into Inventor, and be set as the active project.


Now it's time to point the project to the locations it needs to use.

I like to set my locations with in the project, which means I start out in the "Folder Options" section of the project.

So in my case, I point the Design Data, and Template folder locations to the directories holding the files that are going to be used in Inventor 2016.


In addition to that, I want to add my Material and Appearance Libraries to the project as well.  So that means right clicking on each library, and adding the ones I want.


Once this is done, setting up the project is done.

But before we can start firing up our new project, you'll have to migrate the templates and design data for your new project.
Fortunately, the process hasn't changed from previous releases, so you can reference my posts here from last year.

Here's my post for migrating Design Data, and here's my post for  migrating templates.

And there you have the steps to migrate a project.  Don't forget that depending on your setup, you may not follow the exact same steps.  The key is making sure the steps are done for your configuration.

Don't be afraid to run a couple of tests (that backup can come in handy for that!), and make sure you cover your bases!


Monday, May 18, 2015

Autodesk Inventor 2016 - The "What's New" Trailers

For the last week and a half, I've been working full time on a customer site.  And while it's good to be busy, it's a bit tough on the blogging schedule.

But with the help of the KETIV Technologies team, I have been able to lend my voice to a few what's new videos for Inventor 2016.  

They're what I'd call "previews", but they do give you an idea of what some of the new capabilities are!

I've included them below!  And I'm still planning on creating more posts! Just give me a little time! 

But take a look at these videos for a tour of what's new in the latest release of Inventor! 

Part Modeling Enhancements 

If there's anything that gets used a lot, it's part modeling features. Take a look at some of the new ones here! 

;

T-Splines Enhancements

If you need to create organic shapes, this is the tool to take a look at! Notice how you can create symmetrical shapes with just a few mouse clicks1

;

Sheet Metal Enhancements

Tools like automatic thickness detection, zero bend radii, and multi-body support are now in the tool box for Inventor 2016 sheet metal! 

;

Presentation File Enhancements

These enhancements have been much requested!  There's a lot of improvements, from the interface, to View Representations, a lot of wishes have been answered. 

;

Home Screen Enhancements 

First introduced in Inventor 2015, The home screen has had more features added to it.  I'm a fan of the filters for recent files, but there are more enhancements than just that. 

;

Electromechanical Improvements

Better communication between Inventor and AutoCAD Electrical is the name of the game.  Here's where you can see a bit of them working together. 

;

DWG Underlay

Do you need to reuse your AutoCAD drawings in Inventor?  Do you want to maintain a link between the two?  You've come to the right place!  Check this out! 

;

Documentation Enhancements

Inventor drawings received quite a shot in the arm this release!  View creation is new and streamlined, text creation has been enhanced, and transparent parts are just cool. 

;

Assembly Feature Enhancements

Do you want to replace more than one part at a time?  Do you need to tweak your install for better performance? Or maybe you just want to zoom in to your interferences, or have a more options for component patterns.

Take a look here! 

;

Additive Manufacturing Enhancements

"Enhancement" is probably an understatement here, entire sets of tools have been added that didn't exist in previous versions of Inventor.  Everything from splitting large parts to fit in a small machines, to having envelopes for different machines available.

;

So there you go!  Your epic tour of the new features in Autodesk Inventor 2016.  

Time to start Inventing! 

Tuesday, May 12, 2015

Installing Your Brand New 2016 Autodesk Suite

Work has been picking up again, which is good!  Being busy beats not being busy for sure!

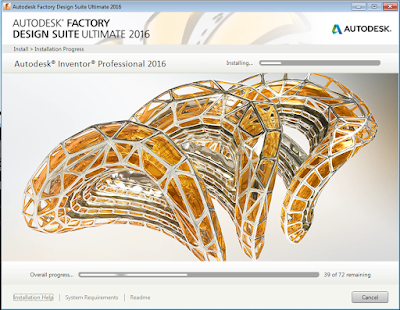
But this weekend, I did find time to install my 2016 Suite, in this case, Factory Design Suite Ultimate.  I had the foresight to record the steps too! . 

But like so many things, the preparation can't be overlooked.   To make your steps go as smoothly as possible, make sure you've done the following before getting started. 

  1. Make sure you have Local Admin rights!  You won't get far without them! 
  2. Turn off your Antivirus.  I don't see too many AVs stop an install now, but I have seen cases where the antivirus will slow the install as it checks the install files. 
  3. Turn of User Account Control.  I've seen it cause issues, and I hate that thing on any Windows OS I've used. 
  4. If you're running a network licensed version, make sure you have your new license files.  Nothing is more frustrating than getting the install  finished, and realizing you haven't updated your licenses yet! 
  5. On that same vein, if your using Autodesk Vault, have you updated it yet?  Consider upgrading your server first!  You can't use your 2016 products with a 2015 Vault.  A little planning goes a long way.  Check out my post here for info on that! 
  6. Give yourself time! These installs take a while.  That's a fact.  You don't do it "in a few minutes".  I've had to leave my laptop at the office because it was only 50% done at 5:30PM.  Don't make that mistake, give yourself a few hours to get it done properly. 
  7. And if there's any doubt, as your admins, your cad manager, or check the Autodesk Inventor discussion groups!  A little clarification goes a long way! 
So you've done your planning, and now you're ready to install.  Go ahead and click on your Setup.exe and let the installation initialize. 

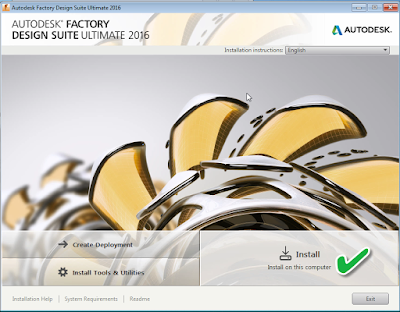
Soon you'll see the intro screen with the Deployments, Create Deployments, and Install buttons.  I'm going to just install my Factory Design Suite directly, so I'm just going to choose Install


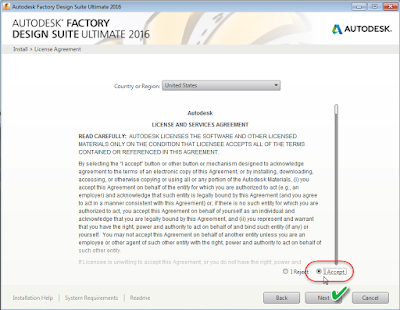
The next page you'll see is the End User License Agreement (EULA), you have to accept it, or else your journey ends here.  Click yes, and click the Next key. 


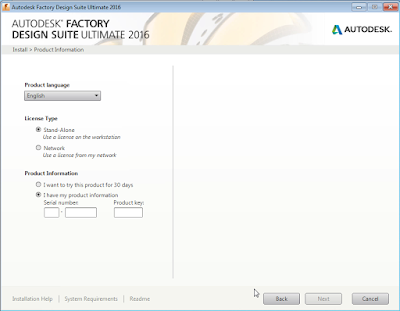
Now, to choose a if you're using a Network, or Standalone license.  A Standalone (node locked) licenced machine hosts it's own license. This is often found on laptops that are aren't always connected to a network. 

Network licenses check out their licenses from a central server, like a book from a library.  

I won't go into the details of each, but it is important to know which one your installing right now . If your not sure, check with your CAD Manager, or your friendly neighborhood reseller.  

You'll also enter your serial number and product key here.  If you don't know what they are, there are instructions on how to locate them here.  Once you have everything you want, you guessed it, hit Next


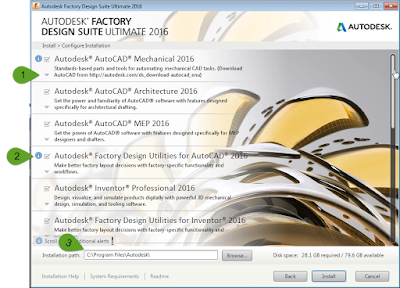
There's one more screen before the big time! It's time to choose which products to install, assuming you want to pick and choose. 


There's several things you can do with this screen.  As indicated by the arrows...

  1. Click the arrow to expand the screen and choose options for a given products, such as configurations, settings, and to download and install additional updates.
  2. The arrows will display additional information.  For example, content center libraries are available to download now. 
  3. Finally, change in the install directory if you'd like to install somewhere other than default.  Such as a drive different than C:
Once you've set all these options, you can choose Install.  At last! 


This is the part that can take a while.  Give yourself a couple of hours for the install, more if you're going to remove old products.  It takes time, so be prepared. 

After waiting it out, you'll be rewarded with the sweet sight of success!   


Now, you're ready to migrate styles, and get your new suite ready to use! 

:

Friday, May 08, 2015

A Post for KETIV - Walking Through History at the Planes of Fame Airshow.


For those of you who know me, even if it's only via the Internet, it's no secret that I like vintage aircraft.  I find the stories about them fascinating, and the people who designed, built, flew,and maintained them fascinating too.

The Grumman F7F Tigercat in front.  Two Vought Corsairs in the background.

Last week, my bosses at KETIV Technologies asked me to write a blog post on the Planes of Fame airshow, and I found myself struggling with quite the case of writer's block.  So much to say, and how to say it.

Fortunately, I was able to put thoughts to virtual paper, and come up with something, and now it's been shared to the KETIV website.

So rather than repost it here, go ahead and follow the link to the KETIV blog here.

I hope you enjoy the article, and here's a couple of bonus pictures for passing through my blog on the way there! :) 

A Douglass C-47.  A loyal, dependable, workhorse of an airplane.

A Lockheed P-38 Lightning, of World War 2 fame, taxiing between two
North American P-51 Mustangs after a flight.

Later on, a F-22 Raptor flew.  State of the art today, here it is taxiing back
between the same two Mustangs.


Wednesday, May 06, 2015

Springtime Changes! Upgrading to Autodesk Vault 2016

It's time to start my springtime upgrade to my Autodesk 2016 based products.  And I've decided to share my upgrade process again.  I hope that this helps you along your way as you consider your own upgrades.

I'm running Autodesk Factory Design Suite 2015, with Autodesk Vault Professional 2016.

Because of that configuration, I'm going to start with upgrading my server to Vault Professional 2016.

Why?  Vault Professional 2016 can run my 2015 and 2014 based products. So my new Vault server can support my 2014 and 2015 base products.  So if I can't upgrade Factory Design Suite right away, I can still access my Vault files.

You might think the next step is to click on that pretty, shiny, setup.exe file, but I would suggest considering a few things first.
  • Check the server's system requirements.  Do you need up upgrade SQL?  Is there enough hard drive space?  Is the server's hostname "Wheezy", because that's an accurate description of it's current condition? 
  • Do you have your Vault backed up?  And just because it was running fine the last time you checked, before going to the company Christmas party doesn't mean it still is.  Check again! 
  • Consider running a test upgrade off line, if you have the capabilty.  And just because you've got a new server you've named NCC-1701 (you clever geek, you!), you might give Wheezy one last shot at glory before consigning to the Great Beyond.  Use it to test your migration off line! 
  • Finally, if you have any network licensed products, like Vault Professional, for example, get those licenses ahead of time!  You're going to need them! 
I know preparation steps aren't fun, and they seem like a lot of extra work.  I rarely see a Vault migration go wrong, but the Titanic was making great time when it hit the iceberg.  You never want to be remembered as "the CAD manager who shut down engineering".

So now, the preparation steps are done. The backups are checked, verified.  Finally, it's time to run that backup.  

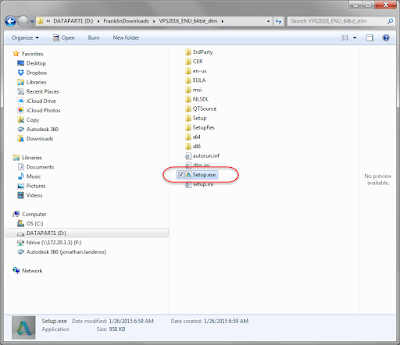
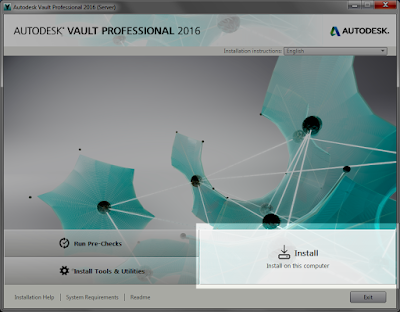
Now, click on the Setup.exe file that you've been getting excited about. 

Launching the Setup.exe

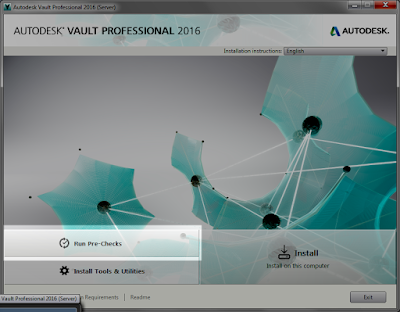
Once the setup initializes, run the precheck.  This is going to identify if there are any issues that need to be resolved before proceeding.

If you're used to 2015, the precheck has it's own button now

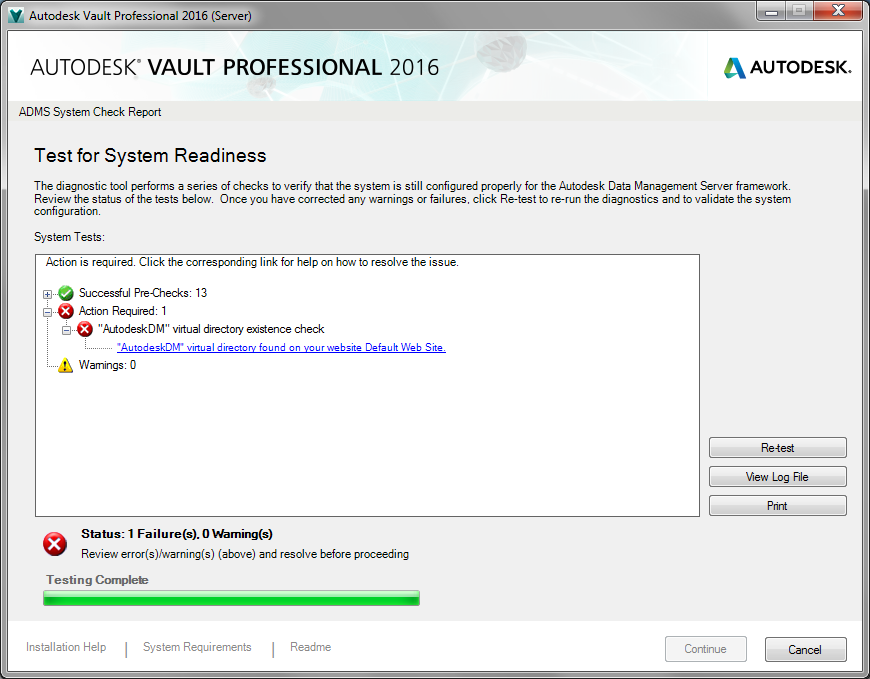
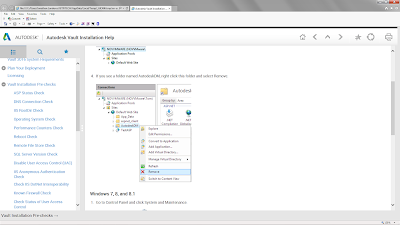
In my case, I did have an AutodeskDM directory already existing.  But if you get any error, click on the link.

Looks like we have a little fixing to do!
A list of possible solutions will appear.  I was able to resolve my issue by following the instructions listed.

Deleting the AutodeskDM directory per  the solution fixed my issue.

Run the precheck again to make sure that all issues are resolved.  Once the precheck is clean, click Install.

Now, we install! 

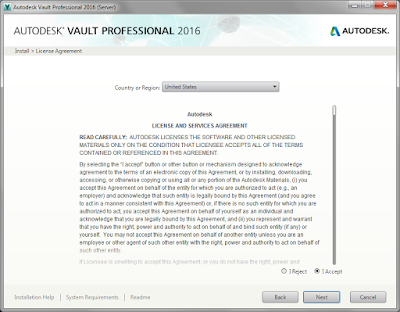
Next up is the End User License Agreement, or EULA.  Accept it and move on.  That's pretty much all there is here! 

Read this carefully (I know you do!), accept and continue!

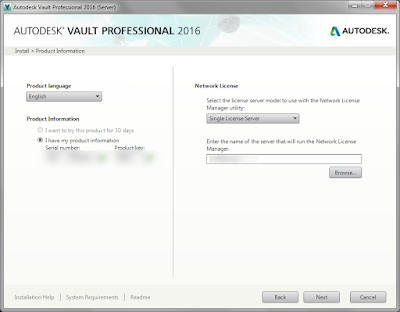
After accepting the EULA, it's time to enter your serial number, product key, and if you're using  Vault Workgroup, or Vault Professional, your license server. 

Entering the information you need,. 

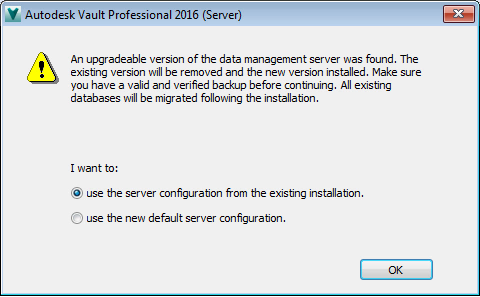
Clicking the next button will now ask you if you want to install with a new configuration, or with the previous configuration from your existing Vault. 

In my case, I'm using my previous configuration, so I choose that. 

Do you want to use the new configuration or default? 

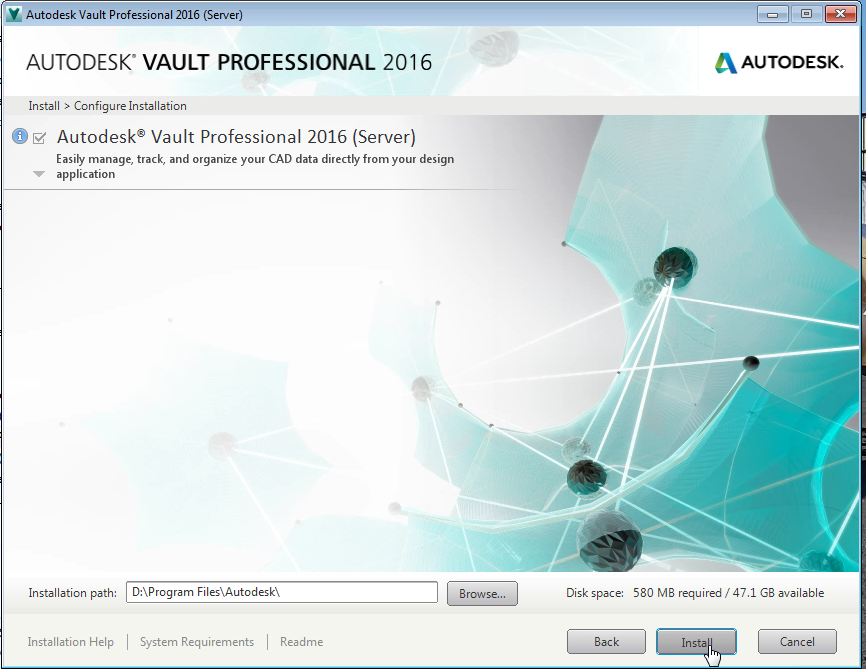
Now, Vault will ask you which components to install, as well as what location your going to install to.  In my case, I'm using my D drive, so I change the install location. 

Now we get to hit the button we've been waiting for, Install.  (Cue music to 2001)

All I need to do is change my location here.
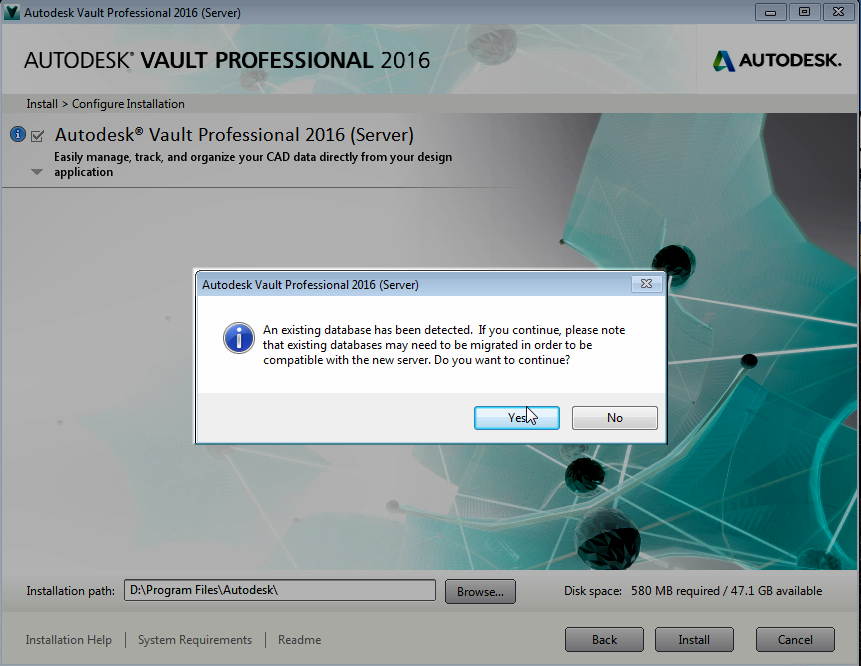
There's one more advisory that appears.  Vault tells us that it's detected an existing database, and in order to be useable, we're going to have to migrate it. 

This is just advising you that you'll need to\
igrate your existing database to make it useable. 
In this case, the point is to migrate it, so we'll say yes.

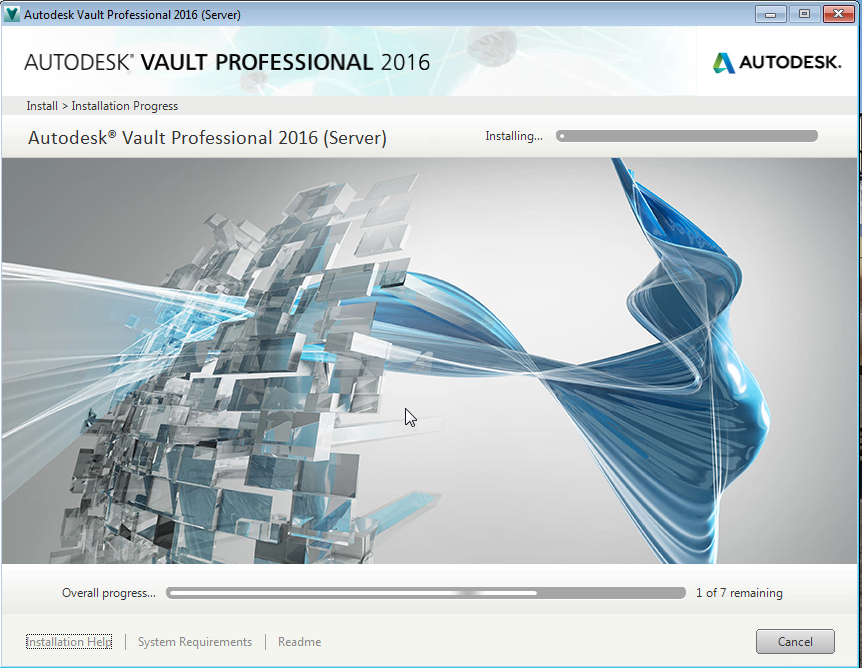
The install goes for a few minutes, depending on your machine.  The installer will run prechecks again, removed the old Autodesk Data Management Console, and install the 2016 version. 

Now we wait for the install.

Once the installer completes, you'll see your "Success" screen.  Take a second and pat yourself on the back!

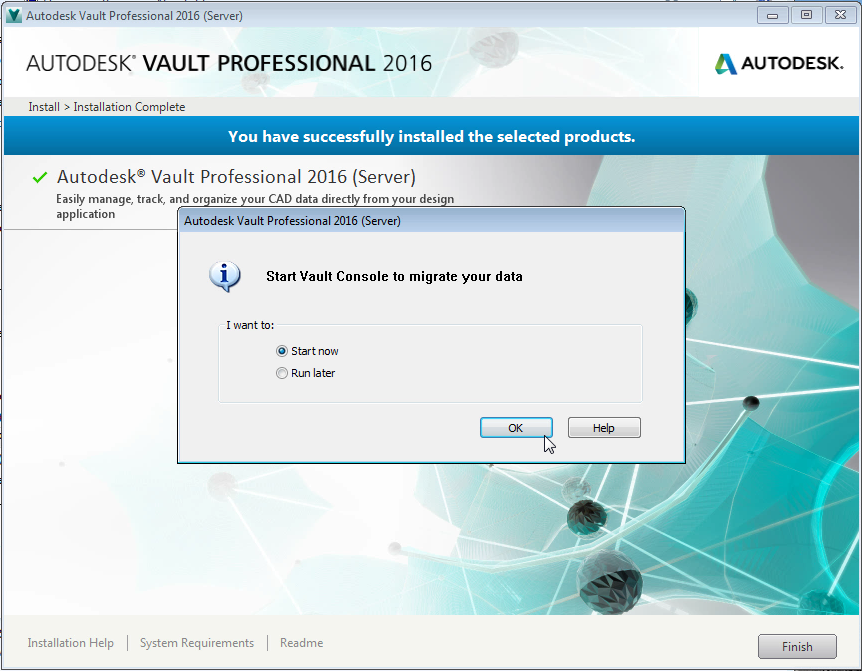
If you're migrating an existing Vault, as I am here, You'll see another message to open your ADMS Console to migrate your databases.  It's a good idea to do that now. 

Starting the console to star the database migration.

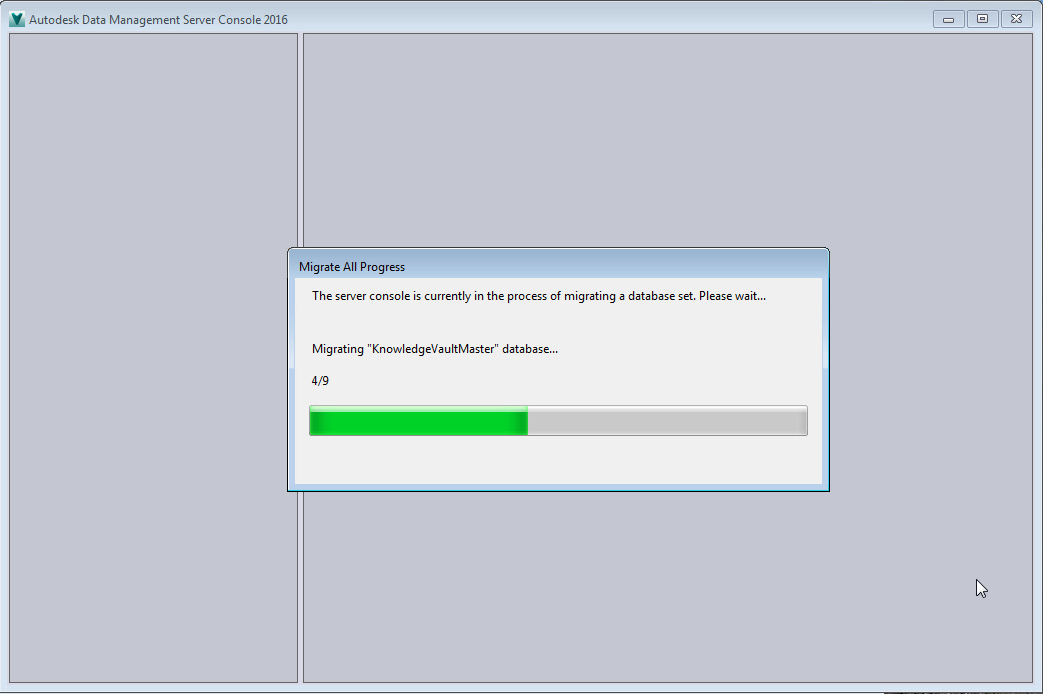
The Autodesk Data Management Console will open and ask you to log in, and begin migrating the necessary databases. 

This is the process of migrating.  This can sometimes take a while for
large datasets.

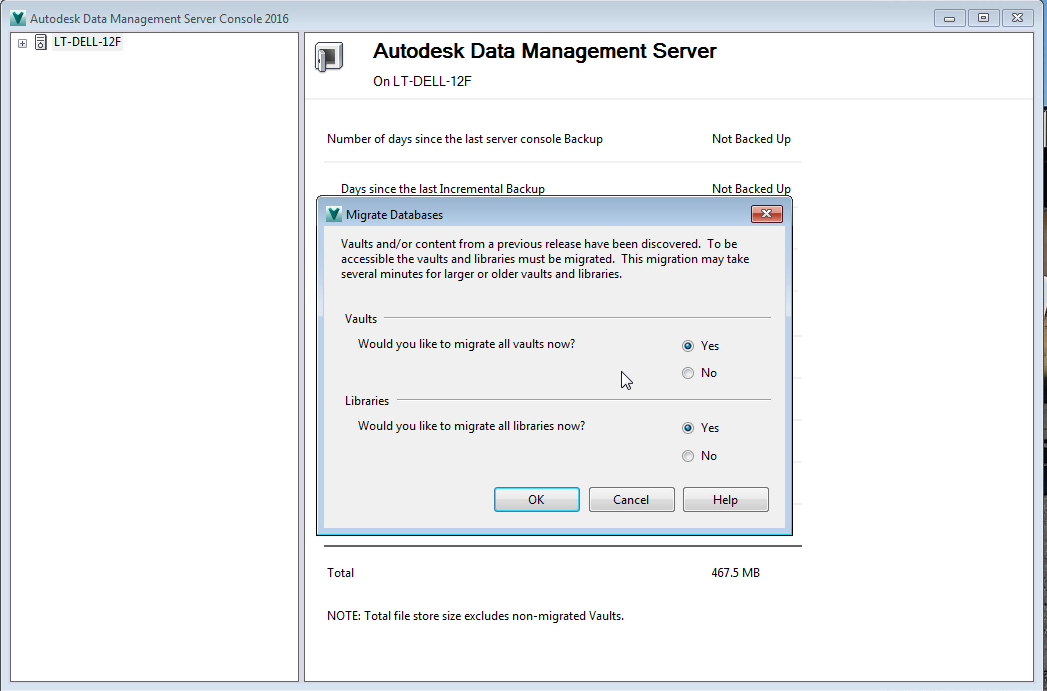
 One more message is going to come through.  Vault is going to ask if I want to migrate my Vaults and custom libraries.  Which in this example, is what I want do to, so I'll answer yes. 

Choosing which databases to migrate.

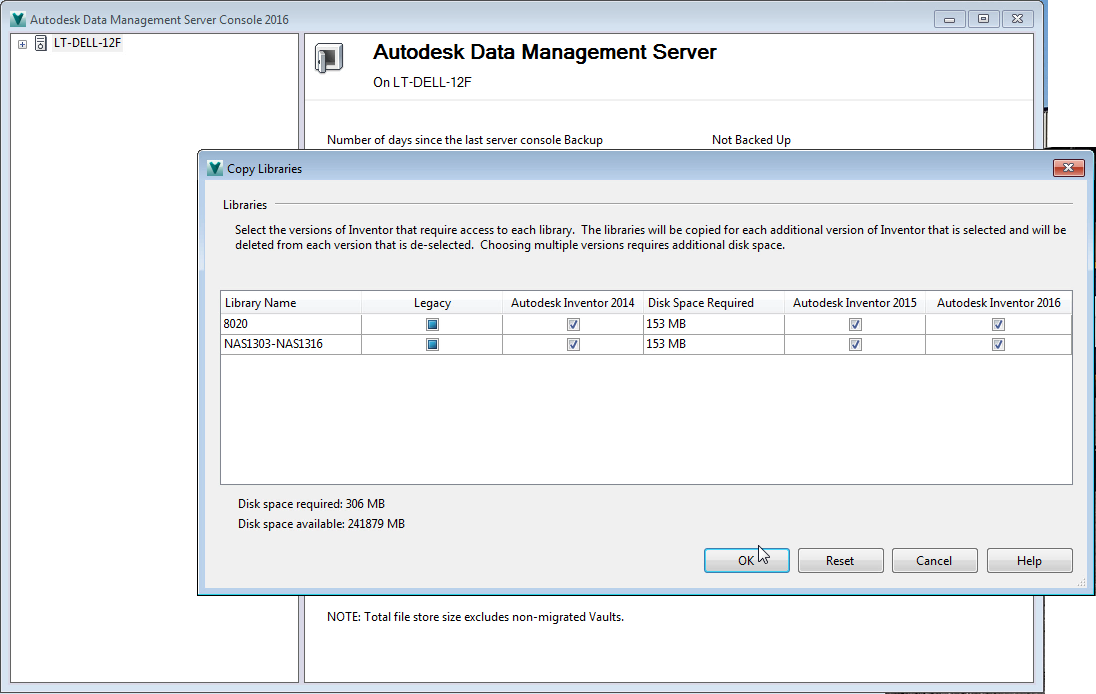
One more question comes up, and it's one worth noting. Vault is going to ask which versions of Inventor you want to have your custom Content Center  Libraries available for.  In my case, I work with Inventor 2014, 2015, and 2016, so I'll  keep all three.

This is a good time to get rid of any unused libraries, it will make backups run a little quicker, and will save a little hard drive space.

Which versions of Inventor do you want your custom libraries available for? 

Once this is accepted, the final migrations are complete, and everything is done.

Now, just reconfigure, and validate your backups, and you're ready to go on to the next step!

In my case, installing my 2016 based client software!

Stay tuned!

P.S. I'm hoping to build a video for this as well, but videos take a while to create, particularly this one!

Look for it to be added in a future date! 

Monday, April 27, 2015

A Little Side Project Now Shared on GrabCAD - The NutPlate iPart

Every so often I like to create content just for the fun of creating it.

It does keep me practicing my Inventor skills, and sometimes, I just enjoy doing it.

One thing I've been doing over the course of the last few months has been creating some standard aviation style hardware.  I've created them as iParts, similar to I have in similar posts.

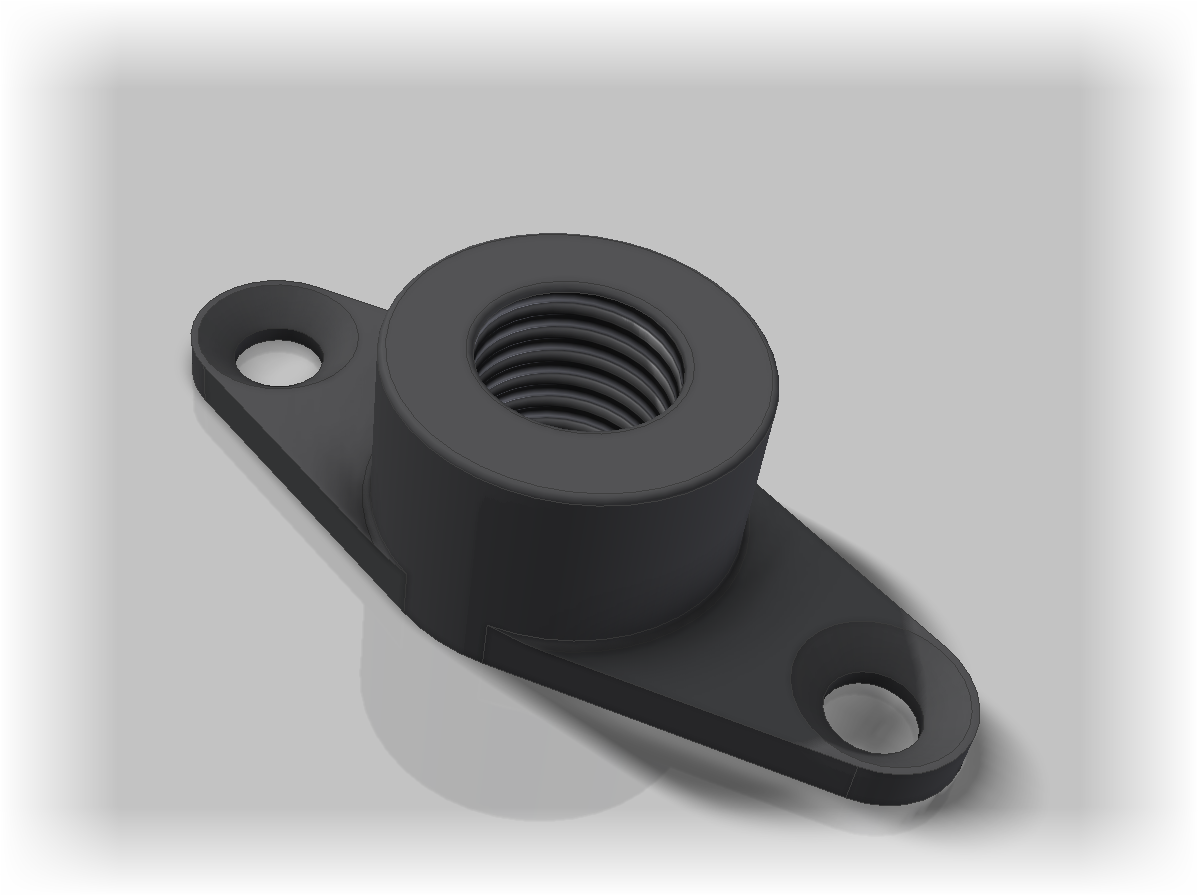
In this case, I've created a nut plate based on the part number NASM21047.  I found this data on the Coast Fabrication website, which I've found to be a great resource for these types of components

A sample of the nutplate iPart. 


I've created the parts using the same methods as in my post from a few months ago.  The steps are largely the same, so I won't recreate those steps here.  They're already in that post.

However, there are a couple of differences that are worth pointing out in this new version.

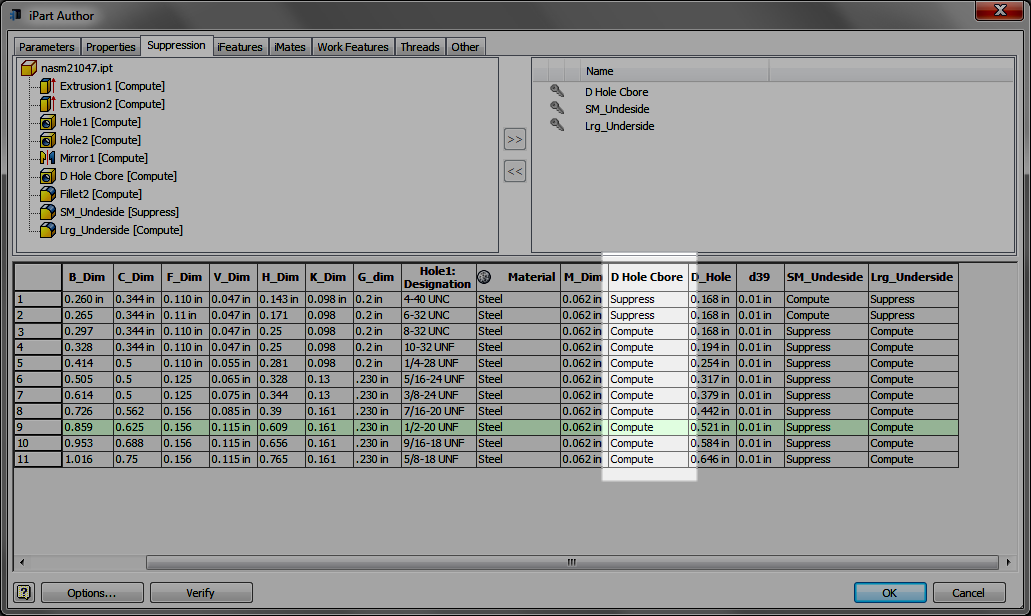
In this model, I've suppressed features in some of my iPart members.  This is because some of variations have a counterbore in the bottom, and others don't.  As a result, you'll see lines where the counterbore features, and the feature attached to them, are suppressed.

Features that need to be Suppressed for some family members can be added on the Suppression tab.

A Suppression Column.  I like to type out the words myself.

Suppression and compression of a feature by typing one of several values in the field.

Suppress a feature by entering one of the following:

  • Suppress
  • suppress
  • S
  • s
  • 0
Compute (turn on) a feature with one of the following.
  • Compute
  • compute
  • C
  • c
  • 1

I've also added a material column this time around, this makes sure the mass is accurate for each variation as well.

You can tell a column to be a Material column by right clicking on the header, and selecting the Material Column option.  Then type in the material you want in the field.

Notice the Material Column

Mostly, I just want to create a sample that you can use to get ideas how to create an iPart, or use this as inspiration to build your own iPart!

After all, why do the work if it's not going to be shared.  The iPart was built in Inventor 2015.

Take a look at the GrabCAD link here!  A login is required, but it's free! Download and enjoy!

Alternately, here's an another link to the iPart that doesn't require a login!

On one last note, I've done my best to make sure the dimensions are accurate, but there's always the chance I missed something.  It never hurts to check.

And if I missed something, let me know!  I'll do my best to correct it!

Tuesday, April 21, 2015

Automatic Material Thickness Detection in Sheet Metal - New in Autodesk Inventor 2016

Having returned from a trip to Arizona, I felt it was time to walk a bit more deeply into one of Inventor 2016's new features.

And I'm going to choose the automatic thickness detection in sheet metal.

In short, when converting a model to sheet metal, Inventor 2016 automatically detects the material thickness, versus the "measure and copy" method of previous Inventor versions.

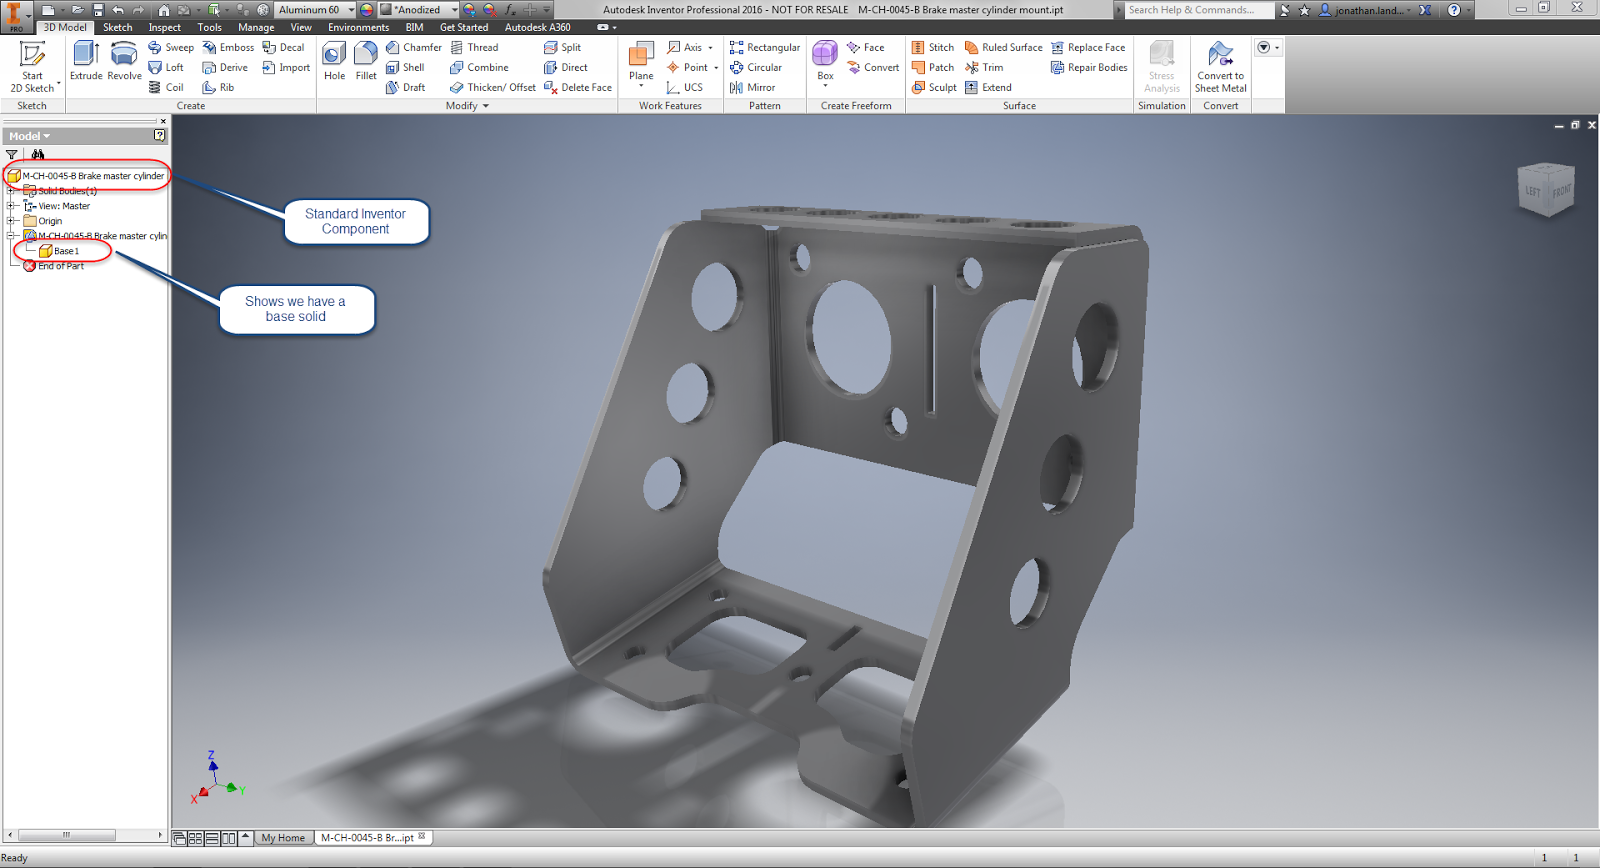
The process starts out with a part in the Inventor part modeling environment.  In my test, I used a base solid, as you might see in an imported file.  It's currently a "standard" Inventor part, and hasn't been turned into a sheet metal component.

Starting with a model that needs to be converted to sheet metal
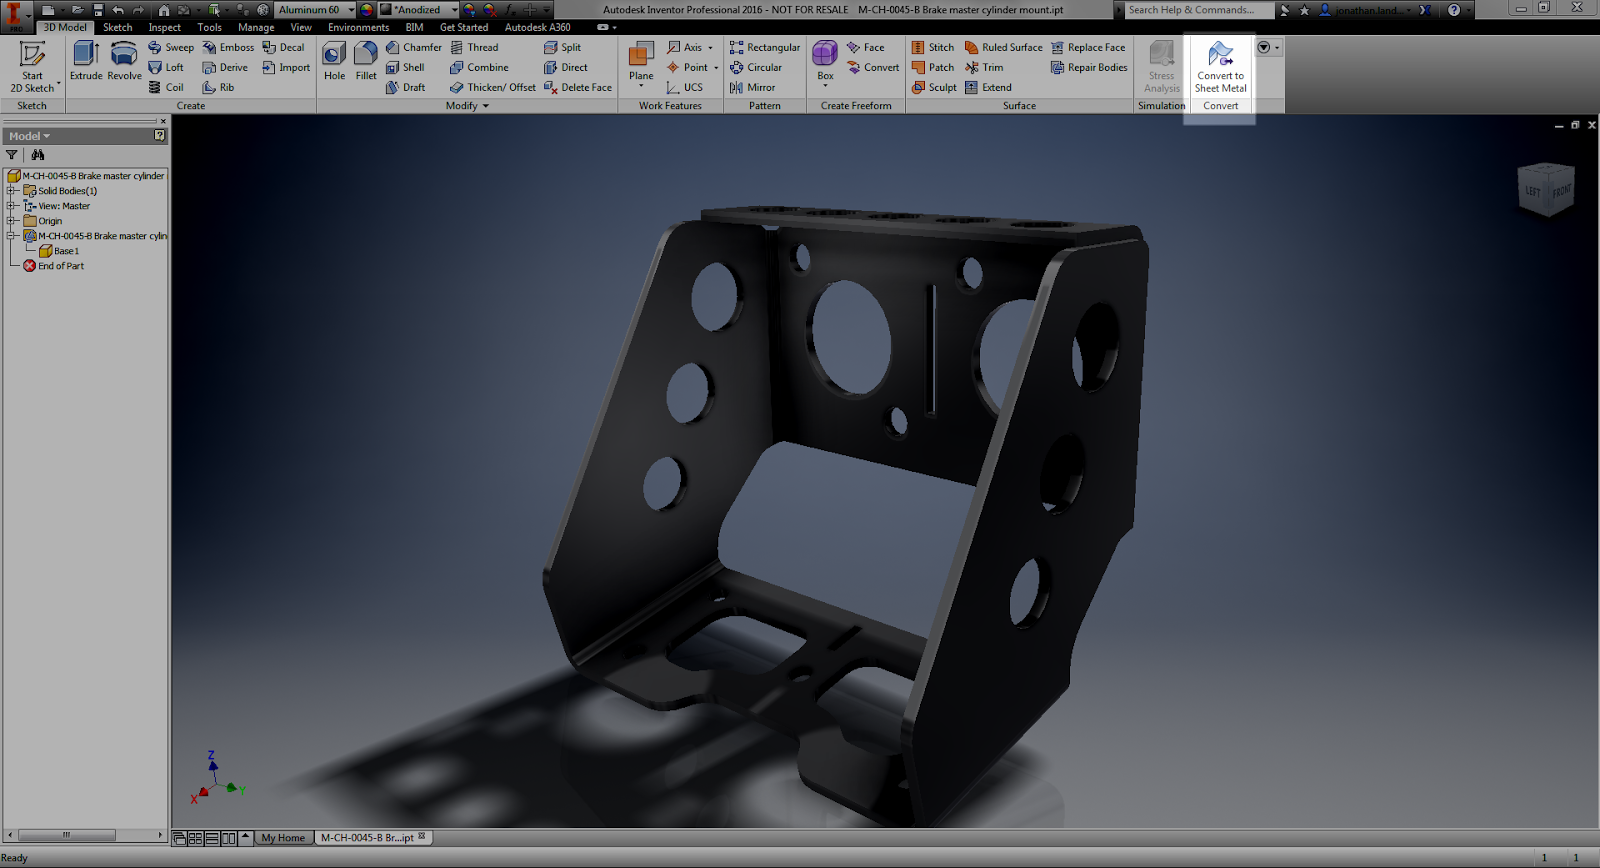
First, it's converted to sheet metal with the Convert to Sheet Metal icon.

Now, convert to sheet metal.
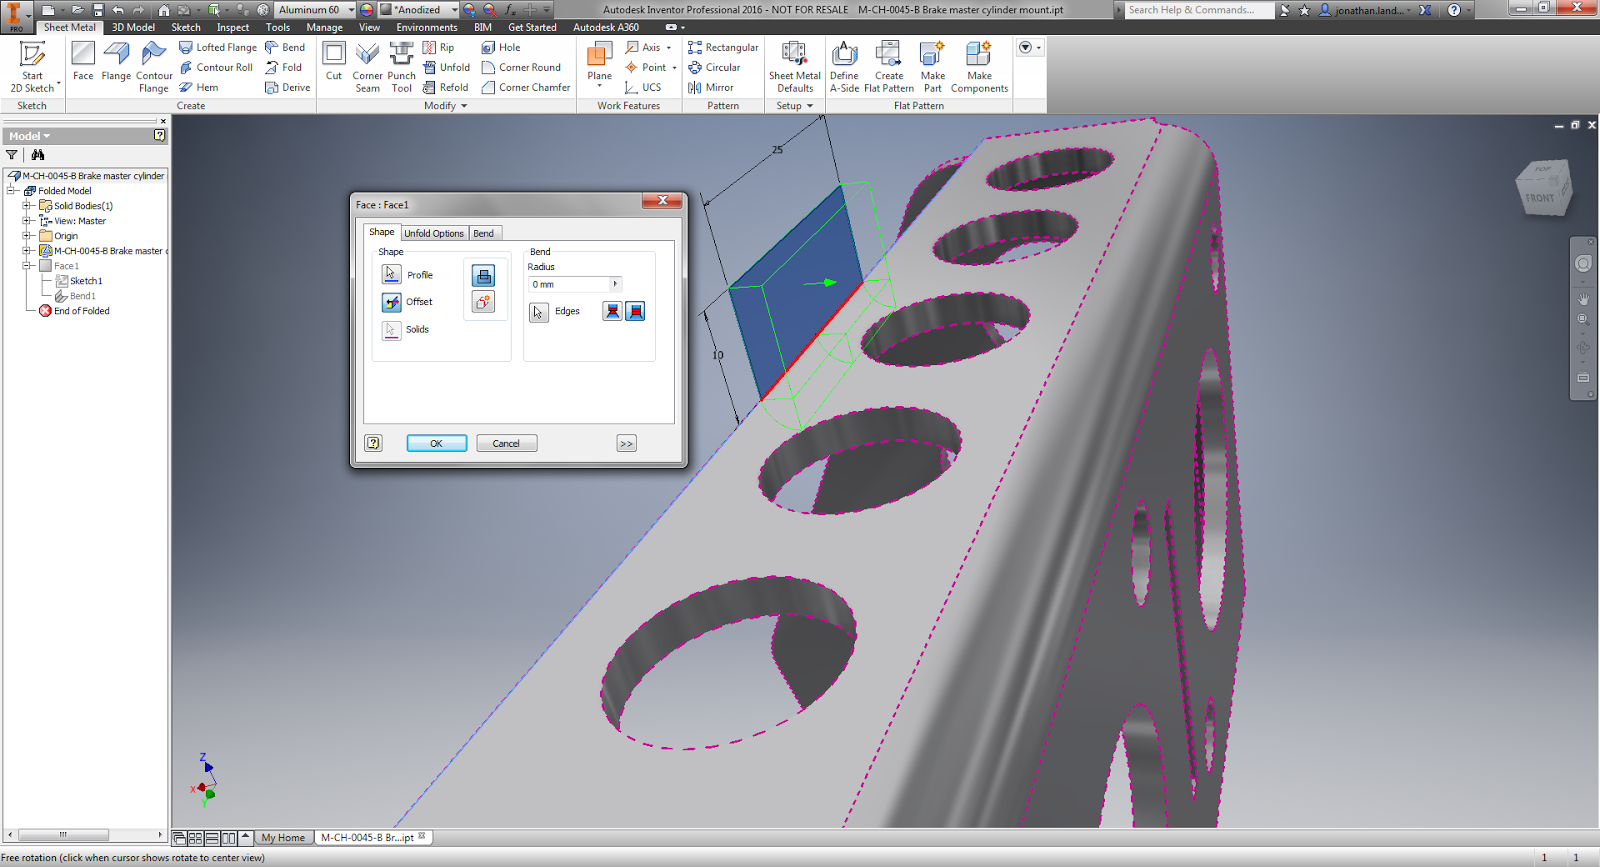
After selecting this icon, Inventor is going to ask you to select a base face. This face represents the face that Inventor is going to unfold around.   This is what will help Inventor find the sheet metal thickness for you.

Select the base face for unfolding


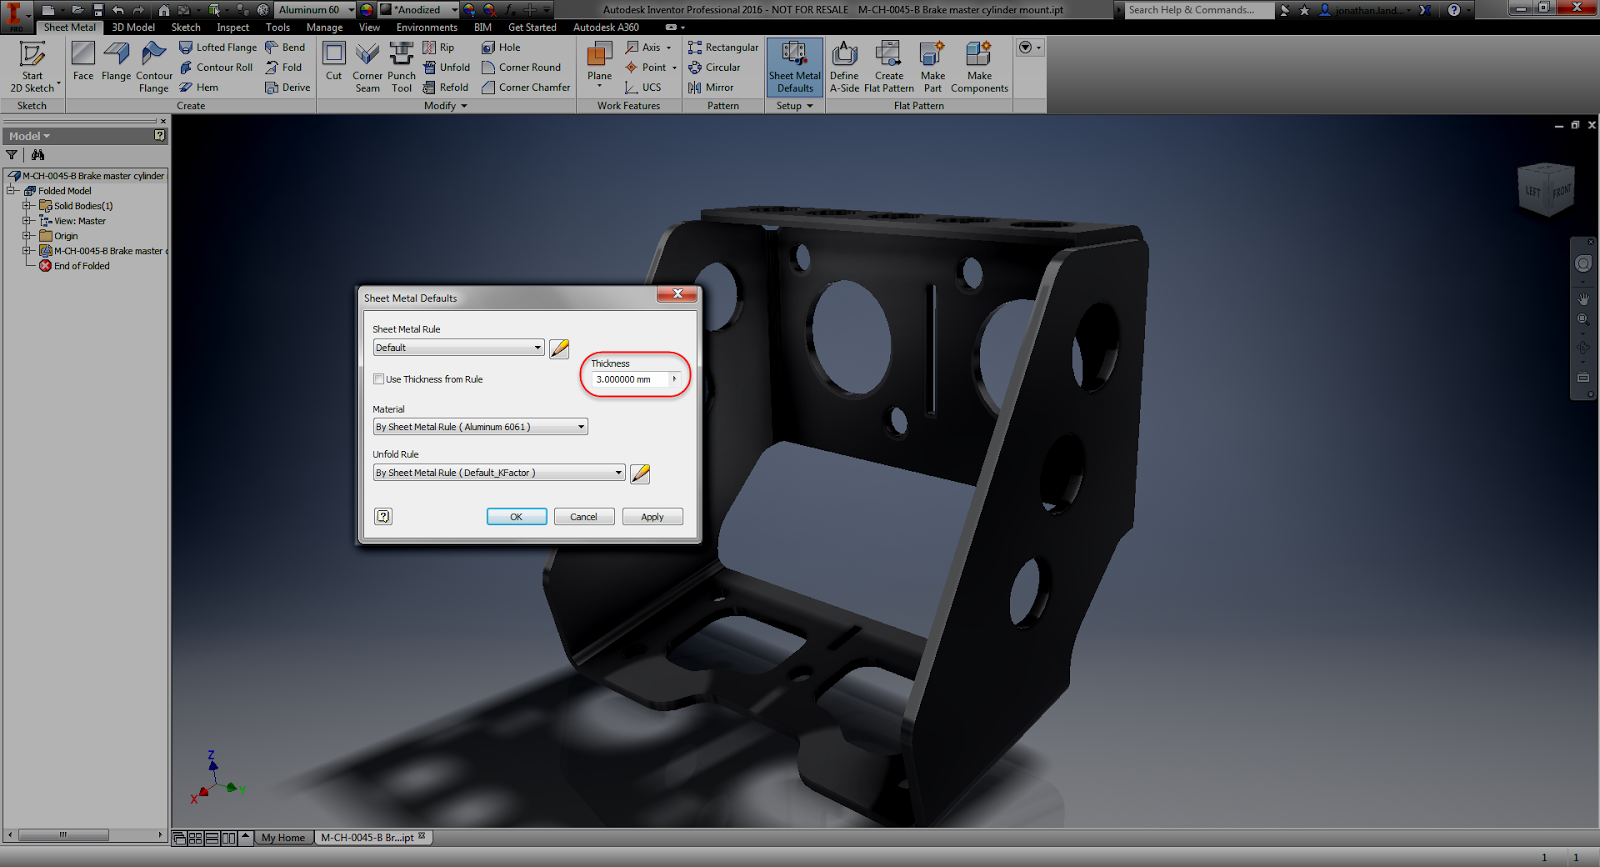
Once you select the base face, Inventor will open the Sheet Metal Defaults dialog box, and display the thickness as measured in the Thickness field.

The Sheet Metal Defaults screen confirming the sheet metal thickness
Beyond that, there's not much left to do but carry on!  The sheet metal thickness is measured, and now you can begin using your sheet metal tools!

Time to start modeling! 

Give it a try!  It's worked pretty well for me so far.  I've downloaded two models from GrabCAD, and both worked just fine!

And if you see this post in video form, here it is below!


Friday, April 17, 2015

What's New in Inventor 2016 - Sheet Metal

Sheet metal has had some nice improvements in Inventor.  Speaking for myself, I think there are some pretty exciting features.

So what are some of these new features?

1) Multi-body is now supported in sheet metal.  Now you can create multiple sheet metal bodies in a single part file.  This gives an opportunity for whole new ways of laying out components in Inventor!  Create geometry in both solids, then create separate components from the solids!

Notice the two bodies in the browser

2) Zero bend radius.  I've heard this one requested from time to time, and when I say "time to time", I mean "all the time". Quite simply, it's the ability to create a bend with zero radius.  No more red in the bend radius field when you want to make that sharp corner!

No red text in the Bend Radius field


3) Auto detect material thickness.  When using imported components into the sheet metal environment, Inventor now has the ability to detect the material thickness.  One manual step saved!

Thickness is automatically detected on import


4) Punch tool shows number of instances. The punch tool will show the number of instances in the dialog box when placing them.  It's a simple thing, but a nice thing to know before you commit the command.


So there are four quick bullet points on what's new in Autodesk Inventor 2016 sheet metal.  I'm planning on creating some more posts that will go into a little more detail on how to use these tools, and I'm hoping to do that soon.

Stay tuned!

Wednesday, April 08, 2015

What's new in Autodesk Inventor 2016 - Text in Drawings

In this post, I decided to continue with my discussion on what's new in Autodesk Inventor drawings.

This time, I thought I'd share some of the text improvements that have come a long inside of Inventor.  


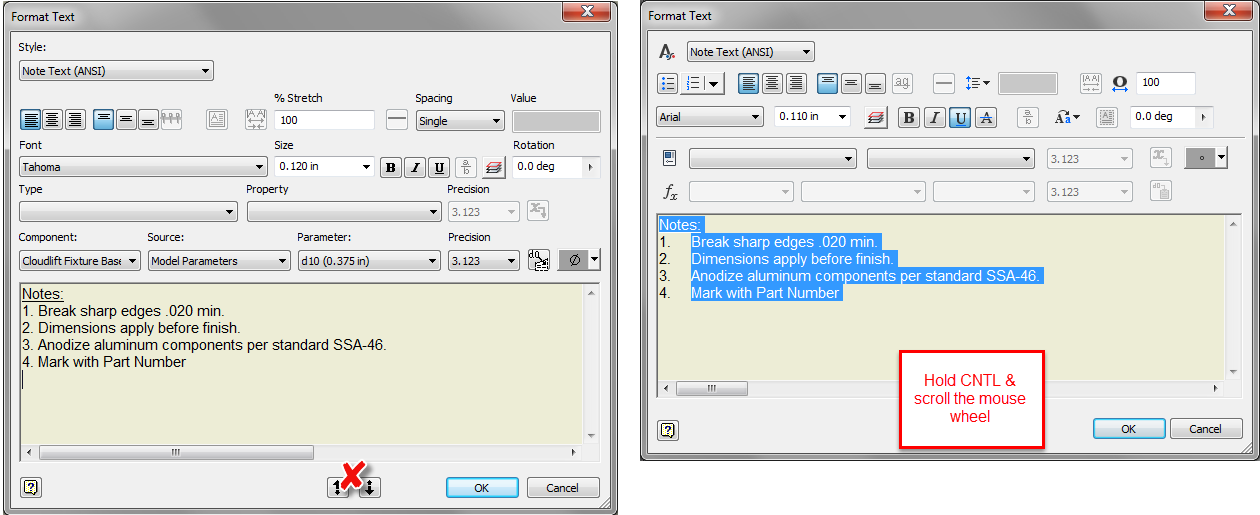
First, the dialog box has been changed slightly.  Primarily the layout has been changed, mostly to help organize and streamline things a bit.  


2015 on the left, 2016 on the right

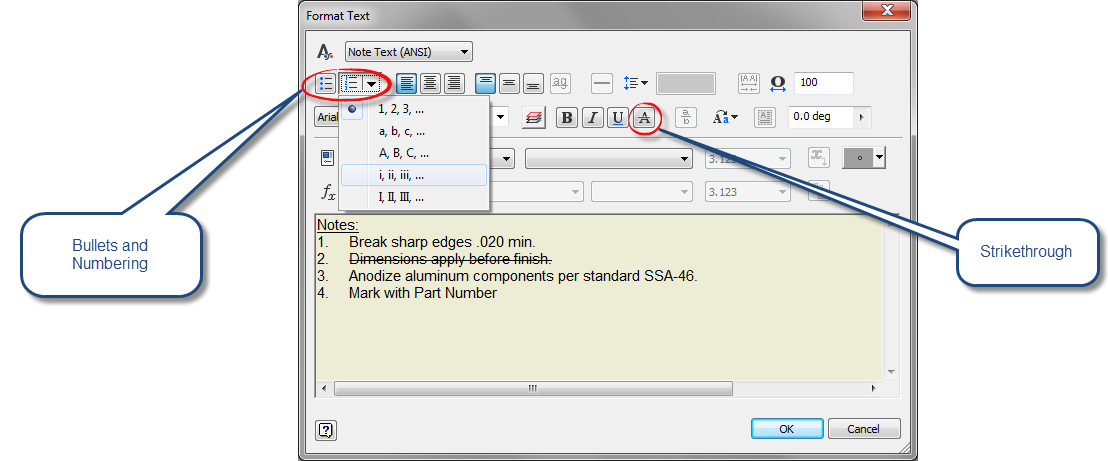
But if you look closer at the screen, you'll also see a few new buttons.  Notice that there's now buttons for bullets and numbering, as well as a button for strike-through.  Now you can create this formatting right in the text box.

The location of the new Bullet, Numbering, & Strikethrough icons.


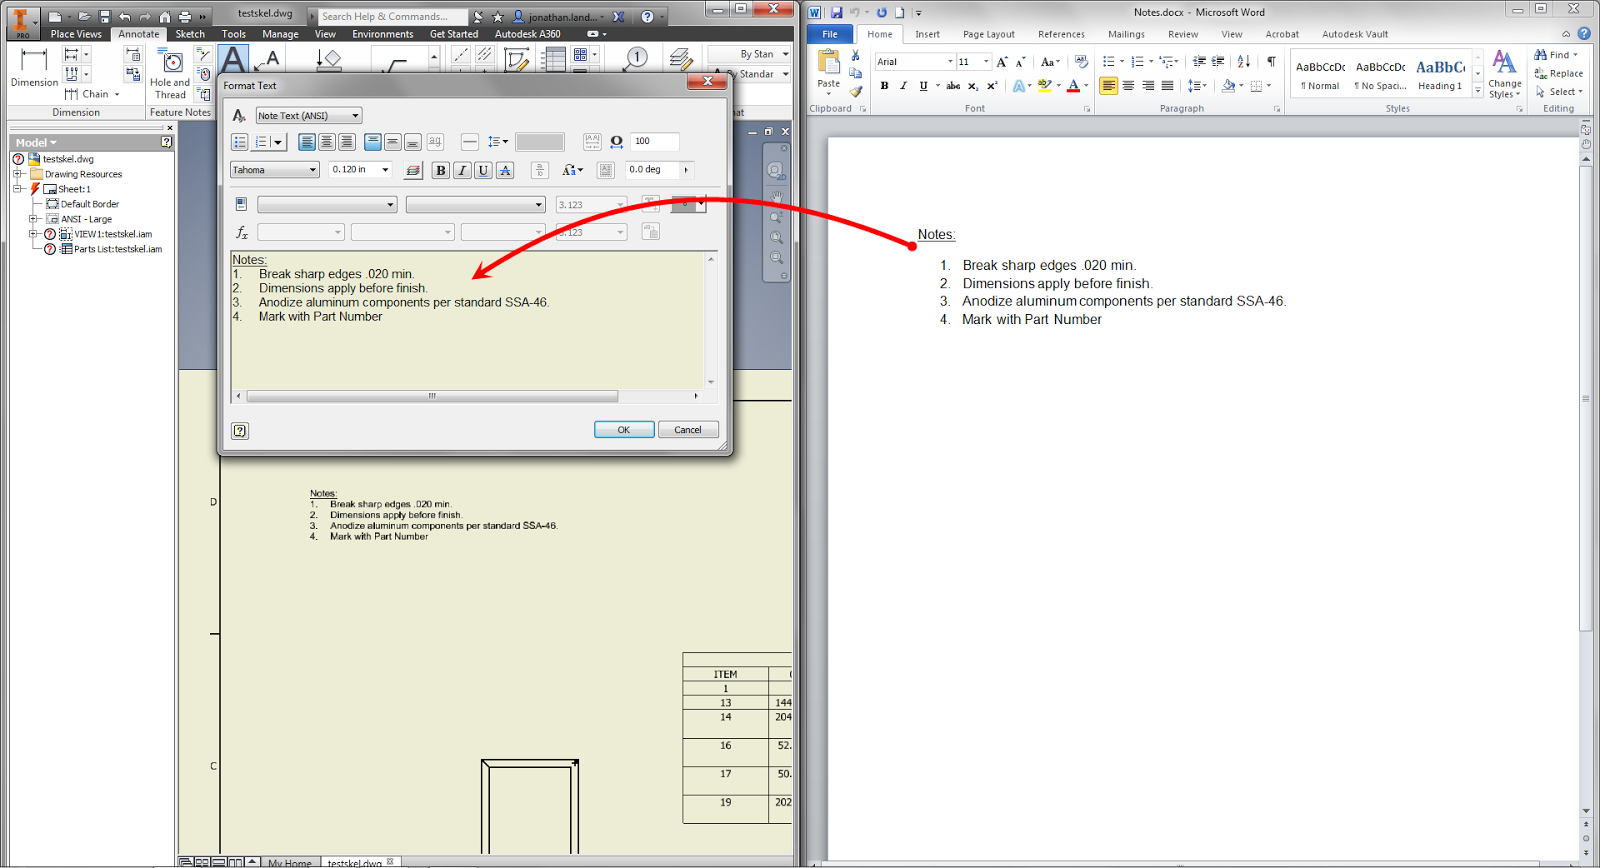
Also, if you copy from Microsoft Word into Inventor's text box, any bullets and numbering used is kept, so you can change it after it's been placed. 


Just copy and paste and the formatting is preserved.
You might also notice that the Zoom in and out arrows are gone.  But the functionality remains!  Now hold down the CNTL key and scroll the mouse wheel to zoom text in and out.

Once again we have 2015 on the right and 2016 on the left. 

Another nice little add is the ability to change case.  Do you want to force text to have ALL CAPS, all lower case, or Set To Title Case?  That's been added now too!

An example using the ALL CAPS setting


The symbol list has been changed too this should make it easier to locate the symbol you want. 

The reorganized symbol library

And did you notice something in the above screenshots?  There's a preview on the drawing sheet as you type the text.  That's not a trick of screen capture editing, that's the real deal. 

The preview on your drawing, you can see your results as you type!

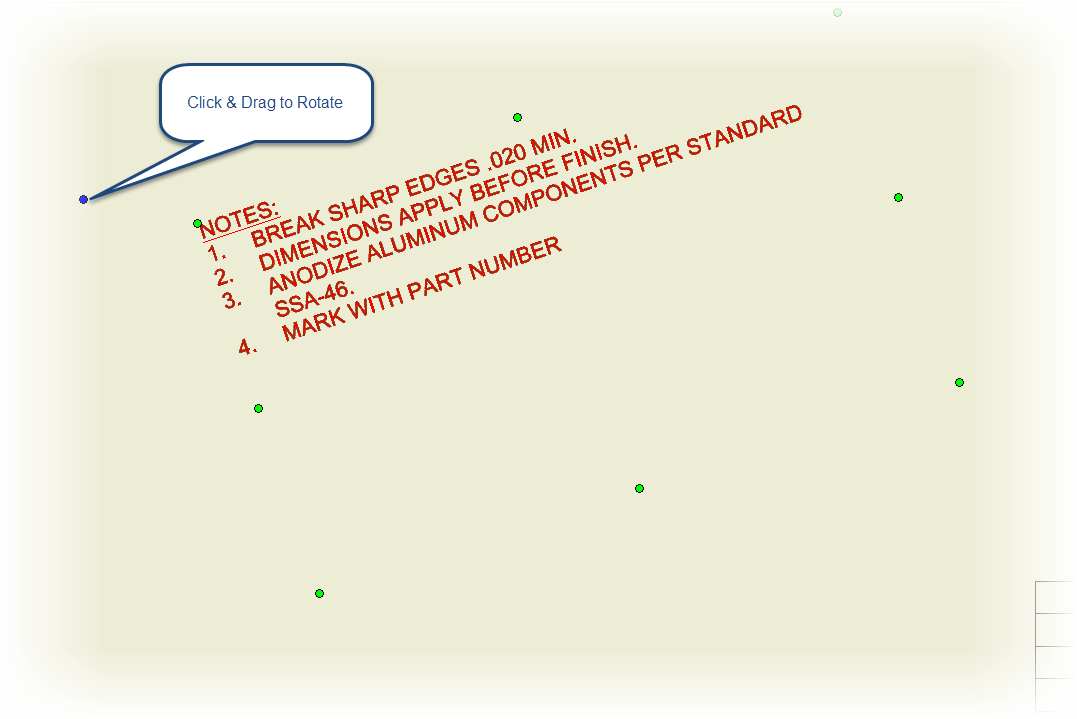
Finally, should you need to rotate your text, you have the option to do so on screen.  Just grab the blue grip with your mouse, and rotate to the angle you want.

Rotating by dragging on the drawing canvas

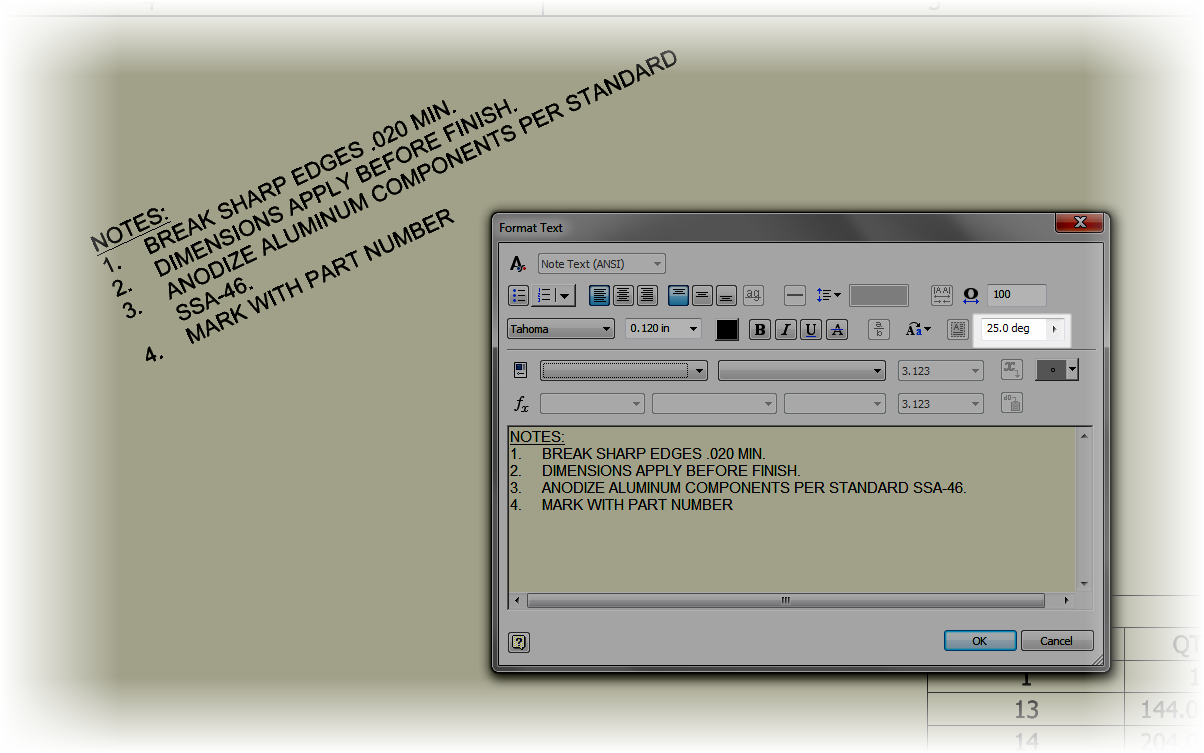
And if you still prefer to rotate precisely, you can still do that in the dialog box. 

Changing the text rotation via the dialog box. 
And that's it for now!  A few of the improvements in text editing in Autodesk Inventor 2016.

I can't create a video for this one I'm afraid.  I'm on the road so I don't have any of my video gear with me!

I hope to add one later!