Find us on Google+ Inventor Tales

Sunday, January 10, 2016

Class Time Again - Materials and Processes. And Lessons for 2016

Here's the first post of 2016, and it's already been a busy year!  

I've started with another class in aircraft maintenance.  This time, materials and processes.  

That means three straight weeks spending evenings learning about aircraft fluid lines, hardware, and heat treating.  

It's a lot of work, but it's also fascinating.  At least for me! 

So my first week there I spent learning about all manner of fluid lines, I learned about semi-flexible lines, flexible lines, as well as the fittings that accompany them.  

The hydraulics in a speed brake in an F-86 Saber
(Taken at Planes of Fame Air Museum)


Just as important, was a lengthy lecture on how to install hoses properly to ensure they're effective and safe use!  

Examples of the right and wrong way to install a hose.
In short, don't twist the hose! (From AC43.13)


Like I said, it's fascinating for me. 

But there are plenty of others out there, who may not give one rip about the differences in flares in an automotive versus an aircraft semi-rigid line.  So what is the broader lesson to consider? 

The tools to design is becoming more pervasive as technology allows design tools to the masses.  Tools like Fusion 360 and Onshape have made 3D CAD available to people who only a few short years ago would have only dreamed of having access to that kind of design capability.

It opens up an entirely new world of potential of how people create things and build. 

But I think that raises a new challenge.  How do we design?  We now have amazing tools for creating and making things.  But that doesn't mean that we have the experience to use them to their full potential.

Those lessons can always be learned, but I don't think they should be learned in a vacuum.  "Someone always knows more than you do."  I'm told.

Mentor's come in many forms.  I encourage you to find yours!
Sure, you can create a 3D model, we can even run an Finite Element Analysis (FEA) simulation and see how the stresses interact on our part. 

But that doesn't help us know how to load a part.  We can't always know that a hose should have 5-8% added to it's length to account for expansion and flex.  Even today, software may not tell us that.  Experience does.

There's no account for experience.  Take this from a guy who has learned volumes from mechanics who have been doing their job for longer than I've been walking this planet.

You just can't beat that real world experience in my mind!

I can (and have) learned many a lesson from mechanics like the
those repairing this F-86 Saber!
So what do I think the challenge as we take our first steps into 2016?   

The "Internet of Things" rides on the backbone of the 'Information Superhighway".  

We're fortunate enough to not only have the tools to design, but access to volumes of information on how to design.  

Just look at resources like GrabCAD, and EngineersEdge.  There are so many out there!  

So as we begin 2016, let's design!  Find a mentor, find a class.  Let's embrace learning, and embrace our passions, whatever they are!

There is so much we can learn! 

Additional Photo Credits

photo credit: FDR 1978 Graphic Arts Shop Class - Mr Gruber - 04 via photopin (license)

Sunday, December 13, 2015

Text Masking - Making Leaders Disappear Since 2000.

This week's post is short and sweet, due to a little craziness during the week, but I still hope you all find it enjoyable and helpful!

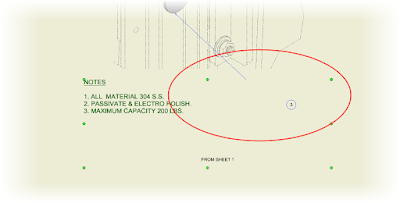
The simplest things can drive you crazy,  One I encountered in Autodesk Inventor was a leader that seemed to randomly disappear.  It would just stop in one place, and start in another.

There seemed to be absolutely no good reason for it.

Why is this leader cut off?
It can be really puzzling.  The first time I encountered it, it completely threw me off.  It took a little bit of clicking and dragging before it finally dawned on me.

If you study the image above, you can actually see it, if you know what to look for.

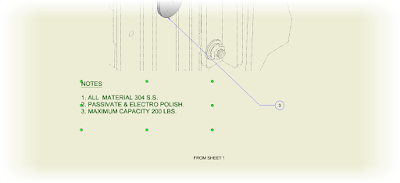
The text box covered up the leader for the balloon.  Because of that, the masking "erases" the leader.  Dragging the leader out of the box, or dragging the box away from the leader, cause the leader to reappear.

And the truth of the fact was I had been a little careless and "whipped" the text box and made it far larger than it needed to be.

Here, I've shrunk the box to give the leader room.

It's so simple, yet at the same time, it can be so frustrating.  But in the end, it's really simple to fix.

So what's my suggestion?

Keep your eyes open, of course!  But also be aware that dragging a huge text box, because "it doesn't make that big a difference" can be asking for trouble.

Why?  It can cause a huge difference!  But just be aware, and know what to look for, and a big frustration can be reduced to just an "oops".

Sunday, December 06, 2015

Why is Inventor Constantly Freezing?!? - Wait, it's not Inventor's Fault!

Earlier, this month, I relived. something many CAD users have experienced.

Frequent freezing and crashing!  The bane of any CAD jockey!

When a CAD system crashes, this is what designing feels like.
Let's paint a picture!

A natural first reaction is to blame the CAD system, then perhaps the hardware.  Next may come the universe and any crimes you may have committed in a past life that have resulted in such Karmic retribution.

But there was one thing that blew everyone of those theories out of the water.  Well, except for the Karmic retribution theory.

Inventor hadn't been having this problems before.  It had been rock solid in the days, even hours.

So I traced back to what I was doing when the freezing and crashing started.  What had I done?

It turned out, I had imported a step file that represented a gearbox. A coworker confirmed that he'd experienced the same thing on his system with that same model.

Smoking gun located!

This was my culprit.  You evil, evil model. 


Confirming the Symptoms

Opening and inspecting the gearbox by itself, There were a few symptoms the model exhibited that indicated it as our sick file.  One of them may not be a problem, but together, things start to click.

1) The size was larger than I expected.  It was about 5MB.
2) The file took forever to perform even simple operations.  Things like placing constraints in an assembly, or creating a sketch in a part took several minutes to calculate.
3) Then aforementioned locking up and crashing.

At this point, I was sure I had found my culprit.

The Solution

I recalled a discussion with a colleague many years ago, I remembered a corrupt step file that had caused crashing in her system.

In that case, there was a weird, intersecting face that crashed the system.  The solution there had been to locate it and cut it away.

I actually tried that, but after about an hour, I hadn't located the problem.  I even tried loading the file into Fusion 360, and still ran into performance issues.

It was time for a different approach, which I should have tried in the first place, in retrospect.

I downloaded a new model!  But instead of a STEP file, I tried an SAT file.

And that worked!  The system was stable again.  It didn't crash again after that.  The file was less than 1.5 MB,

It feels good to be under way again!


The Conclusions

Bad or corrupt neutral files exist.  They're unavoidable.  Like a game of telephone, they can be caused by bad translation, bad imports, or sometimes, just bad luck. I couldn't tell you the cause of this models issue, and ultimately,, my superiors didn't care.

They wanted the project moving, they didn't care about which corner of the model had an issue.

I encourage you to be aware that "bad models exist!"

Some CAD models just fall in with the wrong crowd....


Moreover, when your program of choice begins crashing, remember that crashes aren't always the fault of the program.  Whether your using Inventor, Solidworks, Solidedge, or "My-CAD-Program-is the-best-and-if-you-disagree-your-wrong" CAD (We all know who those guys are!), look at what you did just before the crashing started.

It's always possible that whatever that was, a model, a bad constraint, sketch, whatever, is your "bad seed"

Keep your eyes open!


Photo Credits

photo credit: image29991 via photopin (license)
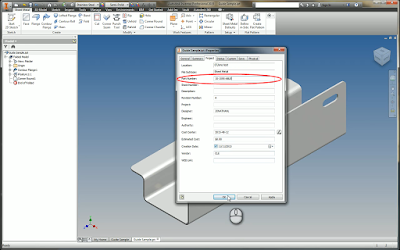
photo credit: L'hydrofoil via photopin (license)

photo credit: 45/52 Cat Burglar via photopin (license)

Sunday, November 29, 2015

Fusion 360 - My Concept Modeler, Test Station, and Presentation Tool

I'm at the end of the four day Thanksgiving Holiday in the United States, but even on vacation I was busy trying new things.

It's what I do...(Shrug)

For a couple of years, now, I've been hearing the benefits of Fusion 360.  It's portable!  It doesn't require a high power workstation!  It's easy to use, and so on.

My old colleague, Jorge Fernandez, even built a 30 minute presentation on the benefits of Fusion 360!


And don't think I'm a detractor!  I see the benefits, I fully acknowledge them.  But what I haven't truly had yet, was an opportunity to realize those benefits for myself.

Our black cat, Scar, however, remains completely unmoved.

Scar the Kitteh is unimpressed by cloud applications like Fusion 360.
However, he does see immediate ROI in a fresh can of wet food.
This weekend, during the long weekend here in the United States, I had my opportunity to realize my benefits on a level that had a more personal impact.

First, a brief  description of my situation.

I was working on a small cover that had to be light enough to be removed, but strong enough to be walked on.  A constant concern was excessive "oil canning" of the material, where it would "pop" in and out like an old oil can.

If your old enough to remember theses, you know the "Oil Can Effect".


But time at work is precious.  Development time, like anywhere must be kept to a minimum. And while there is value in development, there isn't always the time for development.

Many of us have encountered that before.

I don't mind playing with an idea at home.  I do some of my best thinking at home, in solitude, with a cup of coffee in my hand.

My challenge is, I don't have Inventor at home.  My installation is on a desktop machine, and I don't have a laptop husky enough to run the software currently.

But what I do have, is Fusion 360.

So over the course of my weekend, I built up a quick concept model,and ran a quick FEA to see what the design would do.

The floor model.  There's even a grate texture to simulate perforated metal


The FEA analysis.  I'm looking to see how much the floor deflects. 


Is it a perfect design, no, it's a concept!

But what Fusion 360 allowed me to do was "strike while the iron was hot" when my ideas and inspiration collided in my brain, instead of when I walked into the office after a long weekend.  Now I also have a more fully realized concept that I can share with colleagues.

When I walk in the office after vacation, I can talk about ideas. with a little more confidence, and with a little more visual aid.

This was my use for Fusion, a 3D notepad, repository for ideas, test station, and presenting tool, all in one.

Does this affect you?  Perhaps, perhaps not.  I leave that for you, as an individual to decide.

But do I think it's worth consideration, for my part, I have no doubts.

Oh!  And one last post script.  Here's the file I created, embedded from A360.  I know the design isn't perfect, there's more tweaks I can make.  But remember, it's a concept!


Additional Photo Credits:

photo credit: Oil be darned! via photopin (license)

Sunday, November 22, 2015

An iProperty in Time - Linking Autodesk Inventor Properties to Your Drawing

Creating and modifying prints often comes down to details.

Many errors I've seen (cough, made myself), are smaller, easier to miss details.  One example, is forgetting to update a text field.

This is not the print you want to miss a detail on.
Just ask this engineer.  He's got a tough boss!


These are often notes that are hiding in a corner in the drawing.  A part number in a note is a prime example. 

But what if I told you there was a way to set up your template with a field that automatically read in the part number?  So that every time you placed a part in the drawing, the drawing automatically read in that part number. 

There is, and this is how. 

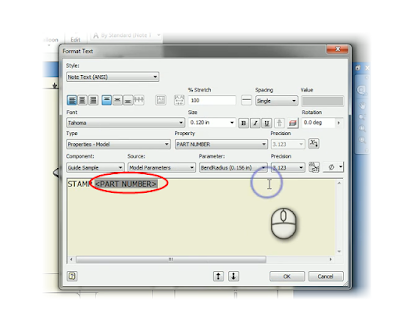
Start out by typing text, just like you have countless times in an Inventor drawing.  But choose the settings indicated in the image below: 


Here are the steps the image describes.

1) Start the text tool.  You won't get far without this step.

2) Start typing! You'll need to get to the point where you're ready to insert the text.  

3) Set the Type to Properties - Model.  This makes sure that your reading the property from the model placed on the drawing. 

4) Property - This is the property being placed in the text field.  In my case, I'm using part number, but there plenty of others to choose from.

5) Insert - This is "pulling the trigger".  This places the text in to the text field. 

Next, you'll see carets with the property insert into your text editor.  Part number appears in my case. 
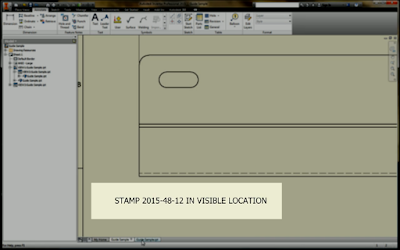
After this is done, complete typing the note you need.  Once you hit OK.  The text will appear on the drawing and the property's value will be read in. In my case, it's the part number 2015-48-12.


Should the property change, the field will update, wherever it's called out on the drawing, including multiple locations, if you have them. 

In my example, I'll change the part number from 2015-48-12 to 15-1595-ABLE.   Which, let's face it, part numbers, among other fields, can change.


Once the field is updated, the drawing will read that property from the model and automatically update. 


There are the steps to get a property linked into a text field.  To get real bang for your buck, add required fields to your template, and get rid of some of those repetitive, and easy to forget tasks!

And look at what other fields you can add.  There are plenty to choose from!

I did create a video for this one using Autodesk Screencast.  No sound, I'm afraid.  But life has been keeping me *just* busy enough to keep me out of my little editing room!


Tuesday, November 17, 2015

A Mid-Week PSA - A Wealth of Information from the Stainless Steel Information Center!

In my post earlier this week, I blogged about learning how the orientation of the sheet metal flat pattern in Autodesk Inventor can affect the finish of the part that comes out of a machine, and how to flip the base face to make sure that the desired side was unblemished by the laser mill bed.

In my case, the finish being applied was a #4 finish to a stainless steel sheet.  That was the nice finish that had to be protected.

Another view of a laser mill, and that finish destroying bed.
Now, this is the point where I confess something to all of you out there.

When I first heard #4 finish used in conversation, I was the guy nodding my head as if I knew of the #4 finish they spoke.

In reality, I had no idea what a #4 finish was, aside that it was special.  While I was nodding knowingly, I was tilting my head like a curious dog on the inside. I endeavored to make a few Google searches when I got back to my desk.

Admit it! We've all looked like this at one point or another! 

And Google paid off in spades.  I found the website for the Stainless Steel Information Center.

Not only did I find exactly what I needed to know about #4 finish, I found a wealth of information on stainless steel, I found definitions, information on composition, applications, corrosion properties. The list goes on and on.

I haven't even gone through the entire site yet!  But I know that I will eventually.  I'll refer to this site often!

I've already started downloading some of the handbooks for myself.

But if you're using stainless steel, thinking about using stainless steel, or you're a student wanting to learn about stainless steel, then this is a resource well worth considering.

And if you know any other great engineering materials, or anything at all, feel free to share with a comment!

And by the way!  A #4 stainless finish is what you'd find on appliances, architectural wall panels, and tank trailers, among other things.

But now you have the resources to read that yourself!

Photo Credits

Laser Mill by: By Metaveld BV [CC BY-SA 3.0 or GFDL], via Wikimedia Commons

photo credit: DSC08200.jpg via photopin (license)

Sunday, November 15, 2015

For a Good Finish - Flipping a Flat Pattern Base Face in Inventor

Laser mills can be fascinating machines to watch.  Even thought they've been around for years, watching them still feels like a little bit of science fiction.

Just watch this video from Wikipedia and try not to imagine something sci fi!


But no matter how sophisticated the tool, there are always "tricks of the trade" to get a little more out of the tool. 

One thing I've learned is the care of keeping the "good side up".  

The material in a laser mill rests on a grid of pointed steel plates I've taken to calling the "bed of nails".  

Looking at the image below, you an see pretty easily how that could mark up a surface you'd be hoping to keep free from marks.  

The laser mill bed. Certainly not the place to get a good night's sleep.
Because of that, you may have guessed it, it becomes important to keep the "good side up".  This keeps the visible side of the sheet metal off the "bed of nails", making sure it's got a clean finish. 

In Inventor, this means making sure that when clicking the flat pattern icon, the face that Inventor shows you is the "up" side.  

But how to you make sure the good side is out?

The obvious way, is to choose the "A" side right away, either by using the "A Side" tool, or by selecting that as your face when you create the flat pattern. 

But what if you need to change it after the fact?  In spite of the best efforts of the best designer, it's always possible one flat pattern is going to be reversed. 

An easy way to fix an incorrectly oriented flat pattern is just to delete it and replace it.  This might work great if a drawing using the flat pattern hasn't been created yet, but what if it has?

If a flat pattern view is created, deleting the flat pattern means recreating the view in the drawing. 

This is a fairly simple flat pattern.
But do you want to recreate it if you don't have to?


In other words?  It means more work. 

So here's an alternative that I think you might like. I'll flip the "A" side of the sample below.  I've colored one face red to make the change a little easier to follow.

Getting started with a sample part.

First, while in your sheet metal part's flat pattern, right click on the flat pattern icon and choose Edit Flat Pattern Definition.  

Accessing the flat pattern definition.

Now, a dialog box appears that allows the option to change, create, and save orientations if you'd like. In this case, it's the Flip option under the Base Face section we're interested in. 


Clicking this face flips the sheet metal face over like a pancake on the griddle.  In the flat pattern sample used here, the silver face is now visible. 

The face is flipped over

Now, switching to the drawing, the flat pattern also shows the silver side, Careful inspection will also show that the bend directions have all changed too! (Careful, the view is rotated 180 degrees).


The flipped, can completed, view.
You may noticed that the dimensions need some rearranging, but at least speaking for myself, I'd rather rearrange annotations than recreate a set of annotations.  In other words, this is a small trade off for the time saved when facing recreating entire views. 

So if you're facing flipping a sheet metal pattern over for any reason at all, I suggest considering flipping the base face.  It can be a real time saver. 

Sunday, November 08, 2015

Batch Converting Files in AutoCAD - A Very Handy Tool

Earlier this week, I was faced with saving a handful of AutoCAD files from the 2015 to a 2000 version for use in a laser mill.

Naturally, the most direct way is to open the file in AutoCAD, and save back as a 2000 version.  But there's a handful of files, so it's going to take a little bit of time to save the files one a time.

Converting files one at a time.  This is a common look for
the person stuck with that task. 
But there's a utility here to help us out with that.

It's called DWG Convert, and lets you batch convert AutoCAD files to an older version of your choosing.

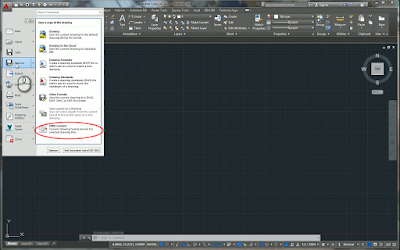
To get to the tool, go to the Application Icon (the big "A" as I like to call it) and choose Save As.

On the flyout, look for the DWG Convert icon.

The DWG Convvert Icon.
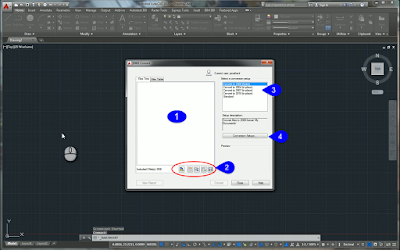
Choosing this icon, you'll be greeted by the DWG Convert dialog box. And there are options to choose from.

The different areas of the DWG Convert dialog

The sections listed by the blue icons are:

1) The list of files to convert (these haven't been added yet).
2) Icons to add files to be converted.  From left to right, they are:
Add files to convert

  • Add files to convert
  • Create list of files to convert
  • Open a list of files you've previously created
  • Append files to an existing list
  • Save to list

3) This section provides a list of selection setups to choose from

4) Finally, the Conversion Setup icon allows you to modify an existing setup, or create one of your
     own.  This is the one we're going with right now.


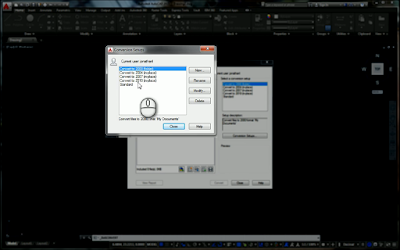
Clicking on the Configuration Setup button shows a new dialog box.

The Conversion Setups dialog box.
Here, you can create a new setup, as well as rename, modify, or delete existing setups.

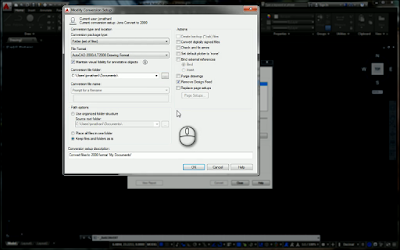
In my case, I chose to create a new setup.  Since I'm converting to 2010, I used Convert to 2000 (in place) and selected new.  This creates a new setup based on the existing one I chose.

Changing different options for the conversion.

Now modifications can be made to the setup.  These include, how the files are handled (such as a zip file, or folder of files) which format to convert to, as well as several actions to perform on the files, such as purging and error correcting.

It's listed quite nicely in the Autodesk Help System here, so I won't try to recreate that particular wheel in this post.

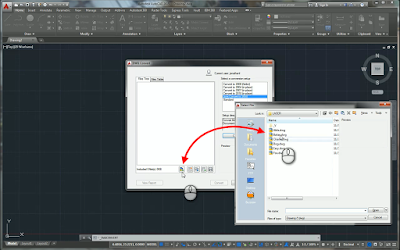
Accepting the settings, I'll return to the previous dialog box, and add the files I want to convert.

Adding files to convert.

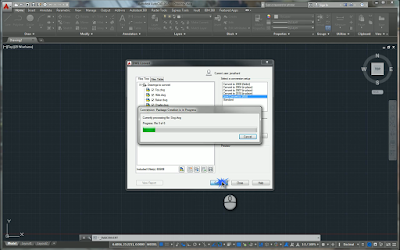
Once the files are added to the list, all that's left to do is click Convert, and let DWG Convert do its thing.

The conversion in progress.  The list can be seen in the background.
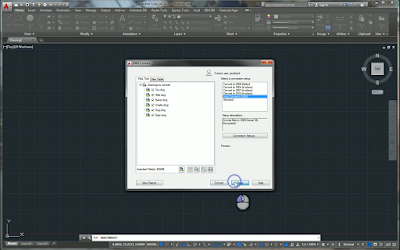
After a short span of time, depending on size, and how many files you're converting, it will all be done.

All done!
You can now get the files from the location you saved them to, and they're ready to do what you need!

So when you need to batch convert a bunch of files, here's a tool to keep in mind!

Photo Credits:

photo credit: 2 a.m. Tedium via photopin (license)

Sunday, November 01, 2015

Show Sick Constraints in Autodesk Inventor - A Newer Trick That's Worth It!

To borrow a phrase from Fiddler on the Roof, "Our old ways were once new, weren't they?"

And I'm reacquainting myself with building, changing, and modifying assemblies in my new capacity.  That means changing geometry after parts have been assembled.

And that means dealing with sick constraints!

They say an ounce of prevention is worth a pound of cure.
But sometimes you need a heaping pile of cure.
I had to change a hole into a slot in order to give a part a easier to adjust.

Note! For this post, the top nut and washer have their visibility turned off to make the slot easier to see.  But it is there!

One of these holes has to become a slot
Creating the slot is easy enough.
However there were threaded rods and nuts that were constrained to the now removed holes, and naturally, those constraints lost association.

Locating these in the browser is usually easy enough.

The sick constraints in the browser.


But then I remembered that there's a tool that will make glyphs visible on screen to show me where my problem constraints were.

It's called Show Sick Constraints, and it was actually introduced in Inventor 2014.

Clicking this tool shows glyphs for the sick constraints right in the modeling window.  By right clicking on these, the options to change the constraints become available

The glyphs shown.  Note one washer/nut combination is invisible
Choosing the Edit option, the lost constraint becomes visible.  It's represented by the red arrow.

Right click on Edit


By clicking it, I can re-associate the missing constraint to the new geometry represented by the slot. It's just like when the constraint was added in the first place.

Replacing the constraint.  The nut and washer are invisible.
This makes it easier to select the desired geometry.

When compared to fixing constraints by the "right click in the browser" method, I found this to go by quickly.  I wasn't checking the browser, and using tools like "Isolate Components and "Find in Browser" nearly as often.  And while those are great tools, "Showing Sick" made the process smoother with a minimal amount of "mouse mileage".


The constraints restored!  The glyphs can now be hidden if desired with
the "Hide All" tool net to "Show Sick"
It's a nice tool that helped me quite a bit in this particular situation, I'd suggest you take a look and add it to your repertoire of tools!

Photo Credits

photo credit: photo credit: Conefluence! via photopin (license)

Wednesday, October 28, 2015

A Lesson in Technology - The Activated Roller Belt

My learning experience in material handling continues and continues.... and continues some more.  Many times faster than I can absorb it.

Learning.  It can be a bit like this!
One newly acquired bit of knowledge I thought I would share is something called the "Activated Roller Belt" made by Intralox.

This fascinating bit of technology has a conveyor chain, like you might expect on a conveyor line, but in addition to that, it has small rollers embedded in the belt at an angle to the belts direction of travel. 

By activating these rollers in a controlled manner, the direction of travel for anything on the belt can be changed.  This is accomplished without gates or any other (apparent) physical force. 

Instead of trying to describe it, I was able to find a video showing it in action.  It's an interesting little watch.

I hope you enjoy a sharing my little bit of insight into the material handling world!


Photo Credits:

photo credit: punch via photopin (license)

Sunday, October 25, 2015

Using the Refresh tool from Autodesk Vault

There's no better experience than real experience.  Especially when it comes to the nuances of things.

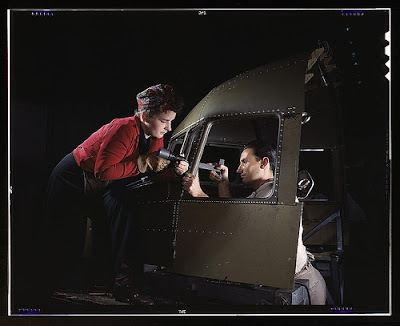
Some things you can learn by reading, others, like riveting, you must get out there and do!
One of the tools I've been using quite a bit in the last month is Refresh from Vault, particularly when I'm renaming or moving a file.

And I've found I do this a lot.  File names, which go part and parcel with our part numbers are always being tweaked in Vault.

With regard to moving files?  I have found that sometimes, I get in a hurry and hit that save button before I realize where I've saved to!

Fortunately, Vault's rename feature makes renaming files easy.  And it's just as easy to drag files from one folder to another in Vault  But there's always one rub.

I have the assembly containing the files open in Inventor at the same time.

Now I could always close Inventor, rename the assembly, and reopen the file, but that takes those few, precious, minutes I don't always have.

I could always wait to do it at the end of the day, just before I leave, but who am I kidding!  I'll never remember at the end of the day!

These don't often work for me...

I'll just keep repeating the remember/forget/repeat process in an engineering version of Groundhog Day!

But here's how you can use Refresh from Vault to quickly update files after a rename or move.

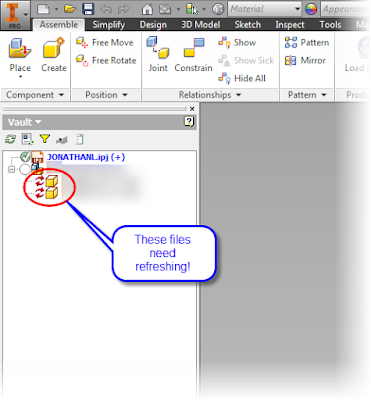
After files have been changed in Vault via Move or Rename, switch to your Vault browser in Inventor.  You may need to refresh the browser to make sure it's up to date.

You'll see a red symbol next to the files that need to be updated.

Files that need refreshing after a move or rename operation
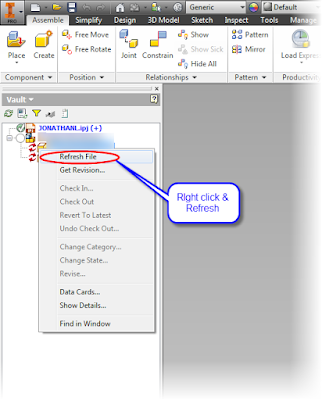
All that's required is to right click on the file you need to update and choose, you may have guessed it, Refresh!

Right click to rename the files

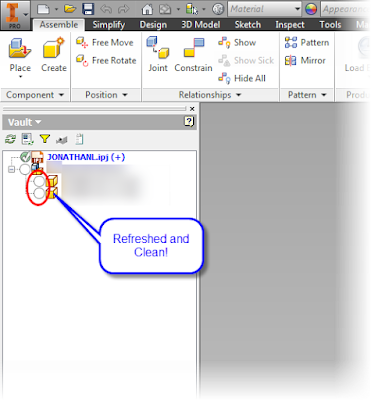
Once that happens, the files will update!  If you've moved files, the locations will be updated, checking the files into the correct location in Vault, and the renamed files will be updated.

Files have been refreshed! 

It's a nice trick that saves a few minutes, makes my day a little smoother, but most of all, makes sure I do something that needs to be done, when it needs to be done, and makes sure it doesn't get "saved for a later that never comes".

Photo Credits:

photo credit: Riveting team working on the cockpit shell of a B-25 [i.e. C-47] bomber at the plant of North American Aviation, Inc., Inglewood [i.e. Douglas Aircraft Company, Long Beach], Calif.   (LOC) via photopin (license)

photo credit: Russell Building: Interior Design Studio via photopin (license)