Find us on Google+ Inventor Tales

Wednesday, February 03, 2010

Whats Wrong with My Environment? - Part 2


“Nothing helps scenery like ham and eggs.”

Mark Twain


As promised. Here's part 2 of creating an environment inside of Autodesk Showcase. What's the biggest lesson I've learned so far? There's a TON still left to learn!

But that doesn't mean I can't share what I've learned so far.

So in the last Showcase blog post, I talked about where to get environments. Now, what to do once we have them.

So first, I've downloaded a *.hdr image from the Alias Design website. In this case, I've grabbed the 'Daylit Gypsumcrater' *file. You'll find them in 'Environments' under the 'Downloads section.
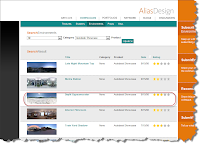

First, the Image
(click to enlarge)

Once downloaded, now we switch gears and jump into Showcase. First, we get our scene open.

Our Car in its Natural Environment
(click to enlarge)

But, today it's about creating a new environment, so now, we have to go to the 'Scene' pulldown, and activate our Environments menu.

Accessing our Environments
(Click to Enlarge)

Now. click the 'Create' button to load up our environment
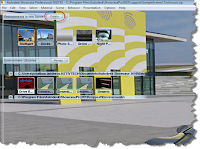

Finally, the Fun Part!
(Click to Enlarge)

Showcase will ask you if this is a Backplate Environment(a flat environment) or a Geometric Environment (a 3D Environment). In this case, I'm using a Geometric Environment.

What Type of Environment do we want?
(Click to Enlarge)

Now, we bring in our *.hdr file. Shown in the screen capture below.


(Click to Enlarge)

Now we can finally adjust our Environment. There's a lot going on here, and yes, I'm definitely still learning a lot here myself. I can say that I've adjusted exposure most often, since this adjust how bright an environment will appear.

If your not sure, just take the defaults go from there. You can always go back and adjust!

The Help button is definitely your friend for reference. I'll definitely post more tricks as I learn.


The Create Environment Adjustment screen
(Click to Enlarge)

Once you've made your adjustments, hit create, and Showcase will crank for a bit as it creates the environment.


The Car in a Whole New World
(click to enlarge)

So these are the steps to create the environment. You'll even notice the new button (named 'Generic' by default) attached to the environments tree.

Of course, there's a good chance you may want to go back and make adjustments. In this case, right click on the newly created environment and choose properties.

Now, we can 'tweak' our enviroment
(Click to Enlarge)


There's a lot going in here as well, so for this part, I've shown two common areas that I change. First, is the name. The second, is the shape of the dome. The dome shape can affect the look of the environment. I definitely suggest trying different dome shapes to get the best one. This will vary based on how the *.hdr file is used.


Even MORE Adjustments You Can Make!
(Click to Enlarge)

Finally, the result!

(Click to Enlarge)

One last note. Right click on the new environment, and you can save it to your library. This makes it available for future scenes, and saves you the trouble of having to repeat these steps unnecessarily!

Time to Save This For Later!
(Click to Enlarge)


Whew! There's a lot going on, and I didn't go into all the details. But it's definitely a start. And as I start learning more, I'll start posting the tricks!

As for what's next? I'll be at the Pacific Design and Manufacturing Show in Anaheim next week helping out at the Autodesk booth. So if you're at the show, come by booth 3609 and say hi!

Monday, February 01, 2010

What Wrong with My Environment?!? - Autodesk Showcase


“One of the Internet's strengths is its ability to help consumers find the right needle in a digital haystack of data.”

Jared Sandberg


If you've been paying attention, I've not been as good about Sunday night blogging. This week is no exception. I spent my Saturday at Planes of Fame being a volunteer museum guide.


Planes of Fame's two P-51 Mustangs. They both flew Saturday.
There's nothing quite like the sound of a Merlin engine purring.
(click to enlarge)

Sunday, I hiked to the vernal pools in Murrieta, which only fill with water during the rains.


Unfortunately, due to teh conditions, we couldn't get much closer.
(Click to enlarge)

Needless to say, Sunday night, I was more about an early bedtime then a blog post. But, at last, here we go!

Today, I'm going to talk about environments in Autodesk Showcase.

Environments in Showcase are something I've not worked with for one reason and one reason only.

I've never gotten around to it. (I say this with a sheepish grin).

But twice last week, I was asked by two different users where to find environments, and how to bring them in.

Granted, this isn't the first time it's come up. But I finally told myself that I was going to take the opportunity to blog this information.

So first of all, what is an environment?

An environment is, essentially, the scenery behind your model. For example, if the P-51s in the picture above were the models I was showing, the hangar and airfield could be considered my environment.

The environment is made of a High Dynamic Range image (HDR), which can be either flat (called a backplate) or three dimensional (such as cylindrical or spherical).

An example of a car in an enviroment
(click to enlarge)


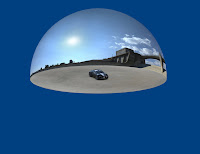
An example of the same car, showing the extents of it's environment.
(click to enlarge)


So now that we know WHAT an environment is, where can I get some.

There are some that are included with Showcase, and those can get you pretty far, but you also may reach a point where you'd like a few more options.

One thing is for sure, I don't have the complete, definitive list. But here's some places that I've either had recommended to me, or I've used personally.

Alias Design - Registration is free, and they have a nice selection of free environments that you can download. The environments are also free.

HDR Mill - They have a small free sample section, and you can purchase images from HDR Mill at fairly reasonable prices. I've used them before, and liked the results. If I was in the market for some new environments, I'd definitely consider them.

Dosch Design - One big disclaimer, I've not used this personally, so I don't feel I can truly recommend them. At about $150 USD for around 30 images. They're a bit rich for my blood, since I just haven't run into a place where I need that many environments. But that being said. I have seen them recommended consistently by several users, and several sites. So I went ahead and gave them a shout out.

With that being said, should I want to have an arsenal of environments at my disposal, I would be willing to try them, based on the recommendations I've received.

So there's where to get some environments. Importing them into Showcase is not that difficult, but there are always tricks.

Don't worry, I'm not going to abandon you. My next post will be taking an environment, and importing it into Showcase.

But for now, back to my Monday!

Friday, January 29, 2010

Stranger in a Strange Land - The Journey Continues


“Let your mind start a journey thru a strange new world. Leave all thoughts of the world you knew before. Let your soul take you where you long to be...Close your eyes let your spirit start to soar, and you'll live as you've never lived before.”

Erich Fromm


Last night, I once again made the sojourn to the South Coast Revit User group.

Once again, this meant that I was a stranger in a strange land. But as always, the members of the user group were more than welcoming.

Speaking that Thursday night, was Will Harris of WILL2PLAY.

He gave an excellent presentation about how Autodesk Revit was used to design an addition to a Gothic church.

Will Harris Presenting.
Sorry about the picture. A Blackberry can only do so much.
(click to enlarge)

And while the technical achievement was incredible, what I found much more fascinating was his talk on the actual implementation process itself.

He spoke about a lot of the challenges it takes to perform an implementation, starting with the fact that a Gothic church is probably the toughest project to start with. He continued into the constant, ongoing challenges of developing and maintaining the standards, and finished with the fact that he bought a lot of lunches as he got acquainted with the team he was working with.

And, while Revit was a worthy feather in Will's hat, the things that struck me weren't necessarily the technical aspects.

So, while some of the biggest things I learned (and having forgotten a few things, relearned) weren't the button clicks, what were they?

Always have a backup plan

Mistakes are made, things go wrong in spite of the best efforts of the team. Make sure you have back up plans and procedures just in case. For Will's experience, he talked about having to restore standards that were accidentally overwritten. A good backup plan meant restoring it in a few minutes instead of several hours.

The technology is cool, but without people, it's just a box


All the software in the world can't help you if you don't have people motivated to learn the software and implement it. And that doesn't mean you fire your team and replace them with new hires. It means learning what makes your team tick, finding a way to give them direction, motivating them, and making them want to achieve the goals.

What I took away...

So those were the big lessons from Mr. Will Harris. We all love the tech. I wouldn't blog if it weren't for the fun tech I get to blog about.

But there's more than the tech. Once the network license is running, the integrations are tested, and the updates installed. There's the trials and tribulations of the real world.

If we lose sight of that, we're forgetting a huge part of the picture.

Thanks for the presentation, Will!


Wednesday, January 27, 2010

The Changing Image of What Is - Preview Pictures in Autodesk Vault.


To finish a work? To finish a picture? What nonsense! To finish it means to be through with it, to kill it, to rid it of its soul, to give it its final blow the coup de grace for the painter as well as for the picture.
Pablo Picasso


While training a class on Autodesk Vault, I inadvertently used a trick that's become second nature to me.

Then someone asks, "How'd you do that?!?"

I had to think a second. The 'trick' is really just a single button click that's become habit.

Here's the issue I've run into, and how I solved it.

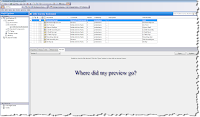
Sometimes, when you're working with Vault, you may find that you click on the preview tab in Vault Explorer, and you don't get a preview. It seems to happen after a renaming, or moving a file in Vault.

(click to enlarge)

I'd love to say that, like Prometheus bringing the gift of fire, I had some miraculous bit of wisdom to bestow that I'd discovered after some great search.

But alas, I learned this trick reading a tech document one night. So really what I've done is provided proof that my life can be rather dull at times.

But the small tip that I do have is that you can hit the 'Update' button in the preview pane of Vault Explorer, and regenerate the view.

Click Update to Regenerate the View
(click to enlarge)

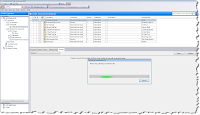
Once you click the update button, the preview will regenerate (it may take a minute or two), but you'll be back on your way with your preview window intact and functioning!


The View in the Process of Updating
(click to enlarge)

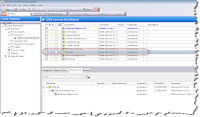
And your preview is back!

The Completed Preview
(Click to Enlarge)

So that's it. Another little Vault trick!

Happy Inventing!

Sunday, January 24, 2010

Autodesk Vault - What's in a (File)Name?

What's in a name? That which we call a rose by any other name would smell as sweet. William Shakespeare

So what is in a name? If you've read the Vault literature, you know that you probably know that Vault uses a database that allows you to search by multiple criteria to find a file.

So now instead of having to recall a file name, you can also use the file properties like author and description (among many more) to search for your files. This greatly increases the ability you have to search for files.

As I've used Vault for my woodshop projects, I've found that I don't have to be as careful with my file names, since I have other ways to search for the file.

But I've also learned that it doesn't mean that I have an excuse to be sloppy with my file names.

Luckily, Vault gives us a way out should we ever become careless.

In this example, I've got a bookshelf that I modeled from some plans in a book for a future woodshop project.

The bookself in Inventor
(click to enlarge)

Okay, it may be distant future, but I swear I'm going to build it someday!

In any case. In this scenario, I've placed my files in Vault, like a good data manger should. But there's a problem.

When I saved one of the files, I forgot to change the default name. I've accidentally given it the name of 'part4.ipt'.


The file unnamed
(click to enlarge)

As I said earlier. This doesn't really bother Vault much. I can leave this file name unchanged, and lead a happy life.

But I also said we shouldn't use Vault as a reason to be careless, especially since Vault gives us a way to change the file name.

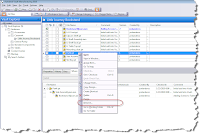
Once the file is in Vault, all you need to do is right click on the file name in Vault Explorer, and choose 'Rename'.

Right Click and Choose 'Rename'
(click to enlarge)

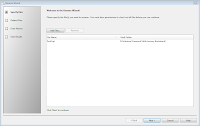
The wizard will ask you if you want to add more files to the rename wizard, 'while your at it'. Although for this example, I'm only changing one.

Add files if You'd Like
(click to enlarge)

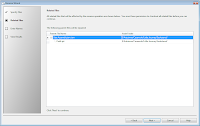
With this step done, Vault shows you which files it's going to repair. That is, which references will be adjusted to fix the links.


The Link to an Assembly has to be Updated
(click to enlarge)


Next, you can choose what name you want for the new part. Notice that you can also update the part number with the new filename (assuming this is how you number your parts). You can also create part numbering schemes here, if you have another method to number your parts.

Now to Enter the New Name
(click to enlarge)

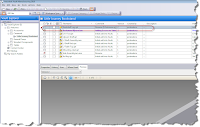
Now the file's name is changed! But Vault also notifies all the components using the file. So you don't have to resolve links for any lost files due to the rename. Vault takes care of that for you!


And it's done! Notice the 'Rename' comment
(click to enlarge)

You could call it a basic trick, but it's a common thing we all have to do.

And aren't the best tricks the ones that we use day to day?

Tuesday, January 19, 2010

Microsoft Windows Uninstaller - There's always another way.

A computer once beat me at chess, but it was no match for me at kick boxing.

Emo Philips


So this isn't really an Inventor, Showcase, or Vault tip. But it's an issue I've run into a few times, and it's definitely worth mentioning.

Every once in a great while, a Windows program doesn't install, or uninstall correctly.

Okay, the 'virtual peanut gallery'' will probably say 'Jon, that's every time you uninstall a Windows program'.

But what I really mean is, something goes screwy. I mean that you can't install the program because Windows thinks that the program is already installed, but you can't uninstall it because it doesn't show up in the control panel.

Now what?

Well, there are things like using Windows restore points, but let's be honest. But have you used one of those recently?

If the answer for you is 'yes'. Congrats. Pat yourself on the back.

If the answer is 'no'. Welcome to the club, my name is Jon, I'm a charter member. Look me up when you arrive.

That's right, I'm as guilty as anyone.

There's also the 'scorched earth' approach, where you completely format your computer, and reinstall everything.

This can be fun in a 'geeking out' sort of way. It also gets rid of any other 'nasty bits' that could be lurking in your computer. But, it's also time consuming.

But, (eyes dart back and forth quickly), there's another way....

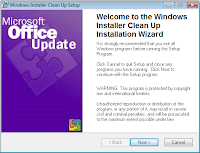
Microsoft issued a little program called Windows Installer Cleanup Utility. You can download it from Microsoft's site by following the link HERE.

Just download and install.


Welcome to potential computer salvation
(click to enlarge)


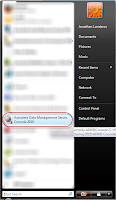
Next, run the program. It'll show up in your Windows Programs list as Windows

The utility in the Startup window
(click to enlarge)

The program starts, and you'll see a list of all the programs that Windows sees. Many times, the programs that don't show up in the control panel will appear in this window.

Who's the culprit?
(click to enlarge)

Pick your program, uninstall, and now you can try to install again if you need to.

Of course with anything, there are disclaimers. There has to be.

  1. Don't use this instead of the standard uninstall practices. This is only for when the standard methods fail.
  2. Is the program going to fix every install/uninstall issue you're going to encounter? No. Sometimes, it really is that bad, and you may have to try that aforementioned 'scorched earth' policy.

That being said, this utility HAS saved me from having to get more drastic in the past. And this has been a blessing when a reinstall means several hours moving data around and getting a system back up to speed.

So in that sense, I've come to view it as my snowboarding helmet. It only had to save me once to be worth it!

Wednesday, January 13, 2010

Manual Override - Manual Backups in Autodesk Vault


“Expect the best, plan for the worst, and prepare to be surprised.”

Denis Waitley


A few weeks ago I wrote a blog on using a script for an automatic backup.

I mentioned that manaul backups are also possible, and even talked about the steps.

This time, I'm going to go a little deeper into them.

First, a bit of a refresher, and some explanation, on the manual backup process.

One the machine acting as your Data Management Server, open your Autodesk Data Management Console.


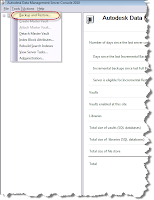
When the Data Management Console opens, choose Tools>Backup and restore.


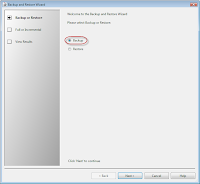
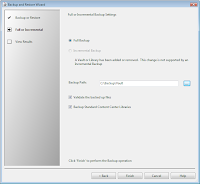
The backup and restore screen opens. This is where you can create, or restore a backup. Today, we're going to create the backup, so choose the 'Backup' radio button.

Click next, and now we get to the core.


First, you can choose a full, or incremental backup. The full backup option does just what it says, it backs up all the data in your database and filestore.

Incremental only backs up only the changes since the last backup. This option cannot be used unless a full backup has been performed first. Today, I'm just going to use the full backup settings.

We can also set the path, which is the location where the files are saved.

Next we have the 'Validate' check box. Setting this will have Vault go back and validate that we have a valid copy. It's not necessary, but I usually set it. You might call me paranoid.

I like to use 'prudent'. It has a much more positive ring instead of the 'eyes darting nervously around' connotations of 'paranoid'.

Last, we have 'Backup Standard Content Center Libraries'. These are the standard nuts, bolts, etc that ship with Inventor. These are read only files that don't change, so the only benefit you gain in backing them up a reduced number of steps should you need to restore a database.

Choosing not to save them can save about 3-5GB of drive space however, so this is worth considering.

Unchecking this box means the Standard Content Center Libraries are not backed up, but should you need to restore a backup, you'll need to grab your Vault disk and reinstall the libraries.

For routine backups, I'll skip the libraries. Disk space is cheap, but not so cheap that I'm going to backup 3-5GB of redundant data every night!

However, if I'm doing a 'test', I'll usually grab the libraries too, if I need to restore, then I can restore in one step.

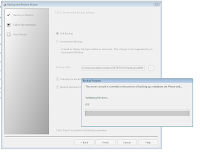
Then just hit 'Finish', and away your backup goes!


It will finish, and the files will be stored in a directory with a name with the following format.

VaultBackup_2010_01_13_11_49_48_AM

This directory contains all your Vault data. Don't lose this. Treat it like the United States Secret Service treats the 'Nuclear Football' with the nuclear launch codes for the U.S. arsenal.

So, now you've stored your Vault backup under lock and key, safe from harm.

But Why? You might think that with a backup script, why would I ever want to perform a manual backup?

In truth, you may never make a manual backup. But I've found that at least for my own Vault, there are situations that I do go through this extra step. The three biggest situations I can think of are:

1) Pre-migration

When I'm going to migrate a vault from one version to another, I'll make a manual backup.

Why? It ensures that I have the most current data from the moment the Vault was shut down. It also makes sure that if there's anything wrong with the scripted backup, I have an additional fall back point.

That's right, I make a backup for the backup. But my peace of mind is worth it.

2) I'm going to try something 'death defying'.

Sometimes I want to try something with my data that falls into the "It's crazy! But it just might work" column. Typically, it includes manipulating, copying, or deleting data that should address an issue. In theory.

If I create a backup manually. I can safely experiment on the latest data in a test environment until I'm sure it's safe on the live data.

There's that 'peace of mind' thing again.

3) Any time my data and I need a 'warm fuzzy'.

In other words, sometimes my peace of mind is reason enough.

So now, you may find yourself questioning my faith in the Vault backups? You may be asking, "Jon, don't you trust the stability of the Vault backups?"

The short answer. I do trust my backups. As a matter of fact, I can't think of a time when a backup that was properly created failed on me.

But that doesn't mean it'll never happen. It also doesn't mean that the automated backup that's supposed to have been running for months wasn't inadvertently turned off three months ago, and the backups you thought you had, don't exist.

Trust me, I've seen it happen.

So the moral of my story? It's a lot easier to say. 'Don't worry, I made an extra backup just for this situation!" Then to say, "I thought we had a backup, but we don't. We lost 'x' hours of work.'

The latter is particular scary for extremely large values of 'x'.

Think about it.....

Sunday, January 10, 2010

The Measure of a Model - Units in Inventor

“The only man who behaved sensibly was my tailor; he took my measurement anew every time he saw me, while all the rest went on with their old measurements and expected them to fit me.”

George Bernard Shaw


While training a class last week. Employing units measurements in models became the subject of discussion. Mostly it revolved on mixing units.

Here in the United States, we use feet and inches. The most common unit I'm accustomed to when designing is inches. It was the unit I worked with mostly in industry, although I've also done a fair amount of work in millimeters as well.

During our class we talked about how to best use the units in Inventor. And like with so many things in CAD, there's never one right answer. But there are some tools that can be taken advantage of.

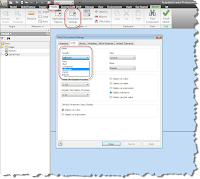
Inventor part and assembly all have a default unit. Out of the box, Inventor comes with templates in millimeter and inches, but those aren't the only units you have available.

In your part and assembly files, if you go to Tools>Documents and Settings, you can access the units. Here you can change the defaults unit of a given model file.


The Documents and Settings screen
(click to enlarge)

Now that we've seen how to change the default units of a drawing. If we type in a number. Inventor will assume that the unit we're using is the same as that set in Documents and Settings. (For example, if we're using a document set to inches, typing the number '12' will be interpreted to mean 12 inches in Inventor)

But what happens if we want to use a different unit in the drawing?

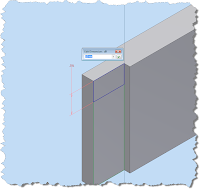
Type in the unit at the end of the number. So if we're using the same inch document above, typing in '15mm' will result in Inventor converting the number to .591 inches. In effect, Inventor divides by 25.4 for us, saving us the conversion.


Inventor converting units
(click to enlarge)

By the way, Inventor carries out to twelve decimal places, so the .591 inches you see are just what Inventor is displaying.

What else can you do?

You can create equations to help combine units, and save you the trouble of doing the math. Below is an extrusion with a bit of a whacky equation. '1ft+125mm+3/32'.

(click to enlarge)

Inventor has converted the 1ft into 12 inches, converted the 125mm to 4.921 inches, then done the math to add the 3/32 inches. You can get even more complicated if you need to, Inventor can do quite a bit with units.

So now you can take Inventor and see what you can do with the equations. You can do a lot!

A couple of final notes:

You can also use the 'ticks' for units as well. Try typing something along the line of 4'6" into the dialog box.

Inventor understands that that's 4 feet 6 inches.

And the last note. Don't forget the dimensions we use in the model don't have to appear that way in the drawing. Things like fractions, units, and dual dimensions can all be shown on the drawing using dimension in the drawing. So don't forget you have additional flexibility there too.

Below is an example of a model I created for my woodshop projects. The models are all created in inches, but the drawing units are dual units in decimal inches and fractions.

Why? When I was taking my woodshop classes at the local city college, I found that because of my design work, I liked to work in decimal inches. But many of my classmates worked in fractions. So I created a dimension style to use both!


(click to enlarge)


So that's a little bit on units in Inventor. I like to set my document to the most common unit that I expect to use, then type in the units for anything that differs from that default.

Happy Inventing!

Tuesday, January 05, 2010

A Matter of View Point - View Representations in Inventor

“My movies were the kind they show in prisons and airplanes, because nobody can leave.”

Burt Reynolds

Tonight I decided to try my hand at creating another video. It's been a while, but it's always fun to create one when I have a spare evening.

I created this video based on the 'Night Stand Project Reviewed' blog I created earlier this week.

In particular, I'm referring to where and how I used view representations.

Anyway, a picture is worth a thousand words! So check out the video below. I hope you all like it!

Jonathan

Monday, January 04, 2010

Hindsight is 20/20. The Night Stand Project Reviewed

"There is no end to education. It is not that you read a book, pass an examination, and finish with education. The whole of life, from the moment you are born to the moment you die, is a process of learning."

Jiddu Krishnamurt

Well, I finally made it! The nightstand is modeled, it's drawings completed, and now it's checked into Vault Manufacturing. I'm reviewing the files for missing dimensions and the other little things, but the heavy lifting is over!

The nightstand rendered in Autodesk Showcase

(click to enlarge)

So what are some of the lessons learned in this particular affair?

Here's the list:

  • Every time I check a file into Vault, a version is created, I don't want to have 20 versions of the file inside Vault

True, every time you check a file into Vault, you're going to create a version. There's no denying that. It's also true that this takes up more disk space (because of the multiple copies) than just saving the file into the workspace, and overwriting it on subsequent saves.

I know that I'm guilty of having a visceral twitch to creating extra versions. It's like admitting that the previous version had something wrong with it, and I hate making mistakes.

However, I also found through this exercise, that I rarely, if ever, regretted having the extra version. It gave me fallback points when I made a mistake, and also let me rest assured that when I backed up my Vault to my external drive, the latest versions of my files were being backed up with it.

Lastly, don't forget that you can purge old versions when you're done. So while you might have 20 versions of a file, that doesn't mean you have to keep all 20 versions of the file

So I came to the conclusion that in the long run, the versions aren't as bad as they sound. On the contrary, they can save you a ton of time.

  • Take advantage of all the tools you have at your disposal.

At first blush, this might think that this project was pretty simple. Almost every component is rectangular. It doesn't get any simpler than that! But there were definitely some tools that I found very useful, that I hadn't planned on using.

  • View Representations. The floor of the night stand has fasteners in it that are used to connect the back panel. But when dimensioning the actual assembly, I didn't want the fasteners shown in the view. I created a View Representation that allows me to make them invisible for that view.

View Rep with hardware on

(click to enlarge)

View Rep with hardware off

(click to enlarge)

  • Promote/Demote Components. I changed my mind on BOM structure more than once during this project. I decided that a component that was originally in Subassembly 'A' would be better placed in Subassembly 'B'. Recall that you can drag and drop a component from one subassembly into another.

(click to enlarge)


  • You can't beat doing it right the first time

Okay, this is a little tongue in cheek, but I'll own up to the fact that I didn't bother to put things in the correct folder every time, or ignored a misnamed property or two because I knew that Vault would let me fix them later. I usually did this when it was getting close to midnight and I was just trying to 'squeeze out' one or two more files.

While that's true, and Vault did allow me to move and rename files without much hassle (which is one great advantage of Vault), I still had to go back and make sure to perform all the corrections that I'd let slide because I got a little lazy.

So one of my New Years resolutions is going to be; If I tell myself 'It'll be okay for now', rethink it. It very well might be okay for now. But then again, when I have to go back and make the changes, I might also be grumbling about 'why didn't I just get it right the first time?'.

There're some of the lessons learned. I'm definitely planning on expanding on these lessons a bit. I'm sure there's going to be more learned as I perform my review

Happy New Years, everyone! Here's to a great 2010!


Monday, December 28, 2009

I'm ready for my close-up. Generating Stills from Autodesk Showcase.

“I am enough of an artist to draw freely upon my imagination. Imagination is more important than knowledge. Knowledge is limited. Imagination encircles the world.”

Albert Einstein


I'm back from my snowboarding trip, and it was a great trip. But alas, all good vacations must end.

With Christmas now over, many of us wait calmly for New Years to come around. In my case, I started reflecting on some of the challenging questions I was asked over 2009.

Here's an interesting one.

"How can I batch publish still images from Showcase?"

I had to think about that one a bit. I've never tried it. I tend to be a 'shot at a time' type of guy.

There isn't a button like File>Batch Render, or similar, so the head scratching began.

It turns out, that there is away, although it's not 'in your face obvious'

You can create a series of stills by using the Save As Movie option!

At first, it might be a little non-intuitive. After all, a movie implies motion, not stills. But a movie is just a series of stills moving so quickly that there's an illusion of motion. This is where we can take advantage of some Showcase settings.

The first thing you want to do, is create shots at the angles you want to see. Create as many as you need.


(Click to Enlarge)

This will get the proper shots, but watch out, the number of stills created is based on these things.

1) The type of transition between shots. I can't say I know all the ins and outs of this one, but if the shot has a transition set to use any type of animation, you'll get extra frames there as well.

2) The frame rate rate the movie is set for.

If you have Showcase set to animation frame rate, you'll get a still for each frame. For example, if your frame rate is set at 25 frames per second, you'll get 25 stills for each shot! Obviously, that's going to increase your render times dramatically.


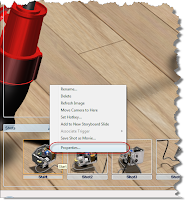
To address item 1, right click on each shot, and choose 'Properties'.

(Click to Enlarge)

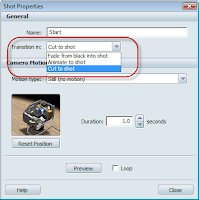
Once in properties, change the Transition setting to 'Cut to Shot'. This will eliminate extra shots created by the transition.


(click to enlarge)

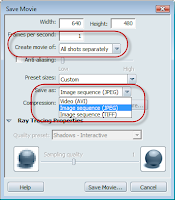
Now the renders can be saved out as stills. Go to File>Save Movie As. The following screen pops up.
Notice that the frame rate has been reduced to just 1, and that 'Image Sequence' is selected. Also, the 'Create movie of' option is set to 'All Shots Separately'.


(Click to Enlarge)

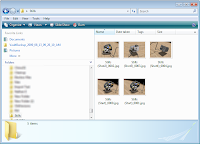
Now when you choose 'Save Movie', you'll get the following in your destination directory.


(Click to Enlarge)

Notice that you'll still get an extra shot. There's an extra shot for the beginning of the sequence. I haven't yet found a way to eliminate that one.

But if you need to generate several renders that might take a while, such as big images with ray tracing. You can let your computer work away while you're out doing other things.

Like what? For me, that either means snowboarding or heading out to Planes of Fame for a little volunteer work after Christmas.

While I was there, I grabbed a picture of the Museum's P-26 Peashooter with my cell phone.


(Click to Enlarge)

Built in teh 1930s, it boasted innovations like all metal construction. About 150 were built. Now only two are left. One is in the Smithsonian, and the other is in Chino, California.

Only the one in Chino (pictured here) is flyable.

That's it for now!

Happy (almost) New Years everyone!


Saturday, December 19, 2009

Happy Holidays!


“Celebrate the happiness that friends are always giving, make every day a holiday and celebrate just living!” Amanda Bradley


Today, there's no big post on Inventor, Showcase, or Vault.

Today, I'm packing up and heading for Mammoth Mountain for some snowboarding!


(click to enlarge)

I'll be back Christmas Eve, in time to do the holiday thing with the family.

Look for some blogs after that!

Happy Holidays!


(click to enlarge)

Tuesday, December 15, 2009

Addendum: The Importance of Being Earnest (about Autodesk Vault Backups).


“Trust, but verify.”

Damon Runyon


Sometimes you need a little help from your friends.

One of our applications engineers, Mike Carlson, sent me an e-mail reminding me of two more switches that can be added to your Autodesk Vault backup scripts, discussed in the blog 'The Importance of Being Earnest" here.

Here are the additional switches he sent me.

  • -VAL Validates the backup. Errors are recorded in the specified log file.
  • -INC Performs an incremental backup. Tells Vault only to backup files that have changed.
Thanks for pointing that out, Mike!