Find us on Google+ Inventor Tales

Monday, May 05, 2014

Getting Ready for Autodesk Inventor 2015 - Migrating Custom Templates

“Burglars know there's more than one way to skin a vault.”
James Chiles

In previous posts, I showed how to install your Autodesk Design Suite, as well as migrate a Vault from 2014 to 2015.

However, there are still things that need to be done.  For example, what about custom templates that have been carefully crafted in previous releases?  They aren't usable in Inventor 2015 until they've been migrated.

It goes without saying that this step is important.  So what are the steps to migrate template files?

The simplest, is to just open each template file in Inventor 2015 and save it.  It will work just fine, and it's a completely valid way of doing things.

However, I'm going to describe something that's more automatic then just opening and saving.

Here is my scenario.
  • My custom template files are checked into Vault
  • I want to check them out, migrate them, and check them in all in one fluid process


And while it's possible to perform these tasks manually, I'm going to use a tool called Task Scheduler.

Why?  I like letting the computer do the work where possible, and this is my chance!

The steps required for Task Scheduler are in reality, straightforward.  It's more a matter of knowing where to find the right tools.

Having said all that, what will Task Scheduler do for me?

It's going to check the files out of Vault, migrate them, and check them back in again.  Making sure they're all ready to use in 2015.

First, what are my preparation steps?  Really, there's only one.  But it's a big one!

Make sure everything is configured the way you want it.  For example, I'm still using 2014, so I've kept my 2014 templates safe and sound in a separate directory, so I can still use Inventor 2014.

Remember, once migrated, there's no going back!  So plan accordingly!

The first thing to do, is locate Task Scheduler, which can be found in:
Windows>Start>Autodesk>Inventor 2015>Tools>Task Scheduler


Once the Task Scheduler starts, choose Create Task>Migrate Files


Now, I see a screen to setup my migration.  There are several settings I can choose from.  For your migration, you can change any of the settings here.  For my migration for my vaulted, files, I'm going to make sure to check the following:

  • I'm going to choose my 2015 Inventor project
  • I'm going to check migrate from Vault
  • I'm going to start the migration instantly, instead of scheduling it for later (I'm impatient)


Now, I add the files from Vault.  The icons allow me to add Files, Folders, and an entire project.  I can even create combinations of these if it suits me!

But in my case, I'm just going to choose a single folder in Vault. This is the one with my custom templates.


After choosing the folder,  I'm going to choose my options icon, where I can change settings on what functions to use when checking in.

The first tab, the Local Options, such as rebuilding files, deferring updates, and so on.  The help system describes the steps well. In my case, I'm just going with the default settings.


On the Vault tab, I can add a Vizualization file, and delete the local copy from my workspace.

In my case, I'm not creating a visualization file, only because this is a template, and it's just a blank file.

I'm also not going to delete the local copy.  I need them locally to use them, so they have to stay!


Finally, I'm all ready to go, and I can hit the "OK" button, once to close the options, and once to "pull the trigger".

The migration begins, and all I have to do is give it a little time.


After a short time, it's done!  I have my new templates.


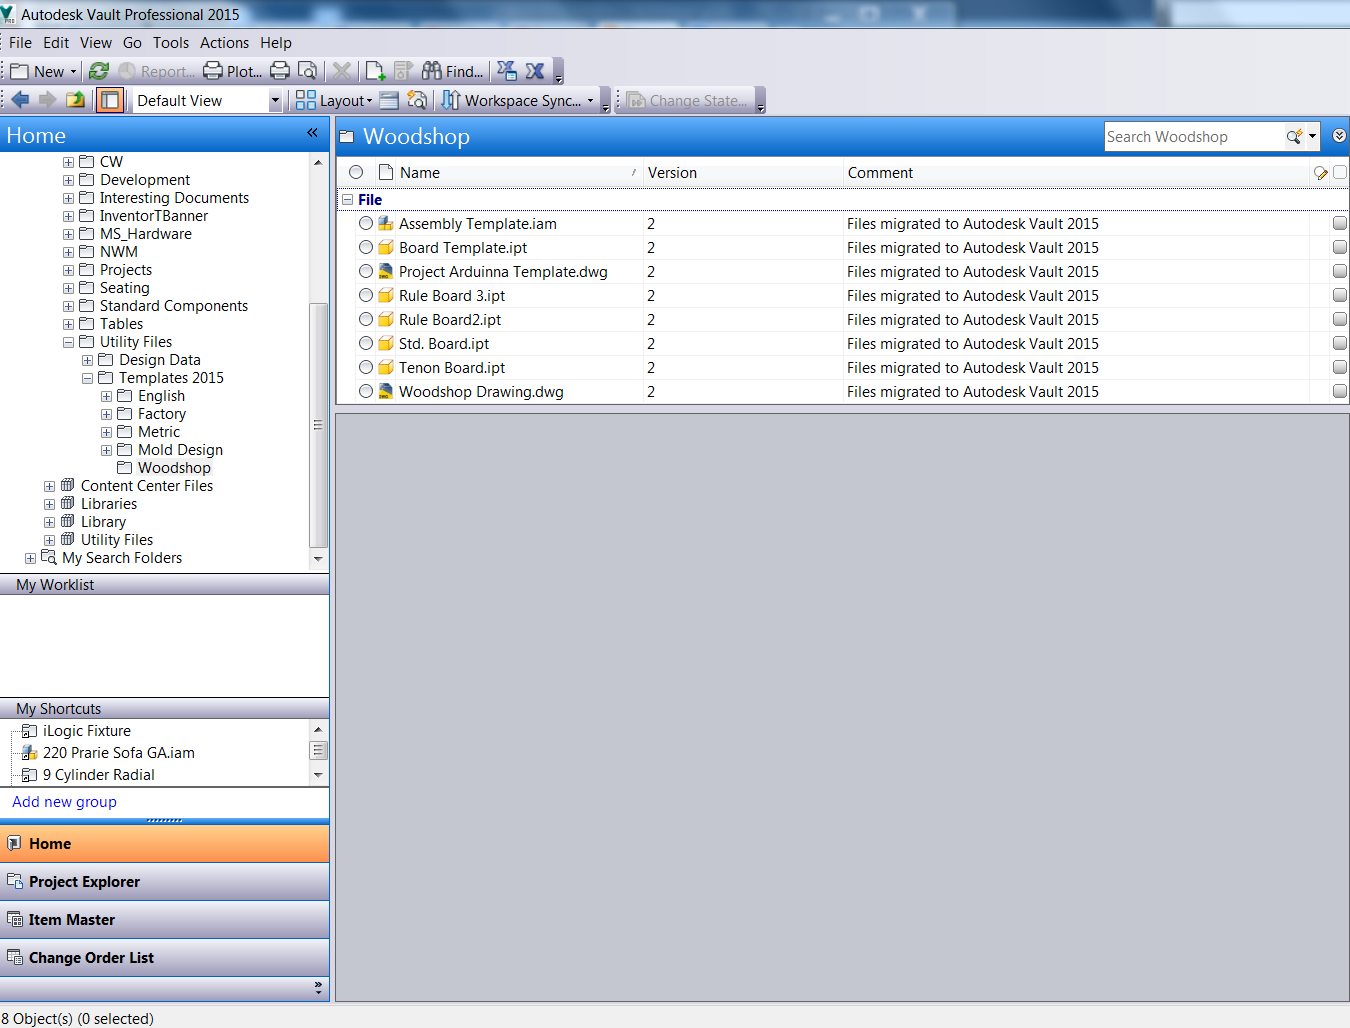
I can even double check by looking at the new versions created in Vault.


Now, my templates are all ready to use!

And for the video of the steps, take a look below!


Thursday, April 24, 2014

Spring is the Time for Migration! Migrating to Autodesk Vault 2015 from 2014


An important step in migrating to a new version of the Autodesk Products is the upgrade of Autodesk Vault.  While this step is important, it's not necessarily difficult, but it does require some planning to make sure things go smoothly. 

Before even looking at your shiny new installation files, there are a few things you should make sure of:

  1. Do you have a valid backup of you Vault filestore and database?  Check.  Then double check.  Then think about the consequences of losing all your data.  Check again.
  2. Make sure you allot for downtime!  The installation takes time, not to mention that databases need to be migrated.  This can take a while, especially if you have a large amount of data.
    1. An additional consideration to this.  You can only skip one version while migrating a Vault.  For example, you can jump from Vault 2012 to Vault 2014, but if you're trying to go from Vault 2011 to Vault 2015, you'll have to jump to Vault 2012 or 2013, then to Vault 2014.  Take this into consideration for your planning.  
  3. Recall that Vault server can run one version back of many of the Autodesk Products.  For example, Vault Server 2015 can run 2014 based applications, and 2014 Server can run 2013 based applications.  Take this under consideration.  It might be wise to update the server, while saving the clients for later.  
    1. EDIT 18-June-2014 See comments below!  David pointed out that the 2015 version of Vault server can run 2014 AND 2013 versions of the clients!  I mistakenly thought it was only the 2014 version!  Make sure take note, and thanks David for the correction! Check out the Readme Here for all the details.
      Also note that the Vaults have to be common (Professional to Professional, Workgroup to Workgroup, etc. 
  4. Consider a test migration on a separate server!  While most migrations go off without a hitch, that doesn't help if you're the one exception to that rule.  It's not paranoia if something is really out to get you.
  5. Did you check that backup?  Make good and sure.  The test migration in step 4 can be a way to verify your backup.   It's worth considering if you have the resources. 

Once the deployment is planned out, go ahead and install the new Vault server from your installation files. 

The Autodesk Vault Install will help guide you through the rest!

The process begins by starting the install from the Setup.exe file, found on your downloaded files, or USB media.


The first screen that appears will have three options, to install the Autodesk Vault Server, choose the Install Tools & Utilities Option.


Next, the End User License Agreement, or EULA appears.  I have to agree to this to proceed, so that's what I'll do!


The Vault installation informs me that it sees an upgradeable version of my Vault.  This is my 2014 version, which I do indeed want to upgrade.  I'll choose that option.


Moving to the next step allows for the selection of which programs I'd like to install.  At this point, I'm interested in installing Autodesk Vault Basic Server 2015.

I've already installed Autodesk Content Service with Factory Design Suite Ultimate, in my previous post.

Content Center is downloaded for Inventor 2015.  Hovering over the "information shows this information.


Also note that the Network License Manager can't be installed.  This is due to the fact I've already got a copy installed.  Hovering over the "No Smoking" symbol will give this information.


Finally, I place my Vault on my D: drive. This is because my C: is a smaller partition, and I want to put programs like the Vault Server on my larger data drive.


Finally! I can click the install button, and get the installation going!

The installation will take some time.  This is part of where that "allotting for downtime" note comes into play!

Add caption
After a little time, the installation will wrap up.  I close the final screen, and this is where I get to take a moment.  The installation is done, but the migration is next.

Now it's time to open the newly installed Vault Data Management Console  The first part of the migration starts.


But there are still a few more steps.  I'll need to log into my Vault, where I'm presented with a message indicating that I need to migrate my Vaults and Libraries, and asking me if I want to do so.

Of course, I'm going to agree! I can't use the Vault until I do.


At last, the end is in sight!

Now, a message asking me if I want copies of my custom Content Center Libraries created for Inventor 2014, Inventor 2015, or both.

You're options might be different here, based on whether or not you have custom Content Center Libraries or not.

In my case, I'm going to make sure I have libraries for Inventor 2014, and 2015, because I am going to be using both.


Now!  Vault is ready to go.  But there are a couple of last things that need to be done!

I'll update any scripts that are maintaining my Vault.  The installation paths have changed!  Backups won't run unless the scripts are updated!

If you're doing your own migration, don't forget this important step!

And if you prefer, I've also created a video of the steps too!  Check it out below!


Tuesday, April 22, 2014

Onward and upward! Installing Your Autodesk 2015 Design Suite!

We think a modern cloud lets you decide when you want to upgrade. We don't decide for you.
Larry Ellison

***********************EDIT April 22, 2014*******************************
Added video to accompany the text description
**********************************************************************


Ah. Software updates.  I'm always excited when the time comes to install my new Autodesk software.  There's new features to try, after all!

But as always, there are options that have to be selected.

So for this post, I'm going show the options that I use for install, as well as explain some of the other choices that might be used.

I can't cover every last detail, but perhaps what I can show can help you plan your own installation.

Before I start cranking, I should point out I'm installing from Factory Design Suite Ultimate 2015.  So if you're installing a different Autodesk software, some of the options may be different.

But even if you're not installing exactly the same product, there should be similarities!

1. To begin the install, click on Setup.exe to being running installer. 

The Setup.exe file.  Pulling the trigger on the installation.

2. This starts the installation.  Soon, the first installation screen appears.

Clicking the option to install to my laptop

For my configuration, I'm going to choose the Install option.  But here's a brief description of the other options.

Create Deployment: This option is used to create network deployments.  This is an install that's configured with a script.  It can be pulled to different users machines and make sure consistent settings are used for different machines.

Install Tools & Utilities: This contains the Network License Manager, CAD Manager Tools, and Vault Basic Server, among other tools

Choosing the Install option, I move onto the next screen.  This is the End User License Agreement (EULA). It's legal stuff.  You have to accept it.  'Nuff said.


The EULA.  Just say "Yes".  

3. After accepting the EULA and hitting next, it's time to choose the license type.

One choice is a Network License installation, where a server holds the license, and the installation "pings" the server for the license.

Since I'm installing on my laptop, I'm going to choose a Stand-Alone license. Also known as a Node Locked license, this will tie the license to the hardware on my laptop.

This screen is also where the serial number and product key are entered.  You'll get your serial number and product key from Autodesk.  (You can't have mine. Get your own!)

Note! Your 2015 Product Keys can be found at this link!

Choosing license type and entering serial numbers


4. Clicking next will now let me choose which programs to install.  I'm going to install the entire Suite.  But you could deselect any options an programs you don't want.  
The only thing I do on this screen is change my installation location, which I change from my C drive to my D drive (which is larger).

Changing my


Additionally, clicking on one of the programs will expand out additional options for the installations, such as downloading service packs (if available), and adding or removing certain components from the installation.

 Each one is different, so check the programs you're installing, and make sure the options you want are selected!


Make sure to click the program name to close up the options!  The install button will be grayed out until you do this!

5. this is all done, you're ready to Click install, and proceed! 


, For a video description, take a look below! 

Monday, April 21, 2014

A Guest VIdeo: Workflows for using Autodesk Inventor and 3dsMax Together!

“I see the computer as just another tool in the creative process, in place of or with paint, pencils or other drawing methods. Working digitally simplifies the workflow process.”
Donna Berger

It's been a busy week, and a busy (but wonderful) holiday weekend too!  I do have some 2015 blog posts and videos in the works, but things have been hectic!  So I'm still working on them!  I hope to have something up soon!

In the meantime, here's a great video from Marion Landry showing some tips and tricks on using Autodesk Inventor and Autodesk 3dsMax!  Take a look!  There are some nice tips in here!

Wednesday, April 16, 2014

It's That Time of the Year Again! What's New in Autodesk Inventor 2015

“When patterns are broken, new worlds emerge.”
Anonymous 

It's an exciting time of year for Autodesk Inventor geeks!  Surfing around the internet, I found my first "What's New" video for Autodesk Inventor 2015!

I'm really looking forward to getting into the free form technology that was just added!  It looks powerful, very powerful indeed!

But, why not talk a look at the video from Autodesk below!  Take it straight from the source and see what you think!

Monday, April 07, 2014

Choosing a Sheet Metal Base Face before Creating a Flat Pattern in Autodesk Inventor

Simon: I'm trying to put this as delicately as I can... How do I know you won't kill me in my sleep?
Mal: You don't know me, son, so let me explain this to you once: If I ever kill you, you'll be awake, you'll be facing me, and you'll be armed.
Simon: Are you always this sentimental?
Mal: I had a good day.

Exchange between Simon Tam and Mal Reynolds in the television series "Firefly"

The trick I share this week is one I've actually known about for a while.  As a matter of fact, it's become part of my "background knowledge".  Something that has become second nature.

I've known it so long, I can't remember when I didn't know it. f

But I'm sure there are those that may not know it, so I choose to share it today.

When unfolding a sheet metal part in Autodesk Inventor, inventor chooses which face is going to be shown to the user via it's own means.

It might be considered common knowledge that the face can be changed in the flat pattern screen by right clicking on the Flat Pattern icon in the browser, and choosing Edit Flat Pattern Definition.


This tool invokes the Flat Pattern Definition dialog box.  This has a button where the flat pattern can be flipped.


But there's another way that it can be done before the flat pattern is created.

Just pick the face you want to see before hitting the flat pattern icon, and that will become the "Base Face"


And if you really want to make sure, change the color of one of the faces to a different color by selecting it and right clicking.  Give it a try!  It works!


And for those who prefer a video format, here you go!

Windows XP - Rest in Peace

“In this business it takes time to be really good - and by that time, you're obsolete.”
 Cher 

As I work on something for my next post, here's a bit of news that is flying all over the web. At this point, this is little more than a reminder that a die that was cast a long time ago, is coming to rest shortly

Tomorrow, April 8th, 2014, is a big day for computer operating systems.

Windows XP is no longer going to be supported by Microsoft.

What does that mean?

No more security patches, tech support, nothing.  Windows XP is set adrift, just another piece of jetsam in the technological world.


Hopefully, everyone has made their moves.  Decommissioned Windows XP boxes from production, or relegated them to old test stations.

But get ready!  Tomorrow is the big day.  After twelve long "computer years", Windows XP is passing into history.

Monday, March 31, 2014

Setting Component Materials Upon Import in Autodesk Inventor

“Finding the material wasn't a problem — remembering what to look for was.”
 Steven Severin

A question was posed to me earlier this week.  I'm importing files of different formats into Autodesk Inventor, but I need the material to be Mild Steel, instead of default.

Is that possible?

I wondered for a moment.  I looked around, and thought "what if I change the material in the standard.ipt template?"

It made sense.  Inventor starts with that template, what if the imported files made a pass through that template first?  There was only one thing left to do.


Try it! So the first thing I did was browse to the directory containing the standard.ipt template file, and open it directly. 


Make sure to open the file with the open command!  Do not create a new file from the template!  The material has to be changed in the template file, so when a new file is created from it, the material is already set.


Once the template file is open, it's time to choose.  In this case, I'm using Mild Steel.


Once it's the active material, I save the file and close it. 


Now that my template has Mild Steel set as the material, I can import the files that I need.  In the example here, I'm using Solidworks files that I've downloaded from GrabCAD at the link here.


The files will translate, and Inventor will now use the template to apply Mild Steel to the Imported Parts.

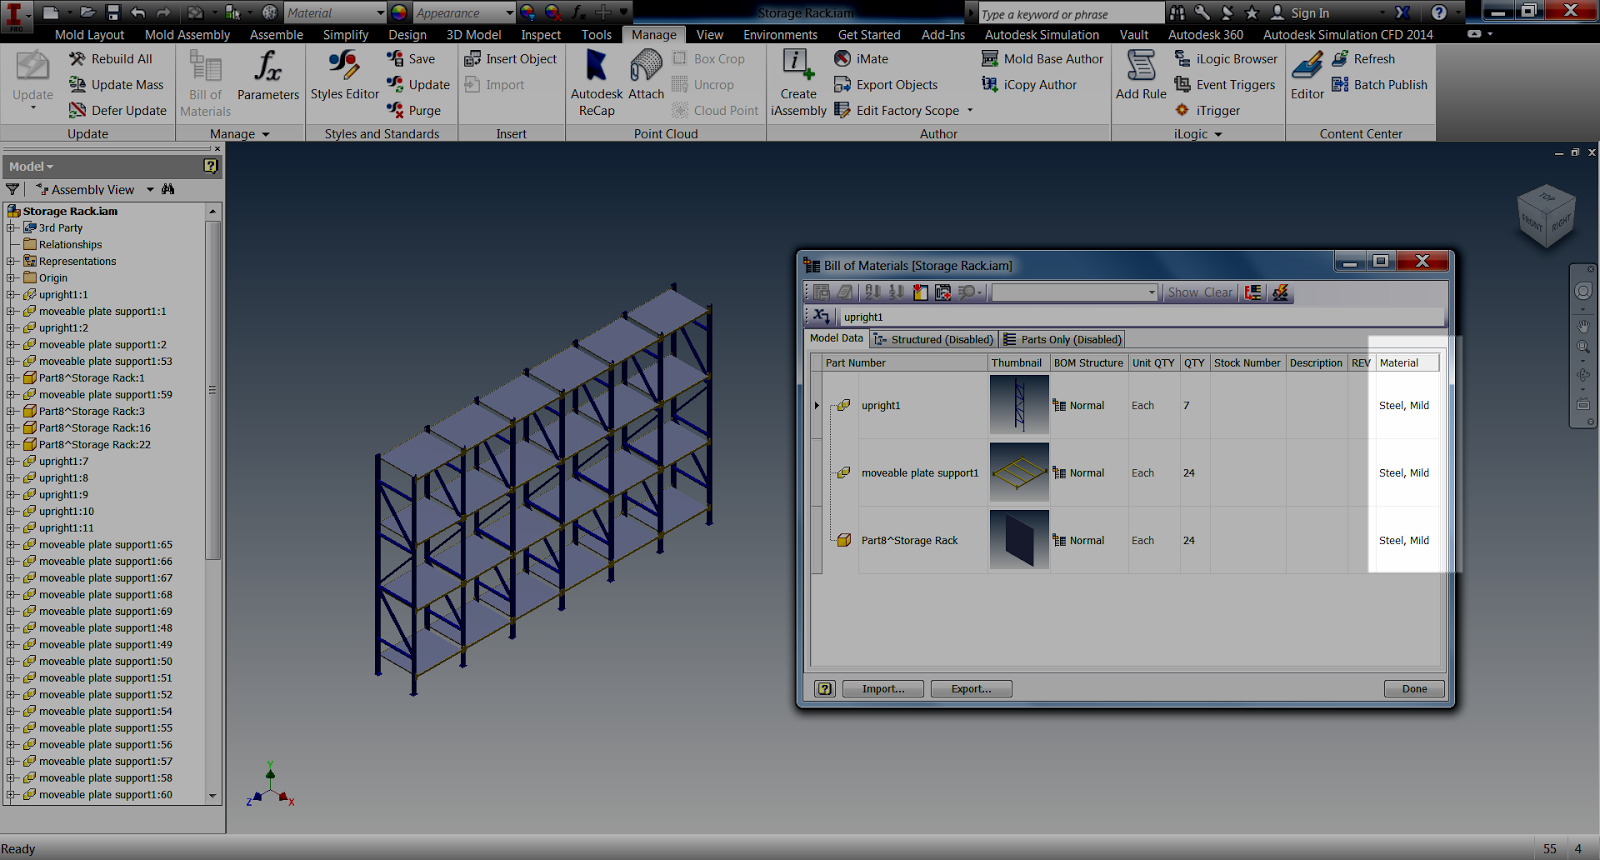
Checking the Bill of Materials screen in Inventor, I can see that indeed, all the materials are set to Mild Steel.


Now there are a couple of notes.

This option sets everything to Mild Steel.  Anything using this template will start with Mild Steel, so this may not be the perfect solution for everyone.

But it can be useful, and it's pretty quick to change.  So think about it, give it a try, and see what it can do for you!

And be sure to check out the video version below!


Monday, March 24, 2014

Uninstalling Your Autodesk Design Suite - Did You Know There's a Tool for it?

“Hopefully everything will be a clean slate here,”
 Koren Robinson

The 2015 releases of Autodesk software are approaching soon...

And I don't know release dates.  So please don't ask me.  :)

As part of that process, many of us may already be planning out how we're going to deploy new software.

For this post, I'm going to talk about one of the steps that I perform when I'm getting ready to upgrade my system.

First, some background on how my system is setup.  This is far from the only way, and your setup may be much different from mine.  As a result, your upgrade procedure may be different too!

My system is configured with a combination of Autodesk Factory Design Suite 2013 and 2014.  I'm also running Autodesk Vault Basic 2014 for my data management.

Time to move on from 2013!


I'll cover migrating Vault in a later post.

The first thing I do.  Is remove my oldest version of my suite.  I only keep one version back, and I like to make sure I have enough room available.

So in my case, the 2013 version of Factory Design Suite goes first.

Uninstalling all the programs in Factory Design Suite via the Control Panel is beyond daunting.  It's flat out frightening! 

Fortunately, Autodesk has a tool provided that can help with that situation.  It's called the "Uninstaller" and it can uninstall the suite much more easily than one program at a time via the Windows Control Panel. 

And it's installed with the Suites for 2012, 2013, and 2014!

The uninstaller can be located by going to Windows Start>All Programs>Autodesk, and finding the Autodesk Factory Design Suite Uninstaller 2013.


Selecting this tool will bring up a utility that let's me choose which products in the Suite to remove. 


It's important to point out that if the product is checked, it's getting uninstalled!  Make sure that if you intend to keep a product, uncheck it! 

With the proper programs selected, choose Uninstall, and let the Uninstaller do it's magic.  It might take a bit of time to uninstall, but it's time that you can spend doing something more productive! 

P.S.  There wasn't an uninstaller included with the 2011 version of the Autodesk software, but Autodesk did make one available for download at the link here!

Tuesday, March 18, 2014

Help! I've Lost My Autodesk Inventor Feature Browser!

“You affect the world by what you browse.”
Tim Berners-Lee

It can be easy to lose the browser in Autodesk Inventor sometimes.  Just click the "X", and poof!  It's gone!

One click is all it takes

All it take is one missed pick of the mouse, and Inventor looks like the picture below.


Inventor without its browser.  It's not fun!

Now that Inventor is broken.  How is it fixed?   That part is easy.

The first step is to go to Inventor's View Tab and locate the User Interface icon.

The User Interface icon.  The ticket to a solution


Click on the User Interface icon, and a fly-out appears.  One of the options will be, Browser.  This is the one we're after!

Find that Browser check box

Check that option, and the browser is back!  That's all there is to it!

Check the Browser checkbox, and celebrate

So that how the browser can be brought back in a matter of seconds.

P.S. Looking back at the options on the User Interface icon, other options can be turned on or off from this same screen.

These include the:

  • Viewcube
  • Navigation Bar
  • Browser
  • Status Bar
  • Document Tabs
  • Marking Menus
  • iLogic Browser

Several items can be controlled here

 These can be used to customize how Inventor looks and feels, and can tailor it to a given users preference.

It also makes for great April Fools jokes to users who don't know the trick of turning it back on.... 

Not that I'm encouraging that....

*** Update 13-November-2018 ***

It seems that somewhere along the line that somewhere in the newer releases of Inventor, the "Browser Bar" option has been replaced by "Model".  I'm not sure exactly when this happened, I'm currently using Inventor 2015 at work, and I haven't gone looking at the newer versions lately.

But if you don't see the "Browser Bar" option, look for the "Model" check box.  That should do it! 

Thursday, March 13, 2014

Can't Select Threads in Autodesk Inventor? Check the Registry!


“The stitch is lost unless the thread be knotted”
Italian Proverb

Every once in a while, I run into something that in all my years of using Autodesk Inventor, I've never seen before.

And I just recently ran into one of those cases.  I encountered an Inventor installation that was doing something I had never seen before.  Using Inventor for nearly 15 years, this one was totally new.

On this particular machine, threads couldn't be added.  The hole tool would start just fine, but when I tried to select threaded holes, nothing happened.  The radio button wouldn't select.  It was like the button wasn't there.

Threads cannot be selected!
Not having seen this before, I do what any self respecting geek would do.  I fired up Google and began a search!

Fortunately, my search paid off, and I found a link with a solution!  I can't take the credit for finding the solution, but what I can do, is share what I've discovered!

Credit goes to JD Mather who put up the solution originally!
  • The first thing I do, is shut down Inventor.  I don't think this is necessary, but it's a good practice, and I don't take chances.  
 
  • Next type REGEDIT in the Windows Search box.  This opens the Windows Registry Editor. 


  • Once the registry editor is opened, browse to the following key: HKEY_CURRENT_USER\Software\Autodesk\Inventor\RegistryVersion 1X.0\System\Preferences\Part  
    • Locate the key: UseExcelToReadThreadFile
    • Note! The value for 'X' varies based on which version of Inventor is being used.  (This example is Inventor 2014)


  • After locating the key, right click on it, and choose Modify


  • Change the value from 0 to 1


  • Once this value is changed, close the Registry Editor, and start up Inventor. 

After that was done, the computer could place threads just fine!


This was really an odd one, I've never seen it, but feel free to drop a comment if you have.  I'm curious to see if this has shown up for anyone else out there!

Acknowledgements!!!!

I'd love to say that I came up with this solution all on my own.  But I didn't.  Thanks again to JDMather.  He placed a great update at the following link on the Autodesk Discussion Group.

All I can say is that I updated some of the info, and added some updated images.

I definitely have to give credit where credit is due!