Find us on Google+ Inventor Tales: Network Licensing
Showing posts with label Network Licensing. Show all posts

Sunday, March 06, 2011

FlexNET Publisher – A License to Network (Part 7) - License Server Schemes


So we come to a close on our “License to Network” series. 

In this final segment, I talk about different licensing server schemes, single server, distributed, and redundant servers, and how it can affect the I.T. department, and the users at the other end.

This blog post will break down the different servers, the differences between them, and the advantages and disadvantages for each. 

That being said, let’s get to the nuts and bolts, what are the different licensing schemes?

Single Server Licensing

This is the system I’ve described the previous steps in this series, and it’s the most common system I’ve encountered in the ‘real world’.  A single license server uses one license file, containing all your licenses. 

What’s the advantage of this system?  It’s simple.  One server maintains one license, so it has one central point to maintain your licenses. 

Of course this is its downside too.  If the server fails, everyone loses a license until the server is brought back up. 

Now granted, servers don’t tend to drop like flies these days, so running this system is fine.  I’ve known many a system that’s happily run on this type of server.

Distributed Server Licensing

If I had to make a compromise between simplicity, and fault tolerance, I’d choose distributed. 

In a distributed system, you’re licenses are split between two different servers.  For example, if you have ten licenses, you could put five licenses on one server, and five on another (although the number of licenses can be divided in any combination between servers). 

In this system the clients acquire the licenses from either one of the servers, as designated by the environment variable ADSKFLEX_LICENSE_FILE = @SERVERNAME1; @SERVERNAME2

The advantage of this system is that you can have one server fall off line, and you’ll only lose the licenses on that server.  You don’t lose the entire pool.  The department can carry on with the remaining licenses in the pool. 

Granted, losing a significant number of your licenses can be no picnic, but it’s better than the whole pool!

Redundant Server Licensing

This is the most complicated, and the rarest licensing system.  I’ll be up front and say I haven’t configured this one personally, so I don’t know every detail of it.  So I can’t say I’m intimate with the functions of the Redundant System.

That being said, I’ve heard enough from the community to not be eager to try this system.

But it does have one advantage.  Three servers share all your licenses.  However, you can lose one server, and all your licenses remain available.

It sounds pretty tempting right?  So what would be the downside?

The downside is you require three servers, but you can only afford to lose one server.  If you lose two, the entire system goes down, and all licenses are lost.

So why have three?

The third server maintains a quorum.  That is, it makes sure the other two agree. It actually doesn’t directly help you access more licenses.

I’ve also heard (but not personally verified), that one of your servers designates itself primary.  The second becomes the secondary, and the last becomes the quorum. 

Should the server designated primary fail, you have to stop and restart the remaining servers to designate a new primary, or the system still goes down. 

The servers also have to be on the same subnet, and I’ve even heard they have to be in close physical proximity. 

Taking all that into consideration, not to mention that most servers are pretty dependable these days, it seems like a lot of work for not much gain. 

So in my humble opinion, if I need fault tolerance, I’ll take distributed. 

But as I said before, I’ve not personally used this system, so if someone out there has used it, and likes it?  Throw a comment; I’d love to hear about your experiences! 

Also, for additional information, check these documents from the Autodesk Website.

Wednesday, March 02, 2011

FlexNET Publisher - A License to Network (Part 6) - Setting up an Options File

I always say don't make plans, make options.
Jennifer Aniston

After getting ahead of an installation this weekend, here's the promised blog on options files.

This is a continuation from Part 5 last week.

First, the necessary definition.  What is an options file? 

In short, an options file is a text file that allows FlexNET (and by extension the CAD Manager), to control access to the licenses under control.  For example, the administrator can

  • Reserve licenses to specific users or groups
  • Set how long a license can be borrowed from the license server
  • Set how long a license can sit idle before it's returned to the pool
And yes, there are many things you can do.

Since there are so many things and variations an options file can control, we'll show this by example. 

Before we'll get started, you'll need to know the Feature Code for the product you wish to control.  In the screen capture below, I've highlighted the feature code for my Vault Professional 2011 license.


The Vault Manufacturing Feature Code


For a full list of Feature Codes for the Autodesk products.  Look to the Autodesk Technical Documents Below

Now that we know the feature we're going to control, let's decide what we want to do.  Let's say we want to do the following

  • Ensure a license can't sit idle for more than 60 minutes
  • Reserve a license for the user "jonathan.landeros" (That's me!)
With that decided, lets go ahead and start a brand new, empty Notepad file and type in the following code

#LIcense can only sit idle for 1 hour (3600 seconds) before being returned to the license pool
TIMEOUTALL 3600

#Reserve 1 license for Vault Professional
RESERVE 1 85588VLTM_2011_0F USER jonathan.landeros

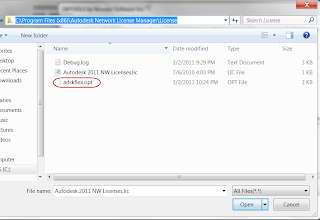
Once you have the license options typed in, save the file under the name ADSKFLEX.OPT and save it in the same directory as you have your license file.

The options file in it's natural environment.

But we have one more really important step.  Make sure to open up LMTOOLS, and on the START/STOP/REREAD tab, click the REREAD LICENSE FILE button.

Hit the reread license file

Now the license file is read in, now switch to the Config Services tab, and click the VIEW LOG button.  Click the close license when done

Log file with license codes
 So those are the basic steps.  But where did I learn the proper codes to type in?  Autodesk has a great technical document on Options Files HERE.  It's absolutely worth it.  It shows you all the different commands you can use.

You can also check the licensing guide, located in the documentation section of your Autodesk Product Install. 

Check the "Read the Documentation" section of your installation

So now we're done.  For now at least.  Next, we'll talk about the different server configurations.

Sunday, February 20, 2011

FlexNET Publisher - A License to Network (Part 5) - Deploying the Deployment


Welcome to Part 5 of FlexNET Publishing.  In the  my last blog post, Part 4, we created a network deployment.  Now, we'll pull it to a client system.

The first step is to go to your client machine, and browse to the location where the network is stored.  


The location of my deployment


Browse down into the folders, and we'll find a shortcut with the same name we used when we created the deployment back in Part 4.


Double Click to start running the deployment.  Since we set this deployment to be non-silent, we'll see the same screens we saw in when we created the deployment, with the same settings we used when we created the deployment. 

We can accept these as defaults (which is the most common), or we can override them to different Serial Numbers, installation locations, etc. 


A sample of the screens you can change during the deployment.
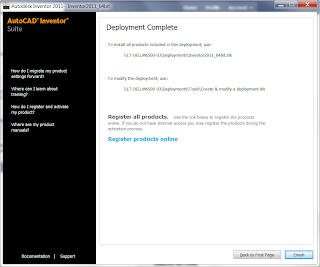
Once you confirm your options, the deployment will run, and the installation will complete.  You'll see a screen similar to this one. 

Install complete!


That's it.  The install is finished, and you can start Inventor (or whatever product you're using).  


So before I close things out, I'll leave you with a couple of tips.


1) It pays to double check the settings the first couple of times you pull your deployments.   You never know when you might find that last little setting that needs to be changed.


2) Pull to one or two clients, then run the products to make sure they're working correctly.  It can be tempting to 'set it and forget it', and pull several deployments without spot checking.  But there's no worse feeling then finding out that something is wrong after you've pulled ten clients, then realizing you're going to have to uninstall them and do it all over.


3) If you realize you've made a mistake on your deployment, all is not lost.  You can go into the "Tools" location of deployment and choose the "Create & Modify a Deployment" option.  You can then go through and change your settings.  


Modifying your deployment


So there you go!  License installed, deployments built, and deployed!  


But we've really only scratched the surface of network licensing.  There is much more that can be done.  In our next blog, we'll talk about options files, and how you can use them to manage the use of your license files! 

Sunday, February 13, 2011

FlexNET Publisher - A License to Network (Part 4) - Building the Deployment

“This is what people need: an easy-to-deploy, easy-to-use tool.”
Nat Friedman

Welcome to Part 4 of my network licensing series, building an Autodesk Network Deployment.  This is continued off of Part 3, last week.

So what is a network deployment? 

A network deployment is the installation copied to a shared location where it can be pulled to your clients from one location.  A network deployment can be a real timesaver when installing to several machines. 

So how do we create this network deployment I speak of?

In order to create a deployment, we'll need to create a shared folder on a the machine that's going to host the deployment. 

 Before we get started, create a folder on the machine hosting the deployment.  In my example, I've named it Deployment.  If you're not sure how to share a folder, here's a link with the steps to share a folder HERE.

   
My deployment folder created

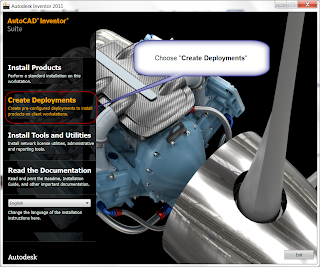
1) Now pop in the disk for the Autodesk product you want to create your deployment for.  In this case, I'm using Autodesk Inventor, but the steps are similar for most Autodesk products.  Run the setup to begin the installation process.    Choose Create Deployments when the first screen comes up.

Choose "Create Deployments"
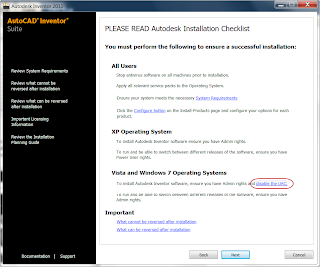
2) The next screen is the Installation Checklist.  It's worth glancing through.  In particular, make sure that you turn off the User Account Control (UAC) if you're using Windows Vista or Windows 7.  If you're not sure how, there's  a KETIV Tech Tip for that HERE.

The Installation Checklist

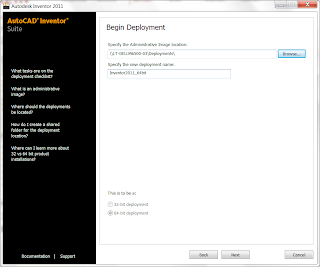
3) Now, we have the opportunity to select the location of our deployment, and the name of the deployment.  You can browse to the location, or you can type the location in if you know it.  Note that  the deployment path is using the UNC naming convention.

You'll also have an opportunity to create a deployment for a 32 bit client, or a 64 bit client.  Choose the one you want.  If you're working in an environment with both 32 and 64 bit clients, you'll have to create two deployments.

The Deployment Name and Location
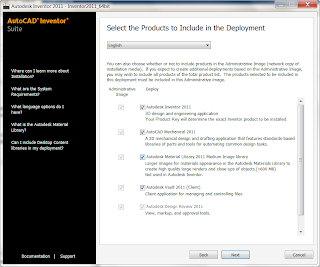
4) Now, we'll choose what to install. This will vary depending on what product you're creating an deployment for.  In this example, we'll install Autodesk Inventor, AutoCAD Mechanical, and the Autodesk Vault Client.  Autodesk Design Review must be installed with the Autodesk Vault Client, so it 'checks itself' and greys out.

Choose what to install
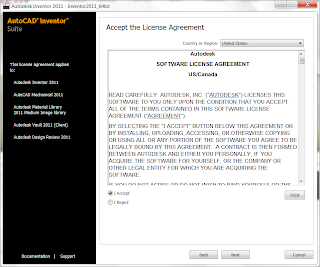
5) Next, we'll see the End User License Agreement (EULA).  Accept it, and we'll move on to the next step.

The EULA, accept it and carry on.
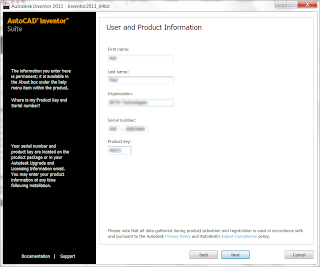
6) Now, we get to enter the user information and serial number.  Enter your info, and carry on.

The Product Info (I have to blur out my info!)

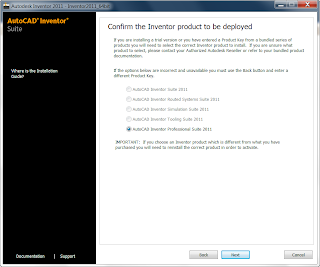
7) Now a confirmation of which product we're deploying.  Double check to make sure the selections are right before moving forward!

Double check the product is the one you want
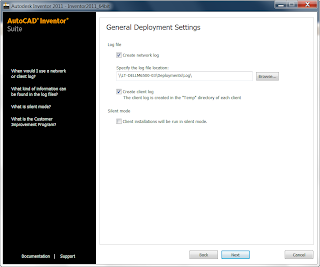
8) Now we can select if we want to create log files, and were we want to create them.  We also get to choose whether or not we'll run our deployment silently when we run it. 

A silent deployment means there will be no dialog boxes, just progress bars.  The deployment will run with the settings created during the deployment. 

A non-silent deployment will still use the settings created in the deployment, but gives us the opportunity to change the settings if we want. 

Personally I prefer non-silent deployments.  I like having the ability to change the settings, and error messages tend to be more verbose in a non-silent deployment.  But the choice is yours!

The deployment settings
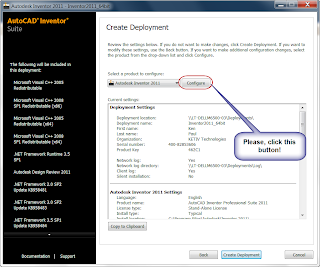
9) Next comes the point where I see many make a HUGE mistake.  When you see this screen, click the configure button!  Trust me you won't regret it.

Check configure!

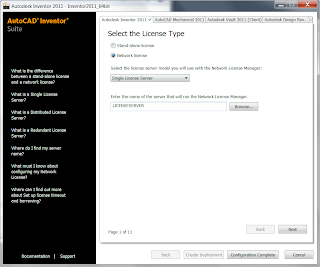
10) The first screen to come up will let you choose whether we're creating a deployment for a standalone (Node locked) or Network license.  In our case, we're creating a network license.  

The default is standalone, so make sure you check this for all products in this deployment.  If you install with the wrong license type, you'll have to modify the deployment, and then uninstall and reinstall any installations with the wrong license type!  
Trust me.  You don't want to be several deployments deep when you find out you've made a mistake!
This screen  also gives you the option to choose whether or not your installing a single license server, distributed license server, or redundant license servers.  Right now, I'll just choose single.  I'll describe distributed and redundant licensing schemes in future posts.
License Type, and Server Name
11) Click next to change other options for your installation.  These will be things like installation directory, default standards, as well as options and preferences.  These will vary for different products, and there's a lot of them, so I won't go into all of them here.  But I will make a recommendation.  

Double check all your settings.  The deployment is the template for all your installations.  It's worth making sure you have all the settings you want.  


A sample of one of the settings screen


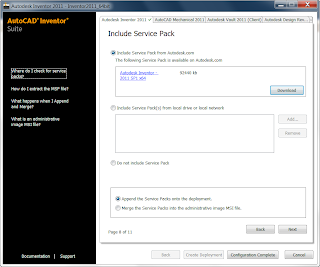
12)  You'll also have the chance to include service packs in your deployments, so when you install to your clients, any service packs can be installed with the deployment.  

Personally, I like to include the service pack in the deployment. 

Adding a service pack to the deployment
13) Click on complete deployment, and we'll return to the screen from step 9.  Now we can view our deployment settings one more time, and click "Create Deployment".   At long last, the deployment begins building itself. 

This can take a while.  Monitor the deployments switching disks when the deployment asks you to.

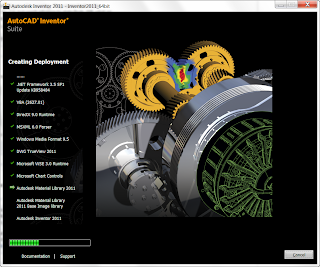
Deployment in progress

14) The deployment will finish after a while, and then you'll be ready to pull the deployment to your clients.  But that's a subject for next week!  

That's it, we're done.... for now!


Sunday, February 06, 2011

FlexNET Publisher - A License to Network (Part 3) - Setting Up the License

“There is only one satisfying way to boot a computer.”
 J. H. Goldfuss

Welcome to Part 3 of my network licensing series, continued from Part 2, last week. 

So we've got the license from Autodesk, now we need to set it up.  The steps aren't that difficult, once you know them.

We'll need to set up the network license manager on the server, configure the license, and finally get the service started.

So let's get the license server.  You'll find it on any network enabled Autodesk product, in my case, I'm using Autodesk Inventor.  The other network enabled products will be similar.

First, start your installer setup.  Choose Install Tools and Utilities.

Choose "Install Tools & Utilities

Select Autodesk Network License Manager.  The other utilities are optional, and not required to setup a license.

Choose Autodesk Network License Manager
Continue to click through the screens.  You'll have to accept the End User License Agreement (Eula), and have the option to change the install directory, but that's really all there is to the actual installation of the License manager.


Now we've got the license manager installed, now we need to configure it.  I like to place my license file in the install directory in the installation directory, in a sub directory called "License", but the license can be placed anywhere.  While we're in here, I'm going to use Notepad to create a file named debug.log.  We'll need this file later.

The location of the license files

Now, start the license manager.   You can find it from Start>Programs>Autodesk Network License Manager, or by clicking LMTOOLS.EXE from the installation directory.

We'll start with the Service/License File tab, and make sure it's set to "Configuration Using Services".

Configure using Services
With that confirmed, we'll jump all the way to the Config Services tab.

The Config Services tab.  Where the magic happens.
We'll perform the following steps:
  1. Name the Service by typing a name over FlexLM Service 1.  This isn't necessary, but it's probably a good practice to.
  2. Browse to the LMGRD.EXE file (this is the service that waits for the license request)
  3. Browse to your license file (in the directory you've placed it in).
  4. Browse to the debug.log file (also in the directory you've placed it in)
  5. Check the Use Services, and Start Service at Power Up check boxes.
  6. Save the Service when it's all done.
The service configuration completed
You might think we're done, but there is still one more step we have to do, and it's an important one!

Go to the Start/Stop/Reread tab and hit Start Server.  It should say, "Server Start Successful".  Just like the name implies, this starts the service.

It's Ahhlive!
 Things should be running fine at this point, but it's a good idea to verify everything.

I usually double check on the Server Status tab (hit 'Perform Status Enquiry").  Scrolling through the screen should show you the service is started, as well as the number of licenses available, and how many are in use, if any.

Server up!  2 Licenses of Vault Professional available in this case.
Next, I jump to the Config Service tab, and hit the 'View Log' Button, and check the log file.  It should indicate the service is started, and that license are running.  If users started the appropriate programs, they may already be grabbing licenses!

The key lines will look similar to this:

15:02:07 (lmgrd) License file(s): C:\Program Files (x86)\Autodesk Network License Manager\License\Autodesk 2011 NW Licenses.lic

15:02:07 (lmgrd) lmgrd tcp-port 27000
15:02:07 (lmgrd) Starting vendor daemons ...
15:02:07 (lmgrd) Starting vendor daemon at port 2080
15:02:07 (lmgrd) Using vendor daemon port 2080 specified in license file
15:02:07 (lmgrd) Started adskflex (pid 2460)
15:02:07 (adskflex) Unable to initialize access to trusted storage: 1
15:02:07 (adskflex) FLEXnet Licensing version v11.7.0.1 build 79971 x64_n6
15:02:07 (adskflex) Server started on LT-DELLM6500-03 for:    85588VLTM_2011_0F
15:02:07 (adskflex) EXTERNAL FILTERS are OFF
15:02:07 (lmgrd) adskflex using TCP-port 2080


Checking the log
Click the Close Log button, and close LMTOOLS down.  The service is up and running, and we're ready to talk about creating deployments next week!

Sunday, January 30, 2011

FlexNET Publisher - A License to Network (Part 2) - Getting the License

“Here in Hollywood you can actually get a marriage license printed on an Etch-A-Sketch.”
Dennis Miller

This weekend, I've decided  to continue last week's post, FlexNET Publisher - A License to Network.  For the purpose of this blog post, I'm going to use the steps for a single server.  There are also distributed and redundant servers, but I'll talk about those in a future blog.

So last week, I talked about how what FlexNET is, next, how do I get a license? 

Before you do anything, you'll need to know these things.   Autodesk will want that information before they give you the license.
  1. Serial Numbers for your network enabled Autodesk products
  2. The Hostname for the machine that will host your license
  3. The Ethernet/MAC/Physical Address for your machine, which is the 12 digit number assigned to your network card.  It has the format XX-XX-XX-XX-XX-XX
  4. Your company information
First thing to do, is take your license server, and obtain the ethernet address and hostname

There's several ways to do it, but I usually get it by going to a command prompt, and typing "ipconfig /all"  (without quotes).

Typing "ipconfig /all" in the command prompt
You can find that info in the screen that results.  You'll usually see more than one ethernet address. Any one assigned to a physical card will do.  I do however, usually avoid any wireless cards, because wireless cards are sometimes disabled, and I've seen this disable any licenses assigned to it.

Finding your information
Now, I'll need to obtain my license from Autodesk. There's a couple of ways to do this, one is to go via the web at the following link on the Autodesk website.  You can also call 1-800-551-1490, and follow the prompts to have your license issued.

The other option is to contact your reseller, such as KETIV.  They can help answer questions, and facilitate obtaining your network license.

Once you've obtained your license you can set up your network license.  I'll create a post on that next week.  Erin Gavlick has created a fantastic tech tip too!  You can find that on the KETIV website.

So I'll see you next week for the next step!