Find us on Google+ Inventor Tales: Autodesk Data Management Topics
Showing posts with label Autodesk Data Management Topics. Show all posts

Monday, January 01, 2018

Using the Fusion 360 Data Panel to Search for Components

Sometimes a part number etches itself in my memory so well, it seems like I'll never forget it.  I know that an MS20470AD4-4 rivet is a universal rivet with a .125 inch diameter head, and is .250 inches long. 

Other times, I couldn't remember a part number to save my life.  It really depends on how often I work with a given component. 

This is the first Fusion 360 component I've created in a long time! 
The parts I create in Fusion 360 tend to fall into the latter category.  I find I'm creating parts when I have time between work and my school studies. 

That means I need to find an effective way to find parts when it comes time to look for them again. 

The thing I found that helps is to include a short description with the part number in the component name. 

Typing the part number, and description in the name.
It helps when searching for files when the part number escapes me, which it often does.  Fortunately, Fusion 360 provides a means to search a project using it's name.  It's accessed by clicking on the magnifying glass shown in the image below .

Choose the magnifying glass to begin a search.

Next, the scope of the search can be controlled by clicking on the pulldown menu.  All your Fusion 360 can be searched, or just a given project, just choose it!

Choosing the scope of data to search.
Once the scope of the search is selected, type in the data to be searched for, it can be any part of the description.  It doesn't have to be complete.  Just a portion of the data will do!

A list of data meeting the search criteria will be shown. This includes the component I created at the beginning of this blog.

A successful search.
Now double  clicking will open the component.  Or if you prefer, right clicking will show multiple functions for the component.  The same options if you had navigated to the file manually!

The right click options are highlighted in yellow.
So give this a try when you need to find a component quickly.  I know it's helped me find components after I've been away from Fusion 360 for a while!
 
And last of all, I'd suggest adding the part number, assuming you have one, the other thing I suggest is keeping the file description as simple and effective as possible.  I like to use a description similar to what I would put in a drawing title block.

Good luck in your design and data managing challenges!

Thursday, August 31, 2017

I've Got Great Designs in Fusion 360! But How Do I Find Them?

A valve housing I built, I'd hate to lose this! 
Lately, I've been posting about building models in Fusion 360, especially with the addition of sheet metal tools.  (Yay!)

But the most stunning Fusion 360 file in the history of stunning Fusion 360 files does no good if you're not able to locate it in the sea of slightly less stunning Fusion 360 files.

As I've started accumulating models, I found myself thinking; "How to I find a given file as I create more designs?" or, "What happens, if I misplace one?!?"

I haven't yet misplaced a file yet.  But it will happen some day, and I'll have to make sure I can find it again when I do.

Thus, I was led to the Data Management side of Fusion 360, to try a little simple searching.

The first thing I had to do was log into my A360 hub here.  That opens up the A360 hub, where I was greeted with a list of the projects I've created over my time using Fusion 360.

From there, it was a fairly simple matter of locating the search icon, typing in a file name, and letting the search tools do their job.

In my case, I picked a valve housing I had worked on.

Searching for the housing


When the file opened in my dashboard, I could see a thumbnail, what other designs this housing used, and where this file was used.  In my case, I'm not yet using this design elsewhere.  I can also access drawings created from this part.


Now there's quite a bit that can be done from this screen, so I'm not going to go into it all in this post. I'd be typing forever!

But I will point out two icons that are well worth looking at.

The first, is the View icon, which will open up the file in a viewer, the other is the Edit icon, which will open the file in Fusion 360 desktop, and the browser if available.


Just these functions alone helped as I was exploring alone, and there are more functions in the viewer. But like I said, I'm going to save those for later!  It's getting late, and I have to sleep sometime.


But remember to take advantage of the hub if you're using Fusion 360!

I think it'll help you out!


Sunday, March 05, 2017

The Amazon Web Service Outage of 2017

Earlier this week, Amazon Web Services suffered a service disruption.  For me personally, that meant disruption in Autodesk Fusion 360 (which I thankfully wasn't using at the time), and Fusion Lifecycle, which I was.  Fortunately, while Fusion Lifecycle was disrupted, it wasn't offline.

So, what happened?!?!

Several sites were affected.  My girlfriend sent me an instant message to let me know their CRM (Contact Resource Management) was down.  According to NPR, Gizmodo and Apple iCloud were affected.

The amazing, and perhaps disconcerting part of this is how easily the service was disrupted.  It seems that a technician was troubleshooting, and took off more servers than intended with a typographical error.

That's right, a typo, fat fingers as us techies call them, were the cause of the disruption.

Added to that, there didn't seem to enough redundancy, or possibly any, to absorb the lost servers while they were brought back online.

Now I'm no expert on Internet architecture. I imagine I know more than some, less than others.  I'm not going to prognosticate on what Amazon could have, and should have done, or should be doing.

There are plenty of people smarter than I who can do that better than I can.

But what I will say, is what I learned, relearned, and what I can do in the future.

What I learned and (relearned)

  • The cloud is a great tool, it's saved my class grades when I didn't print it out by mistake.  But the technology is new, and new technology is often developing systems, and developing systems can be prone to failure.  
  • As a whole, the cloud is pretty robust, but when it fails, it can fail spectacularly.  Many can be affected, and word can get out quick!
What can I do in the future


  • I can't make Autodesk, Amazon, or anyone else change their system, at least not directly.  But I've heard rumors that improved offline capabilities are on their way.  I hope they're true, and that after this outage, the efforts have been increased.  I'll be keeping my eyes out for that development! 
  • To this end, I'll be doing a better job of backing things up locally.  That's right, in a 180 degree turn, I'll be working in the cloud and backing up locally.  Just in case. 
I won't be abandoning the cloud, what I will be doing is approaching it more cautiously, and more diligently.  

In many ways, the cloud is a new frontier filled with pioneers, and pioneers must face the hazards of a new frontier to pave the way for others.  

For my part, I'll choose to stay on that frontier, but I will make sure I'm planning ahead! 

On into the brave new world!

photo credit: NPS Park Cultural Landscapes Program Chilkoot Trail via photopin (license)

Friday, January 06, 2017

Autodesk A360 and Your Own Private Wiki

One thing I've learned from my aircraft maintenance classes, as well as from my various aviation mentors, is that the information surrounding a design can be every bit as critical as the design itself.

For example, aircraft have extensive logbooks recording all maintenance and inspections that have been performed on the aircraft.  At any time, your friends from the Federal Aviation Administration (FAA), can drop in and say.

"We're from the FAA, we're here to help.  May we see your aircraft maintenance logbook?"

A typical aircraft maintenance logbook.  This is not to be lost! 

Needless to say, if you don't have an accurate and updated logbook, you may feel a few beads of sweat on your forehead.

The point of my little anecdote is that when working with an aircraft, product, or design, the information that drove your design in a given direction can be every bit as important as the design itself.

That information may come in the form of spec sheets, vendor quotes, or meeting notes.

What would you do if you were asked, "What information drove you to make the decision you did?

In my experience, these documents are often misplaced or even worse, lost forever.  Meeting notes get thrown out, spec sheets get dropped in "a network drive somewhere", and vendor quotes are left in "an email from a few months ago".  

As I've taken a deeper dive into Fusion 360 and Autodesk A360, I've found that A360 provides a nice tool that can help with that very thing.

A360 has a "Wiki" folder that let's you create documents letting you keep the information you need with your project.

The "Wiki" folder hidden in A360.

It's a special folder where you can add information and add links to whatever information you deem important to your project.

Here you can create multiple documents, share them with other members of your team, and allow them to comment, and update the documents.

A sample of my A3t60 Wiki.  I only have one page started


In my initial test, I created a Wiki page with links to important documents that I might need.  These references are documents from the FAA, links to important technical documents, and helpful instructional videos.

The Wiki page I created for my Fusion 360 project.

Now is that all you can do?  Hardly!  Personally, I've only just waded into the shallow end of the pool.

But it's something I intend to make further use of, and if you're using Fusion 360, I think that it's worth taking a look at what this Wiki folder in A360 can do for you.

After all, if you don't record it, it's like it never happened in the first place.

So what do you think you could use this Wiki page for?

Share your thoughts!  In the spirit of collaboration, let's all learn together!


Sunday, October 25, 2015

Using the Refresh tool from Autodesk Vault

There's no better experience than real experience.  Especially when it comes to the nuances of things.

Some things you can learn by reading, others, like riveting, you must get out there and do!
One of the tools I've been using quite a bit in the last month is Refresh from Vault, particularly when I'm renaming or moving a file.

And I've found I do this a lot.  File names, which go part and parcel with our part numbers are always being tweaked in Vault.

With regard to moving files?  I have found that sometimes, I get in a hurry and hit that save button before I realize where I've saved to!

Fortunately, Vault's rename feature makes renaming files easy.  And it's just as easy to drag files from one folder to another in Vault  But there's always one rub.

I have the assembly containing the files open in Inventor at the same time.

Now I could always close Inventor, rename the assembly, and reopen the file, but that takes those few, precious, minutes I don't always have.

I could always wait to do it at the end of the day, just before I leave, but who am I kidding!  I'll never remember at the end of the day!

These don't often work for me...

I'll just keep repeating the remember/forget/repeat process in an engineering version of Groundhog Day!

But here's how you can use Refresh from Vault to quickly update files after a rename or move.

After files have been changed in Vault via Move or Rename, switch to your Vault browser in Inventor.  You may need to refresh the browser to make sure it's up to date.

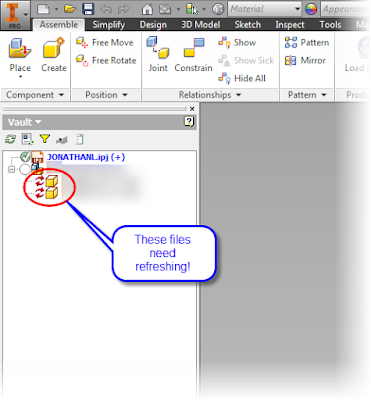
You'll see a red symbol next to the files that need to be updated.

Files that need refreshing after a move or rename operation
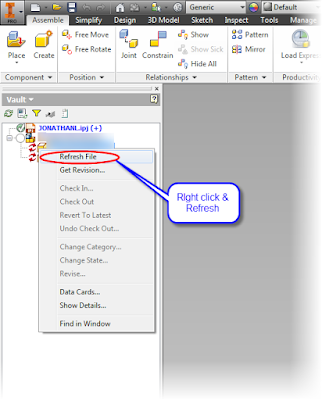
All that's required is to right click on the file you need to update and choose, you may have guessed it, Refresh!

Right click to rename the files

Once that happens, the files will update!  If you've moved files, the locations will be updated, checking the files into the correct location in Vault, and the renamed files will be updated.

Files have been refreshed! 

It's a nice trick that saves a few minutes, makes my day a little smoother, but most of all, makes sure I do something that needs to be done, when it needs to be done, and makes sure it doesn't get "saved for a later that never comes".

Photo Credits:

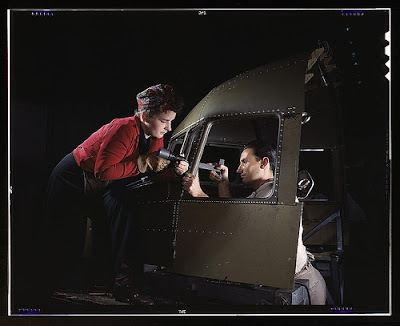
photo credit: Riveting team working on the cockpit shell of a B-25 [i.e. C-47] bomber at the plant of North American Aviation, Inc., Inglewood [i.e. Douglas Aircraft Company, Long Beach], Calif.   (LOC) via photopin (license)

photo credit: Russell Building: Interior Design Studio via photopin (license)

Friday, August 21, 2015

Defragging Autodesk Vault Using a Script

It's been a little while since I've been able to dig into Autodesk Vault, but just this week, I had to locate a script to defragment the Vault database. 

The reason for a defragment is to make sure Vault performance doesn't degrade when making database queries.  For those of us not intimate with SQL, those are Vault Searches.

A manual defrag can be kicked off from the ADMS Console on your server at any time.  All you have to do is right click on the database you want to defrag, and choose "Defragment Database".
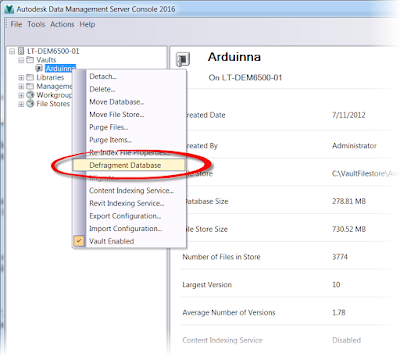
A manual defrag from the ADMS Console


But the next warning will give you an indication that this isn't a small feat.
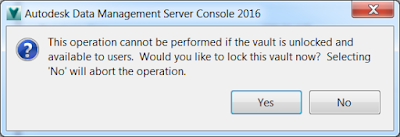

You should read and heed this message! 
The database will lock during a defragment, and the users won't be able to use it.  As a rule, this is undesirable during working hours.

What would be better, is if we could run it during off hours when nobody is accessing the server.

A script can be used to make sure you, as a CAD Manager, don't have to log in during the dead of night to execute the command yourself.  The script is just a text string that runs the same function as the command shown above.

An example of the script in Notepad.  Click to enlarge this image.

This can be set to run as a Window Scheduled Task.  You can let the server run this at a time of your choosing.

First of all, the text for the script is listed below.  You can type this in Notepad.  Also, it's all one line of text.  Don't let the wrapping below fool you.

"C:\Program Files\Autodesk\ADMS Professional 2016\ADMS Console\Connectivity.ADMSConsole.exe" -Odefragmentvault -NVault -VUAdministrator -VP -S

There's a lot of geeky sort of words and phrases in this script.  So let's break it down a little bit.

C:\Program Files\Autodesk\ADMS Professional 2016\ADMS Console


This line just opens up the directory where the executable file to run thee script is located.  Note that it's version specific if you use the default location.

To make sure I've got it right, I copy and paste the location into Windows Explorer.  If it opens up the folder location with the file, Connectivity.ADMSConsole.exe in it, congratulations, it's right.

Go get yourself a cookie!

Speaking of Connectivity.ADMSConsole.exe. 

This one is pretty simple, it's the executable file that starts Vault commands.  In effect, it's starting the ADMS Console without the interface.

-Odefragmentvault

This is the switch that tells Vault that a defragment is being done.  Different switches can get Vault to do different functions, such as backup.

-N

This is important! The -N is a switch tells Vault which Vault database is going to be defragmented.  For example -NOlympus would defragment the Vault database named "Olympus".

-VU

Often the user "Administrator", the -VU switch tells Vault which user the Vault is using to run the defragmentation.  The user running the script isn't important, but they must be a Vault user with administrative permissions.

-VP

This is the password for the user identified by the -VU switch.  In my sample, it's blank because my administrator doesn't have a password.

Yes I know, this is a terrible practice.  Do as I recommend, not as I do!  (cheeky grin).

-S

This runs the script silently.  That means that it won't show you any dialog boxes and wait for you to hit "OK".  It's just going to chug along.

Now that all that is been explained, you can save this script with a *.bat extension.

Now, set it up as a Windows Scheduled Task, and you should be off and running!

It's hard to give a solid schedule to run a defrag on, but I usually run my tasks about every six months or so, but that's just what works for me.  You'll have to keep an eye on your Vault and see how it performs.  You may be able to go longer or shorter depending on your personal experience.

If you want, you can always check the ADMS Console, if it says "Defragmention Recommended", it's probably a good idea to run that defrag!
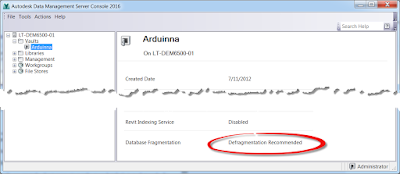
Time to do a little maintenance! 
One more tip, but this is a big one.  Always! Always! Always! Make sure you close the ADMS Console interface when you log off your machine!  

Vault will only allow one instance of the ADMS Console to run at a time!  If you forget this step, the script won't be able start.  That means that no backups, defrags, or anything else that runs off Connectivity.ADMSConsole.exe will work!
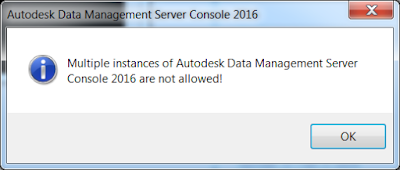
You don't want to see this message
The last thing you want to see is this message when you need a backup, and one hasn't been running for six months because you forgot to close the ADMS Console!

In conclusion, good use of batch scripts can be a boon to making sure your Vault runs efficiently.  It can eliminate the need to constantly log into run maintenance processes.  Instead, you can let them run on a schedule, and just monitor to make sure the finely tuned system is still finely tuned.

The defragmenting script is one, the backup script is another.  But there is a lot more that can be done.

For a full reference, check out this link from Autodesk here!


Monday, July 13, 2015

Remove Unwanted AutoCAD Links when importing into Autodesk Vault

One of the biggest challenges when trying to get data loaded into Autodesk Vault are dealing with missing links.

They can't be loaded into Vault while broken, and resolving them can be difficult when the associated files may have been long lost to antiquity. 

One thing I see a lot of, is the notorious "lost logo image".  These are images linked into a drawing, many times these are nothing more than image files representing the logo for a company. 

I've seen many, many times! 

They were linked into these drawings at some point, but during some part of their lives, the original image files were lost.  The links were never repaired, because it wasn't a big issue before Vault came along.

In my example, I've created several AutoCAD files representing that exact condition.  Company logos that have been lost.  

If you try to push them through Autoloader stands in the path and like Gandalf the Gray shouts "You shall not pass!".  

Broken links  We never want to see these in Autoloader, but often do. 
You can't push them in through Autoloader, so now you're now stuck.  Fixing the files manually can be a daunting task.  So what options are there? 

I have one trick I can offer, and while far from an all encompassing solution, it can ease the pain a bit if you have a lot of AutoCAD files that have the "linked logo" problem. 

First, it's very important that the files meet the following criteria. 

The only link that exists in the file, is the link you want removed.  

That's it, the biggest consideration. But it's a doozy.  The method I'm about to show you will break every single link your file has.  That includes external references in AutoCAD as well as Inventor parts, assemblies, drawings, and presentations.

So make sure the links in the files are links you want broken! 

I'm going to show you how to do something Vault tries very hard to talk you out of.  But if you're crazy enough to try it, it's crazy enough to work. 

So here it goes. 

Log in as the Vault Administrator. Go to the Tools>Administration>Vault Settings, and on the Files tab, uncheck "Disable Check In of Design Files".  

Time t work without a net! 

You've just turned off the safety switch!  This allows you to drag and drop files into Vault.  

But now, take the files with the unwanted links, and drag them into a Vault folder. 

Dragging the files into Vault
The standard Vault Check In dialog box appears.  Enter a comment, and adjust any settings you want, and hit OK. 

The standard check in dialog box.


A warning appears advising you that any depending relationships, meaning file links, will be lost.  But the only links here, are one's we need to get rid of.   

Now the warning that links will be lost.  This time, this is what we're after. 

So shave your head, put on your best accent, and say, "Engage". 

The files will checked in.  In the meantime, Vault will be stripping away the links to the unwanted images. 

The files are getting checked in. 
Once the files are checked in, the "Used" functionality can be used to show that the links are all gone. 

Now, before you do anything else, turn the Disable Check In of Design Files back on! You don't want just anyone trying this, that is unless you want herd of files with broken links roaming free in your Vault! 


In this case, this functionality becomes a filter that cleans out the unwanted links, and while it may not be something that can be used when links you want to keep do exist, it can still help get important files into Vault.  

So keep this in mind when you need to add some files into Vault.  The next time there are a bunch of files with "lost logos", you can be the CAD guy who says "I know a trick..." 


Sunday, June 14, 2015

Updating Custom Content to Autodesk Inventor 2016 from a Previous Version

If you've created your own content in Inventors content center, you'll have to update it when you move to your next version of Inventor.  Fortunately, this isn't really that difficult, but it's good to know the steps.

So in the interest of sharing, here are the steps that I used to update my own content center from Inventor 2015 to Inventor 2016.

In my setup, I'm using Desktop Content Libraries, which means they're not stored in Vault   These libraries are databases stored on my local drive.  These steps are particular to that setup. 

Also, I've already copied the files to their new locations.  So really all that's left to do is update the libraries.  This will make sure they're ready to be used by Inventor 2016.

Without further delay here's how I did it.  I hope this can help you too! 

Before anything, there's that little thing about having a backup.  Custom content can mean hours of work that's been collected over the years.  Do you want to lose that?  It's worth a few minutes to make a backup.

I've never lost content during an update.  But there's no reason to tempt fate.  

The first step is to open up Inventor, and on the Get Started tab, choose Projects.  

Starting up your project
When the projects screen opens, make sure the project your working with is active, and click on the Configure Libraries icon. 


This shows the libraries available to the project.  Any libraries that require migration have an exclamation point icon next to them. 

Only one library needs migrating
To start the process, click the Update icon. 

The update button means go! 
Next, Inventor is going to ask you if you've made a backup.  If you haven't, this is your second, and last chance.  


Once you've made that backup, click next, and go to the next step.  Inventor will ask which libraries you'd like to update.  In my case, I only have one.  So that makes my job easy. 


After the update is done, You'll see a confirmation screen, Inventor will ask you if you want to create a log, if you'd like.  


After this, you're library is updated, and it's ready to start using.

No exclamation point.  It's ready to use!

Refreshing Current Content

This is great for new content that you're going to place, but what about older assemblies that have content from your previous versions?

There's a solution for that too. 

When you have an assembly that contains older content, go to the Manage tab, and look for the Refresh button on the Content Center panel. 

Refreshing content. 

A dialog box appears showing you which content is out of date.  Clicking the Refresh button will update any content in the assembly.  

Refreshing the Content


After a short update, the content will show that things have been successful.  


Congratulations, this content is updated! 

And on a couple of final thoughts, you can also update content via Inventor's Task Scheduler.  This let's you update several assemblies at once! 

Updating via Task Scheduler 

Another alternate, although I haven't used this one much personally, is to go into Application Options, and select Refresh out-of-date Standard parts on Placement.  Checking the box will refresh content as it's placed. 

Out-of-date content can be updated as it's placed.  
Use one, or use them in conjunction!  Either way, these all are here to help you make sure your content is up to date! 


Tuesday, June 02, 2015

A Guest Post! Configure Open File Behaviors - New in Autodesk Vault 2016

So much has been added in the 2016 Autodesk releases, it's hard to keep track of them all.

That's where a great team comes into play.  I'm happy to share this post by Jonathan Kriek of KETIV  This post originally appeared on the KETIV blog, Side Note.

In this post, he discusses the Open File Behavior that's been added to Autodesk Vault 2016.  I'm looking forward to checking this one out myself!

So without further delay, here you go!

Configure Open File Behaviors - New in Autodesk Vault 2016
By Jonathan Kriek


A fair amount of users most likely have more than a couple versions of AutoCAD and/or Inventor installed on their system. This may be due to testing the latest version, while production requires the previous or having other business system requirements that force them to retain an older version.

My reasons are simple - providing all inclusive support to our customers by being able to troubleshoot multiple versions simultaneously. But regardless of why the fact remains that by default until now Autodesk Vault used MS Windows settings for determining which [version of a] program to open for a given file type (except 2015R2 for subscription customers which includes some early 2016 functionality).

Autodesk Vault 2016 now gives you greater flexibility in choosing which version of your Autodesk software to open.

What Autodesk software and file types are supported?

Currently "Open File Behaviors" support the following Autodesk software and file types:


  • Autodesk Inventor
    • IPT, IAM, IPN, and IDW
  • Autodesk AutoCAD
    • DWG and DXF
  • Autodesk Revit
    • RVT, RFA, and RTE


How do I access Open File Behaviors settings?

In the Vault Client, select Tools > Options.
Next to Open file behavior settings click "Settings".


Open File Behavior configuration options

Depending on the CAD application, you can determine whether CAD files are opened by the latest version, the last run version, or the version of the CAD Application that last saved the file.


  • Last Run Version (Inventor Only):
    • This option will open the CAD file with the last used version of the CAD application.
  • Latest Version (AutoCAD and Revit Only):
    • This option will open the CAD file with the newest version of the CAD application installed.
  • Saved by Version (AutoCAD and Revit Only):
    • This option will open the CAD file with the version of the CAD application that was last used to save the file.
  • Default
    • This option uses the current settings in Vault for opening a specified CAD file.
    • Autodesk Inventor files are opened with the default application specified by Windows.
    • AutoCAD files are opened with the latest version of Autodesk AutoCAD installed.
    • Revit files are opened with the latest version of Autodesk Revit installed.

Example scenarios

These settings are pretty straightforward and not all options are available for each CAD application, but let's take a look at a few examples.

If Revit 2015 and Revit 2016 are both installed on your machine, and you want files that were saved in RVT 2015 to always open with RVT 2016, you can configure Vault to always launch Revit 2016 for all .RVT, .RFA, and .RTE files by choosing "Latest Version".

If AutoCAD 2014 and AutoCAD 2015 are both installed on your machine, and you want files that were saved in ACAD 2015 to open with ACAD 2015, and files saved in ACAD 2014 to open with ACAD 2014, you can configure Vault to always launch the "Saved by Version" of AutoCAD for all .dwg and .dxf files.


Final Thoughts

The Open File behavior finally applies some adaptability to the process of opening files and determining whether CAD files are opened by the latest version, the last run version, or the version of the CAD Application that last saved the file. I hope you found this article and the new Vault 2016 Open File functionality useful!

Jonathan Kriek