 |
| A P-51 Mustang at Chino Airport in Southern Californai |
 |
| An image of the two separate socket halves |
 |
| The Welded Socket |
 |
| A P-51 Mustang at Chino Airport in Southern Californai |
 |
| An image of the two separate socket halves |
 |
| The Welded Socket |
 |
| A restored P-39 Airacobra |
 |
| The P-39 Airacobra I'm helping restore. |
 |
| One of the finished barrels |
 |
| One of the guns temporarily placed in its the suppressor |
Recently, I had an opportunity to mix some modern technology with the restoration of an 80 year old airplane.
The project is a Bell P-39 Airacobra, which is being restored to be a non-flying display at Planes of Fame Air Museum. One of the tasks I was given was to come up with four faux .030 caliber machine gun barrels for the wing mounts.
 |
| An example of a restored P-39 Airacobra By San Diego Air and Space Museum ArchivesUploaded by Bzuk at en.wikipedia - Source, Public Domain, https://commons.wikimedia.org/w/index.php?curid=24375991 |
 |
| The P-39 I'm helping with has a little ways to go before its finished! |
All that was needed was a short length four to six inches so it looked like there was a barrel inside the flash suppressor.
Given the tools I had available to me, I opted to 3D print the barrels.
The first step was to get some measurements. Fortunately, Planes of Fame has an SNJ Texan that has a fake 30 caliber machine gun barrel I could use for measurements.

The SNJ and the barrel I could use for measurements.
With measurements sketched on a piece of paper,, I headed home andI created the model I needed in Autodesk Fusion. It wasn't a difficult model. I had it in about an hour or so.
 |
| The 3D Model in Autodesk Fusion |
The next step was to print it out. My plan was to print in black PETG, but it didn't arrive before the weekend, so I printed in gray PLA so I would have something to test fit.
 |
| The PLA Print in Progress |
Once Saturday rolled around, I had a chance to see how the test barrel fit.
I was pleasantly surprised to see it fit well! It fit perfectly in one flash suppressor, and should go into the other three with a little light sanding.
 |
| The 3D printed test part next to its "sample |
 |
| The 3D printed part placed in its tube. Its not fully seated here. |
 |
| The 3D printed barrel recessed in the tube. This will be its final position. |
The next step? Print in the PETG I intended to, perform another test fit, and make preparations for permanent attachment.
In conclusion, it was a unique experience to be able to be able to use Fusion to create a model that could be 3D printed for the restoration. I'm grateful for the opportunity.
But my part was indeed small, and I'm not the only one creating models that are turning into parts for this restoration.
To see some amazing Inventor work that has turned into real parts for this restoration, check out Aviation CAD Technotes here!
One last bit of "Legal Talk".
Any opinions expressed here are my own, and not necessarily those of Planes of Fame Air Museum.
Every once in a while, I responsibly enjoy an "adult beverage" and ponder life.
I call it "barstool philosophy".
 |
| The beverage over which much wistom is shared |
Recently, I celebrated my 51st time riding a giant rock around a "gianter" ball of fire floating in the vast expanse of space.
Only a few days after that, I found myself helping seal the fabric envelope on a 1940s vintage Taylorcraft.
.jpg) |
| The Taylorcraft with fabric over its steel tube frame |
But this time "helping" meant handing the brush to someone half my age and saying, "you're up, kid".
Somehow, when someone said, "he's the expert", and we looked around for that guy, I realized the eyes were looking at me.
It didn't seem right. There's so much I don't know, so much I haven't done yet.
I learned, or rather re-learned, teaching is a different mindset.
It's watching, guiding, stepping in, but not too much. It's saying, "if you do that, this bad thing will happen. Ask me how I know."
But we reached the finish-line in that milestone. The end product was pretty good
The kids looked at me and said , "I hope we did good. "
Little do they know, the thought going through my mind was...
"I hope I did good."
So what lessons did I learn from this anecdote? \ "old guy with experience". I'm not sure when that happened.
But happened it did. And I realized I had something to offer. While I don't know it all, the years had taught me more than I realized. Things that had become second nature by me were new, valuable lessons to those just starting out.
Somewhere, without my realizing it happened, I became a mentor.
I learned patience. I learned to look at a student and say, "You made this mistake. This is what you did wrong." And with a wry smile I'd say, with accurate self-deprecation, "Ask me how I know. I did it too.'
And finally..
This post is pretty far removed from the Computer Aided Design Posts I've done in the past. My life and career has evolved. I'm not as deep in 3D modeling tools as I once was. The versions I use are old, and I don't use them at the level I did a few years go.
But the lesson shares common ground.
For those of use who have a little more gray in our hair, and find ourselves squinting a little harder at our screens because "someone made the fonts smaller".
Look to the fresh faced kids who were born after we graduated high school.
You might have something to teach them.
Sometimes, a lesson learned from long ago comes to pass.
Recently I was working on a project that required I transfer the location of four threaded holes to a piece of aluminum so clearance holes could be drilled. The question was, how to do it?
Sure I could measure out the holes, but the threaded holes were t-nuts pressed into plywood, and the holes for the t-nuts were measured using a tape measure. So the hole placement was made to more of a carpentry accuracy than an aerospace tolerance. But I still wanted to keep the clearance holes as tight as practical.
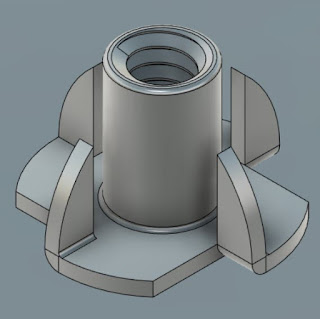 |
| A 3D model of the T-nut that was pressed into Plywood |
But I remembered watching an old tool maker when I was a young engineer fresh out of college. And if you haven't guessed by the title of this post, that was about 25 years ago.... Ouch.
He showed me a "threaded hole transfer punch". It's a small tool that stores threaded screws that look almost like set screws. However they have points in them instead of the hex that one would expect from a set screw.
I had my solution! I placed an order with McMaster Carr for the punch I needed, and I had it in my hands the next day.
They're screwed into the holes you need to transfer. You then position the workpiece that requires the holes, give it a quick strike with a hammer. And now you have marks where you need to drill.
Then it's off to the drill press to drill the holes you need.
 |
| The transfer punch tool and two of its inserts. The inserts are stored inside the tool. The tool also doubles as a wrench for the inserts. |
 |
| The transfer punch with two punches threaded into the T-nuts |
 |
| The marks left in the aluminum from the punches. I'm afraid I didn't get a chance to get a picture of the drilled holes. |
Using the tool that old die maker showed me, in the way he showed me how to use it, I had the holes I needed in no time flat. The whole process took about fifteen minutes. And that includes walking to another building where the drill press was kept!
That's a lot quicker than trying to match the holes by measuring it out.
And, in a strange case of deja vu, a young intern looked over my shoulder and asked me, "How did you mark those holes?"
So it was my turn to pass along the lesson I learned 25 years ago from an old die maker about the "threaded hole transfer punch".
Other than sharing a cool story, what's the lesson?
I would say to look for those small mentoring moments that can sometimes come from the most unexpected places. It might be from someone on the shop floor, an analyst in the corner of that dark office, or a program manager who's "been there and done that".
A lesson can be learned in a few minutes can take years to pay off. But when it does, it can be a life saver!
Wow, that lesson was twenty five years ago.... Thinking of that I'm suddenly overcome by the urge to yell at some kids to get off my lawn....
About the Author:
Jonathan Landeros is a degreed Mechanical Engineer and certified Aircraft Maintenance Techncian. He designs in Autodesk Inventor at work, and Autodesk Fusion 360 for home projects.
For fun he cycles, snowboards, and turns wrenches on aircraft.
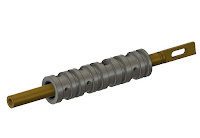 |
| Part of a Hydraulic Valve for a P-51 Mustang |
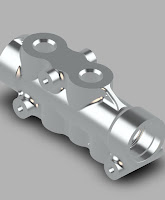 |
| A hydraulic housing in the Fusion 360 mobile viewer |
 |
| A portion of the original print used to create the model. |
But a few weeks ago, I had a fantastic opportunity to create a model that would be used to make a part for the restoration of a B-17 Flying Fortress.
The part was a "friction washer" for use in the throttle quadrant. And the team needed geometry that could be cut on a water jet.
It started with a reproduction of the original Boeing print. Having the original dimensions made the modeling easy. It was interesting to note that even though standards have changed in the nearly 80 years since that print was created, it's not too different from the prints I work with today.
 |
| The model of the friction washer, created in Fusion 360 |
Next, was to place the view on a drawing. The first goal was to dimension the drawing as a way of verifying all the dimensions were correct. Second, the drawing is what creates the 2D DXF file for the water jet.
Once the drawing is created, delete any information that isn't required for the waterjet. This includes borders, title blocks, dimensions, centerlines and centermarks, etc. You might even consider creating a second page in the drawing for this purpose.
Also, make sure to save the drawing before you export. I learned the hard way when I realized that the first file I exported still had all that extra geometry. Save the file before export!
 |
| The dxf geometry sent to the waterjet |
Once I recovered from my snag. I sent the files off to my colleague for cutting.
A few days later, we had our part and it fit perfectly, making for a very satisfying little journey.
And while this little project was well worth a victory lap, there were three minor challenges that are worth mentioning.
1) Drawing standards have changed over the decades, and while the drawing wasn't hard to interpret, some information wasn't where I'd expect it to be. Modern 3D modelers have spoiled us. We can "slap down" a new view in seconds. For the drafters of old? Adding the simplest view would take minutes. A more complicated one? Hours.
The number of views was kept to a minimum. A part of single thickness, such as this one, will likely have the thickness dimension called out in a note.
2) Not only have drawing standards changed, industry standards have changed. That material specification called out in 1943? It's been long superseded by a new standard. It's even possible that the standard that superseded the 1943 standard has, in turn, been superseded itself.
Be prepared to spend a few minutes Googling the updated standards. Thank goodness for the internet!
3) Finally, how does one interpret the tolerances called out on the drawing? Symmetric, +/-.005 for example, is easy. Model to the nominal. But what about a tolerance such as +.010/-.000? Do you "split the difference"? Do you aim for nominal?
In my case, I decided to aim for the dimension as it was called out on the print. I figured that was the target dimension, after all.
And in my case. It worked! Fusion 360 gave me an excellent dxf file that the waterjet used with no issuee, and the part fit perfectly into its intended position.
It was a wonderful opportunity to contribute to a restoration. And a wonderful learning opportunity!
Acknowledgements
Print Reproduction via my Aircorps Library Subscription
Models and drawings created in Autodesk Fusion 360
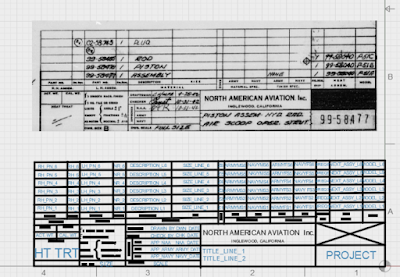 |
| The original, and Fusion 360 Title block together |
 |
| The North American Aviation tile block finished |
About the Author:
Jonathan Landeros is a degreed Mechanical Engineer and certified Aircraft Maintenance Techncian. He designs in Autodesk Inventor, Siemens NX, at work, and Autodesk Fusion 360 for home projects.
For fun he cycles, snowboards, and turns wrenches on aircraft.
Happy 2022! Here's to hoping for a prosperous loop around the sun.
One of my latest endeavors has been recreating 1940s aviation prints as 3D models in Fusion 360. The drawings are available via my Aircorps Library subscription, and they're a great look into how parts and assemblies were documented nearly 100 years ago.
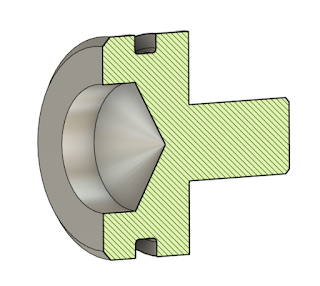 |
| A piston for an actuator on a North American P-51 Mustang. Model created in Autodesk Fusion 360 |
The models are the fun part for sure, but I also decided to recreate the drawings themselves too.
The first part of recreating the drawing, is to recreate the title block of course.
 |
| The title block image, ready for import into Fusion 360 |
It's still a work in progress, but I thought I'd spare a moment to document my progress.
It almost goes without saying, the process can be tedious. Since the original drawings are hand drawn, they have to be recreated from scratch.
The thought of trying to "eyeball" the title block wasn't very appealing, but finally an idea dawned on me that made the process much less challenging.
I imported an image of the title block, scaled it to a suitable size, and laid out the geometry on top of the image.
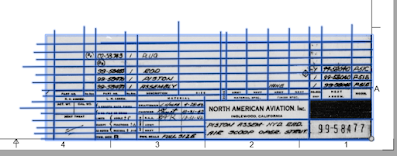 |
| The title block in Fusion 360. The lines sketched in Fusion 360 are highlighted. |
Overall, I felt pretty well. But there was one thing I did have to overcome
There's no image opacity setting like there are in other parts of Fusion 360. But I was able to see where my sketched lines were by highlighting them. I also extended the lines beyond the edges of the image. I can always trim them later.
Finally, I'd also use the good old, "Delete, Inspect, Undo" trick by deleting the image, inspecting, and undoing the delete.
Overall, its working pretty well. I've found the process is much faster, accurate, and less frustrating than trying to scale by using the title block in a separate window.
As I said earlier, it's a work in progress. I'll share my final product when I'm done. Give me time, it might be a while! This is an "evening here and there" project!
One Final Note
The team at Aircorps Library have done a spectacular job collecting, scanning, and sharing these vintage documents. Out of respect for their work, I won't be sharing any documents or models. Please, don't ask me to do so.
If you are really interested in their documentation, feel free to check out their site and investigate a subscription yourself!
About the Author:
Jonathan Landeros is a degreed Mechanical Engineer and certified Aircraft Maintenance Techncian. He designs in Autodesk Inventor, Siemens NX, at work, and Autodesk Fusion 360 for home projects.
For fun he cycles, snowboards, and turns wrenches on aircraft.
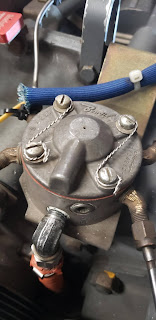 |
| Safety wire on a fuel divider on an aircraft engine |
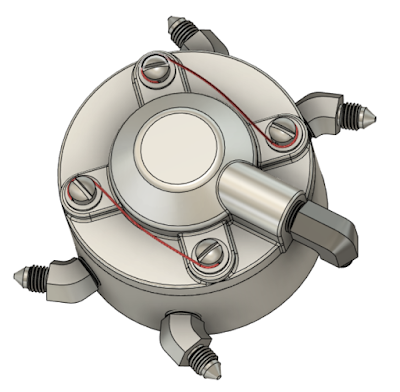 |
| Safety wire shown in the model. I've colored it in red here to make it stand out. |
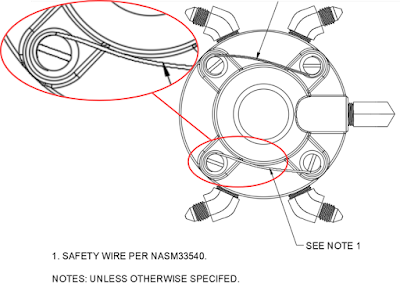 |
The modeled sweep representing the safety wire on the drawing. A leader references the standards in the notes. |
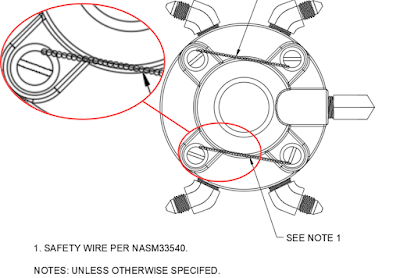 |
Sketches on the drawing calling out the safety wire Circles and lines represent the wire's twists. |
I once saw a graph that showed the cost of making a change in the CAD model vs further down in the product design cycle
 |
Spoiler alert! It gets more expensive as you move from design, to prototype, to production.
One need only to cases like the Takata airbag recall, or Boeing 737 Max grounding or the impact of the impact of a a production level design change in in money, company reputation, and tragically, in lives lost.
But I'm not here to write about such heavy topics. The example I'm choosing to document is a much lower stakes version of the same thing. It's just a basic hobbyist example that at worst, is inconvenient and marginally embarrassing.
It's an access panel based on something you'd find on an aircraft. It's a concept for a potential future hobby project. I built one back when I was in school.
So I happily modeled away in Fusion 360, creating sheet metal parts and placing fasteners from McMaster Carr.
After spending a couple of evenings of casual modeling, I was done! I took that moment we all love, I leaned back, looked at my work proudly, then prepared one last check before I took my little victory lap.
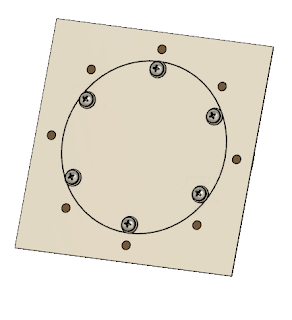 |
| The completed inspection hangar, or so I thought... |
And that's when I saw it.
The countersunk rivets I had installed were the wrong ones. I'm not sure how I missed it initially, but obviously I did.
So first, what's wrong with the rivet?
It's a rivet with a 78 degree countersink, which means the countersink extends to the second sheet of metal being riveted. This is a big no-no. When the countersink extends into the second piece of metal, the larger hole required in the first sheet of metal makes for a weaker joint.
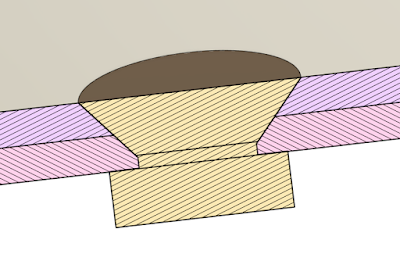 |
| The wrong rivet. I did match the countersink angle to match the rivet for clarification. |
 |
| The incorrect rivet for this application. The countersink angle is too steep |
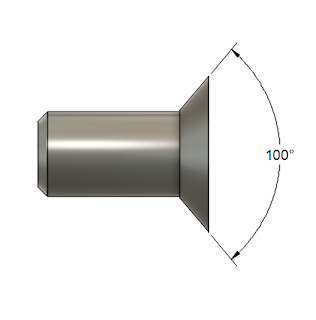
The correct rivet is a 100 degree rivet. The shallower angle prevents the head from punching into the second sheet of metal. That means a stronger, and safer joint.
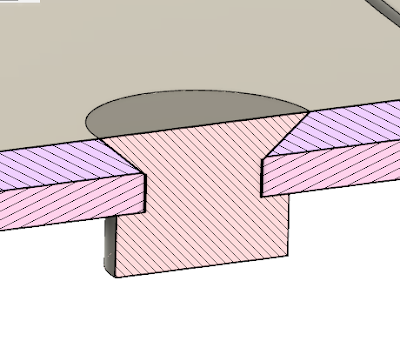 |
| The 100 degree rivet, the correct one for this application. I know in the model the rivet does appear to just clip the second sheet. But past experience has taught me that this combination does work. |
 |
| The shallower angle of the 100 degre countersink makes a stronger joint |
So that's the technical aspect of it, what's the other lesson?
I suppose the first lesson is make sure to check the hardware before you put it in. But we all make mistakes. That's where double checking comes in.
A final check can help prevent the last little "oops" from slipping through. Even though we can't eliminate them all, we can reduce them with a little time.
For those of us working in industry, a second set of eyes never hurts. In some places, multiple checks on a drawing are required. It's not a bad practice at all, one I think should be taken advantage of whenever possible.
Some may argue it takes time, but it takes much less time than undoing a costly mistake.
I've worked in maintenance shops where "second eyes" is a standard policy on items such as fuel system repairs. In other words, the person performing the work checks his work, and then a second technician or inspector checks it again. There often are even signatures required to prove that this step was performed.
But that's it for today's anecdote. I re-learned a few lessons in a safe environment where the only bruise was to my pride.
I hope you can take a few lessons from this musing, and keep making cool stuff!
About the Author:
Jonathan Landeros is a degreed Mechanical Engineer and certified Aircraft Maintenance Techncian. He designs in Autodesk Inventor, Siemens NX, at work, and Autodesk Fusion 360 for home projects.
For fun he cycles, snowboards, and turns wrenches on aircraft.
Additional Resources:
A nice rundown on different types of rivets by- Hanson Rivet and Supply
A wealth of knowledge on general airframe repairs (start at page 4-31 for the Riveting Section) -Aviation Maintenance Technician Handbook
Standard Parts Used on this Project.
.125 Diameter, 78 Degree Solid Rivet (The Wrong One) - McMaster Carr Part Number 97483A075
.125 Diameter, 100 Degree Solid Rivet (The Right One) - McMaster Carr Part Number 96685A170
10-32 Floating Nut Plate - McMaster Carr Part Number 90857A129
.094 Diameter Rivet (to Fasten Nut Plate) - McMaster Carr Part Number 96685A143
#10 Flat Washer - McMaster Carr Part Number 92141A011
10-32 Pan Head Phillips Screw - McMaster Carr Part Number 91772A826