First, I have to start with my big disclaimer.
While I've had experience with drawing standards, I don't consider myself a full blown expert. There is so much detail in standards, I can't say I'm an authority on all of them.
Also, living in the United States, I work in the ANSI/ASME standards.
My apologies to those who are living the ISO life (which is basically everyone who isn't the United States), I'm only acquainted with that standard.
So this post will be based on "freedom units", that is feet, inches, and bald eagles.
Joking aside, I hope this post is entertaining at least. Onward to the post.
My current place of employment has a lot of legacy drawings. It's not uncommon to find a scanned drawing from the 1970s in our data management system.
It's like digital archeology!
One of the things I find can be a big challenge, and very interesting, is interpreting dimensions, notes, and callouts that have fallen out of favor over the years.
Recently I was part of a discussion regarding a hole callout on one of these old drawings.
The callout stated "Drill" and called out a specific drill size. In the case of the screen capture shown below, the drill size called out is a #30 drill, which is .1285 inches in diameter. But even the diameter is called out as a reference dimension.
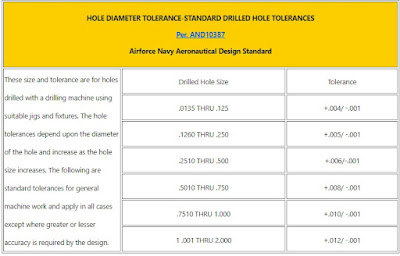
The really interesting thing about this callout is that it implies it's own tolerance, in accordance with AND10387.
The tolerances are based on the size of the drill, and a screen capture is shown here from Engineers Edge. You can even see that it has a link to AND10387
But now comes a plot twist.
According to Everyspec, AND10387 was cancelled for new design and is only used for "replacement purposes". No new standard is shown to supersede this one.
So what does that mean?
I wasn't able to find a specific standard that states specifically how to handle drilled holes now. But my experience has taught me that, if required, a tolerance will be implicitly stated next to the dimension. If no tolerance is stated with the dimension, then the block tolerance will be used.
 |
| A hole with the tolerance implicitly stated |
Since AND10387 is only valid only for replacements, there's a good chance you may never see a drawing with an implied drill tolerance. But there's always a chance an old drawing will rise from the depths. So perhaps it's a good reference to keep in the archives!
And if anyone is aware of a standard that calls out standard drill tolerances, or if you just "do it another way", feel free to leave a comment.


No comments:
Post a Comment