Pages

Wednesday, September 12, 2018

Improvising Dry Storage for 3D Printing Filament with Help From my Cat

A little less than a year ago, I found myself learning how to use the 3D printer at work.  It's a Fusion3 F400, and it's been a pretty good machine so far.  I've learned a lot from it!

Samples of a valve body I use for calibration.  From left to right, PLA, PETG, and Nylon

One of the things I've learned is that many 3D printing filaments are "hydroscopic". That is, they absorb water from the atmosphere.  After absorbing water, the part finish will deteriorate as the en-trained water boils as it leaves the print head.

That means finding a way to keep filament dry.

Some methods include:

  • Keep filament stored in it's shipping bags until just before use.  That reduces the time that filament is exposed to the atmosphere.
  • Store filament in containers with a desiccant. 
  • Use a filament dryer, if you have one, such as this one from PrintDry.
Over time, I found I had several spools of partially used filament with no place to put them, and I didn't have access to a filament dryer.  

That left me with the option of trying to find a good way to store several spools of filament in a container with desiccant.  

The answer came as I was sitting on the couch, scratching the ears of my cat, "Runtley the Runtling".  
The Runtley seems interested in his potential contribution
to the 3D printing industry.
I had an empty 35 lb cat litter container!  It's free with the purchase of 35 lbs of cat litter, it's big enough to hold 4 or five spools of filament, and airtight enough to keep cat litter dry, and that's designed to absorb liquid!
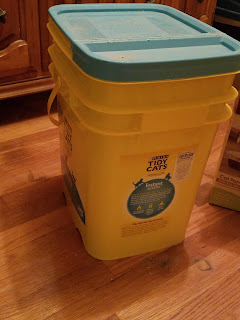
This can be a dry storage container!

So after being emptied and thoroughly rinsed to make sure there was no lingering dust, the container made its way to work.  

It now resides at my desk with a few bags of desiccant and a few spools of printer filament inside.

The container at work

Add a few desiccant packets

Mix in a few spools of filamnet

Tag it so it doesn't get thrown out by the cleaning crew! 

 Hopefully this soles my filament storage issues!

Do you have a clever way of dry storing your filament?  Leave a comment! 

And thank you Runtley the Runtling for your donation! 

In true cat form, Runtley is unimpressed.  


Wednesday, September 05, 2018

Fusion 360 Has A Title Block Editor!

A little while ago, Fusion 360 found itself with a bright, shiny, new Title Block Editor.  It's not as exciting as some of the other tools (I'm looking at you Generative Design), but it's a tool that's very necessary for many users.

When tools like Generative Design have all the flash,
how is the Title Block Editor supposed to stand out? 

So with a little spare time on my hands, I decided to spend a few moments giving the Title Block Editor a try.

My first step was to create a new template from the file menu.

Starting the Title Block Editor

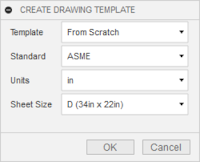
Choose the options for the title block, such as source, standard, and sheet size, and click OK.

An example of the title block options
Once the template generates itself, zoom in on the title block, select it, right click and choose "Add Title Block" to create a new title block.

Adding the new title block
This creates an editable copy of the title block.  It's time to give the title block a name, and you're ready to edit.

Givein the Title Block a Name
Editing is pretty intuitive in my opinion at least.  Sketch, insert images, and place properties as needed to Create the required title block.

The tools at the users disposal. 

For my first tests, I threw an image and a few lines.  I also changed the "CODE" section of the title block to "CAGE CODE", and added the "PROJECT NAME" attribute.

Modifying the title block
I do find myself wishing for the ability to dimension the geometry, although when all is said and done, it's a title block, so close enough is probably good enough in this case.

There's also the ability to use geometry and grid snaps, which helps create more accurate geometry.  I suppose it's the old Inventor user in me feeling the black hole like gravitational urge to fully constrain everything.

The more I practice with it, the more comfortable I found I got.  Go figure!

Now save the template like any other document, and the template will be ready to use, with the new title block.

Saving the Title Block
Now when starting a new drawing, choose "From Template", and you'll be able to start using those fancy title blocks I'm sure you'll all be creating!  Note that you may have to browse to the location where the template was saved.

Adding the Template
The drawing can be created and the new title block can be put to use.  The auto-populating properties are already populating.

The custom title block in use.
Personally, I've only scratched the surface.  I have more to test and try, and certainly more to learn.

Next, I think I'll tackle those customer properties.  Stay tuned!

Acknowledgements:

photo credit: torbakhopper liberace is still having fun times in the lower haight, scott richard via photopin (license)