Pages

Sunday, December 24, 2017

A Quick Post for the Holidays! - Improvising a Hole Gauge

It's been busy for me getting ready for the holidays, but I did have one little tip when your practicing the future of making things.

I found myself needing to double check a hole size.  All I needed to do was to check to see if I #6, or a #8 screw would fit in a hole in a simple bracket.

Normally, I would check it with calipers.  I'm used to being able to do that.  I almost always have them available.  Almost...

Dial Calipers, similar to my set.  These are perfect for measuring small holes,
but not when you don't have them with you!
Image Credit: Wikipedia
But today, I didn't have calipers my calipers.  They were at home, and I wasn't.  So what to do? 

I realized what I did have, was a full drill index (fractional, letter, and number drills!).  In other words, a full set of improvised hole gages!

My set of hole gages!  They can also be used to drill holes! 
I just placed a few drills in the hole I was checking until I got one that told me what I needed to know.  The hole was too small for a #8 screw.  I had to get some #6 screws to do the job. 

It's not a perfect fit, but it's enough to tell me only a #6 screw will fit.
A #8 is too big. 
So as your working in your own shop, remember that while you may not have the perfect tool for the job, with a little improvisation, you may have a perfectly acceptable substitute! 

Sunday, December 10, 2017

Lessons from the Real World - The Folly of Ignoring the 7Ps

There's an old saying about the "7 Ps".  To put it bluntly, the 7 Ps are: " Proper, Prior, Planning, Prevents, Piss, Poor, Performance".  I remember my Father mention mentioning it in reference to his old U.S. Navy days.

But last week, I made the mistake of ignoring the "7 Ps".  I allowed myself to fall victim to the perfect storm of laziness and complacency.  The true frustration of the situation was that I was left with nobody to blame but myself. 

Unfortunately, there's no pony to blame this time.
It was simply: My. Own. Damn. Fault.

It started with my girlfriend's car due for an oil change.  It's automotive maintenance that I've done for about 30 years.  I can do it in my sleep.  Which introduces the first demon to the equation.  Complacency.

I had the oil, I had the filter, all I had to do was get my girlfriend to leave me her car so I could change the oil.  I can do it in about 20-30 minutes, and that's taking my time to make sure I do it right.

No problem, right?  Well, remember that demon of complacency I welcomed into my world?

My girlfriend takes my truck to work so I can work on her car, easy money, as they say.  So I grab  the oil, and grab a few tools out of my toolbox, and get started.

Sure, I grab the drain pan, and the required tools, I have the oil drained in no time.  Then I realize I left the oil in the house, so I go inside to get that.  While I'm at it , I grab a few extra paper towels, I don't have enough in the garage.

The second demon of laziness has joined the party, I was too lazy to gather up everything I needed ahead of time.
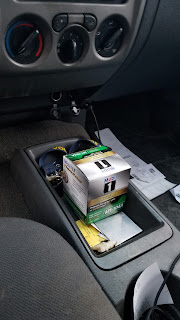
The oil filter, safe on the center
console of my truck
So I move on and remove the oil filter, and realize I need to go the the oil filter too.

And that's when it dawns on me, the oil filter is in the truck.  The truck that my girlfriend took to work!

So with the oil now drained out of my girlfriend's car, I ended up taking a lovely stroll to the nearby parts store to purchase another filter.   It was on that stroll through my fine town that I was able to contemplate my mistake.

Thankfully, it wasn't long before I had completed the job.  I had to take a moment to sit down and have a laugh at my own expense. 

So what was the lesson, and the point of writing this out?  What did I learn on my Hobbit like unexpected journey to the parts store?

I realized that I had become so intent on executing my plan, I didn't actually have a plan.  It was really more of a goal of changing oil, with the execution limited to "I'm going to do some "mechanic" stuff!" in the middle.

Normally, I lay everything out before I get started, should it be a tool, a filter, or fresh oil, it's right there when I needed it.

But this time, I broke that routine.  I still had oil in the house, not all the paper towels I needed, and fatefully, the filter in a car that wasn't there.  I found myself making extra trips to get supplies that I didn't have laid out.

Had I laid everything out like I normally do, I would have realized I didn't have the filter and could have easily fixed the problem before getting started.

But I didn't, I started before I had everything laid out, and paid the price.

I think that happens to many of us in our endeavors.  We want to see action and measurable progress, so we jump to the execution stage, neglecting the planning, or "laying out your tools and supplies".

And we end up seeing action alright!  We end up acting, and then we end up reacting as we redo our efforts and end up having to adapt to challenges that a little extra planning may have foreseen.  We "take that walk to the parts store".

I'll be sure not to let this mistake be made in vain.  The next oil change, I'll have everything right where I need it, like I have in the past.  It will be a final "sanity check" to make sure I'm truly ready to execute.

And I'll be taking that lessons to other projects in my life, making sure to put the extra effort into minding those "7Ps" next time!

Please learn from my mistake, don't fall into the trap I fell into!


Don't confuse action with progress!

Wednesday, December 06, 2017

Lesson's From LIfe's Workbench - Working with Helical Inserts

Ahh. The helical insert.   If you've run into a mangled thread, there's a good chance you've had to use one.  Most likely it's come in the form of a tightly wound, diamond shaped wire which forms the insert.

The common helical-insert.
By The original uploader was Boellhoff at German Wikipedia - Transferred from de.wikipedia to Commons by MichaelFrey using CommonsHelper., Attribution, https://commons.wikimedia.org/w/index.php?curid=7363606


You may also know them as "Heli-Coil" inserts.  Heli-Coil is actually the name of a specific brand of helical inserts, but the names have become interchangeable, much like Teflon (PTFE), Kleelex (facial tissue), and Inconel 718 (Nickel 718).

Many of us have used them to repair stripped threads, they can also be used in softer materials, such as aluminum, to create a more durable thread.

A helical- insert used to repair a thread.
But like any fastener, they need to be placed into a threaded hole, which requires drills to tap holes, and depths for threads

Luckily, I found a great website that has the recommended taps, and hole diameters for helical inserts.

Our friends at Noble Aerospace have provided a recommended drill size chart, and a tap chart for both Imperial and Metric threads.

It's a nice resource if you're using helical inserts in your next design!

How Noble of them indeed! 

Additional photo credits:

photo credit: rustyheaps Repairing exhaust manifold, XK engine via photopin (license)

Monday, December 04, 2017

A 3D "Doodle" with Simulation in Fusion 360

A few days ago, an experienced engineer was explaining to us how changing the geometry of a component could affect the loads that it could have on how a part could handle the forces placed upon it.


Where the conversation started.
The representation of the mounting foot.

He explained that adding ribs to a mounting foot could greatly change how the mounting foot absorbed the loads, making for a more durable part. 

The modified part with ribs encompassing
the mounting hole.
So on this night I decided to build two parts pictured above,  and applied the same load of 1500 psi to them using Fusion 360.  I thought it would be a good exercise, and an opportunity to validate what I had learned.

The hole diameters and positions are the same, as well as the face bearing the load. 

After fixing the parts in the same place, I ran a simulation to see what would happen.

And the results of these quick tests was pretty interesting!

The ribbed foot had a much higher safety factor than the non-ribbed part.

The two parts next to each other.
The difference 
It was a nice exercise and validation of a concept.  And it was nice to have Fusion 360's simulation capabilities to be able to quickly test out an idea and quantify it.

Best part is now I have these parts for reference later!

It's just like a 3D note!

And finally, if you'd like to download the parts I created, you can find them here and here!