But as new tools come out, old ones fade into memory. But just because a tool has some mileage on it, it doesn't mean that it's become less useful.
And so, I go back in time to revisit adaptivity, and more importantly, a case where adaptivity was exactly the tool that I needed, when I needed it.
What is adaptivity?
This is what the Autodesk Help system states, at least in part: "Adaptive parts and geometry have under-constrained features, and adjust to design changes."
In other words, an adaptive components are "squishy", and have flexibility to change based on the changes in other geometry.
A more compelling question for those using Inventor in their trade is "Where would I use adaptivity?"
Here, the Autodesk help system sums things up nicely.
In general, use an adaptive model:
- When an assembly design that is not fully defined requires a part or subassembly in a particular position, but you do not know its final size.
- When the position or size of a feature depends upon the position or size of a feature on another part in the assembly.
Drawing from the second bullet, I decided to share a case where adaptivity proved very useful to me, in hopes that it can give you some food for thought when you sit down at your Inventor station and hit that power button to start your day.
The case I have is for a wood shop project I designed a few years ago now.
The project is a blanket chest that I modeled in Inventor a few years ago,
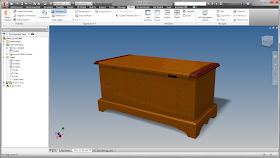 |
| The blanket chest |
Part of that design includes a design feature, sometimes referred to as a "cloudlift" at the base of the part that can be cut using a jig to guide the router cutting them.
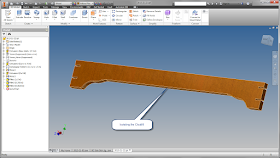 |
| Isolating the part with the cloudlift. |
And that's the challenge, how could the shape be quickly transferred from the part being made, to the tool making it? Sure, we could use the measure tool to and start transferring lines and arcs, but that's not efficient at all.
So here's a solution! I've built the jig to accommodate the part, all it needs is the cutout for the router to follow.
Now it's time to create the mating cutout. First, edit the jig base and create a sketch where it's needed.
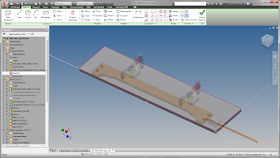 |
| The new sketch is ready to go! |
Before projecting, here's a suggestion to make sure you're picking the correct edges, Go to the view tab, and expand out the Appearance panel on the View ribbon. Turn of transparency so the components that aren't currently being edited are solid. It will make them easier to see in this case.
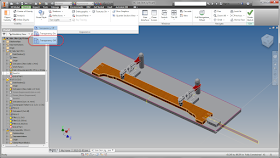 |
| Editing the part with transparency turned off. |
Now that we can see what we're doing, just use the Project Geometry to project the profile from the cloudlift on the part onto the jig.
The sketch and part become adaptive by default.
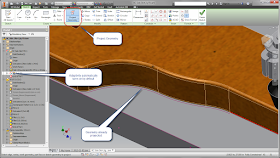 |
| Projecting the geometry from the profile. Note the adaptivity symbol in the browser. |
Now one more step. In order to make sure the profile is closed, connect the open ends of the profile with a line.
Once the loop is closed, extrude just like any other sketch.
And now the jig contains exact profile from the part it's making!
But why go through this trouble? What's the benefit/
For this application, the benefit is pretty simple. If the cloudlift changes in size, the jig making it can change without the user having to make sure to size the mating part again. And that can be a time saver if the part is in a fluid sate of design.
First, the size of the driving part, the cloudlift profile is created.
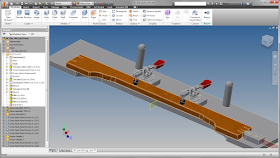 |
| The part sizes are changed. |
After finishing the edit, the jig, being adaptive, will match the size without user interaction!
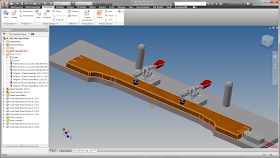 |
| After finishing the edit the jig resizes. |
So there we are, all done! A case where adaptivity was the perfect tool for the job.
But before you Inventor power users light up the comment section, I'll speak to the fact that you don't get something for nothing.
But before you Inventor power users light up the comment section, I'll speak to the fact that you don't get something for nothing.
There is a price to be paid for using adaptivity.
- It will drive calculation times up. Every time you update an assembly where adaptivity may be changing, Inventor is going to check to see if the adaptive parts need to update. You may not notice it at first, but as the assembly gets larger and/or more adaptivity is used, performance can get seriously impacted.
- Parts can update without user interaction. That's right, one of adaptivity's biggest strengths can be its biggest drawback. A part can update automatically. Sometimes updating in such a way that it no longer functions. If it happens without you realizing it, then you have a big problem.
- As a result, it's a common practice to turn off adaptivity once the design begins to solidify. Right click on the component in the browser and uncheck "Adaptive". The part won't update automatically until you turn it back on.
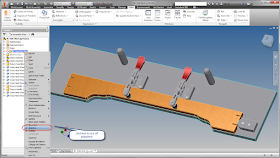 |
| Turning off adaptivity. |
In conclusion, Adaptivity can be a tool that can be extremely useful, but like any tool, one needs to know how, and where to use it. While it's not the solution for every situation, when properly used, it can be a fantastic way to augment your designs.
I'm afraid there's no video this time around! I've been in a big time crunch the last couple of weeks, but I'm hoping to add in the next couple of weeks!


Great post Jon - and a good use for adaptivity.
ReplyDeleteAdaptivity is a great tool for throwing down some relationships between parts when you are in design development. I have noticed that it can send assemblies kooky when mixed with Constraints and Flexibility.
It's a shame that it isn't more robust!
Paul
I agree Paul. I've had the most success keeping it simple. I've used on a few critical parts, for cross part relationships. Outside of that, I find the for at least myself, the prices paid in performance and complexity outweigh the benefits.
DeleteI'm already thinking of my next post. I'm working up an example for using cross part associating *without* adaptivity.
I'm just wondering why you wouldn't derive the part as a work surface into the pattern part and do your thang there? I have a few ideas of course, but I'm curious why you chose Adaptivity here instead of deriving.
ReplyDeleteMostly, admittedly, it's habit. I'm used to adaptivity, and I forget about using derived surfaces, even though that's a completely valid workflow.
DeleteAdaptivity works well for me here, because the assemblies aren't big, and the geometry fairly simple.
I also have a board template built up, with the geometry pre made to keep me from drawing extruded rectangles for boards, so the "Create Component, Sketch, Project" workflow makes sense to me.
But on the other hand, I don't use Adaptivity on much else. It's got to be pretty straight forward, or else I don't use it.
In my case, the number of surfaces doesn't change. The part is fairly static at this point, although the cloudlift can change in length and depth.
ReplyDeleteWhen you say "subtract component", are you using derived component? Just wondering what the workflow is.