Pages

Monday, May 28, 2012

Removing Features and Voids Using Autodesk Inventor 2013's Derived Component Tool

About that time, stronger features became fashionable on the screen.
Marie Windsor

Many of us have been there before.  We need to send our 3D CAD assembly to a 3rd party, like a vendor, for example.  But we don't want to directly export the full 3D model.

Why?  The 3D model contains all the information required to build the components within the assembly.  The "feature rich" assembly may be overkill because the extra information, such as internal cavities, may create a model that is "overly heavy and complicated" for the end user.

Even worse, giving them that feature rich model may give away proprietary information that may allow an unscrupulus end user to take advantage of our hard work.

Would you always want to send out a model with all this detail to a 3rd party>?


In older versions of Autodesk Inventor, you could derive the assembly into a part model, and use standard Inventor part modeling tools to remove the excess features.  You could even use Autodesk Inventor Fusion if you wanted.

But this process took time, and while it might be worth it to protect intellectual property, who doesn't want a faster way.

As of Autodesk Inventor 2013, there is a way.

To take advantage of this new tool, the model is still derived into a part file using the Derived Component too, just like before.

We still go into Derived Component


We can still go into the Options tab, and change how the assembly is derived and remove parts and features that we don't need.

But now check out the "Options" tab for the new options.

But a new option in this window is to remove internal voids that allow the part to be quickly simplified.  With the addition of this tool, manually filling holes, voids, and generally "dumbing down" an assembly can be reduced, or even eliminated.

Remove voids!  The new tool! 

So on that note, here's a video that shows both the steps, and the result of a quick simplification of a component.


Have a suggestion on how you approach this challenge?  Drop a comment below! 

Thursday, May 24, 2012

Where's my "Show All Constraints" Tool?!? - Autodesk Inventor 2013

“If we are facing in the right direction, all we have to do is keep on walking.”
Buddhist Proverb

Show All Constraints.  It's been in Autodesk Inventor since I started way back in the days of Release 4.  It was available from the right click menu, or by hitting the F8 key. 

The right click menu from Inventor 2012.  The "Show All Constraints" option is there like it's always been!

Just today I fired up Inventor 2013, and started up Inventor 2013, created a sketch, and right clicked to show all my constraints.


Guess what?  It wasn't there!  The hotkey (F8) still works, but it wasn't on the right click menu any more.


I puzzled for a second, then I face-palmed.

I remembered reading in the What's New for Autodesk Inventor 2013 that it was moved to the new Status Bar at the bottom of the screen!

I found it!

Along with the Show Constraints tool: some other familiar tools have been moved there (listed in order, from left to right):

  • Snap to Grid
  • Show/Hide All Constraints
  • Dimension Display
  • Slice Graphics
  • Show/Hide All Degrees of Freedom
And if you want more info on these tools, check out the Wikihelp here for the full rundown

But I like the old way better!

Now, I know that there are those out there who are asking; "Why can't we make it like it was in 2012 and earlier?"

If you are on that team, you're in luck!

Go to the "Tools' ribbon, and choose the "Customize" icon.

Choose Customize
On the dialog that appears, choose the "Marking Menu" tab.  Then in the lower left hand side, pull the fly-out open and set the Overflow Menu to "Full Menu".

Tada!
Click "OK" and the settings will be back to the older style settings!

Back to "old school"
So there it is, a few of the Inventor 2013 changes, and some ways to go back to your last release settings.

I hope the tip helped!

Sunday, May 20, 2012

Migrating Colors and Materials into Autodesk Inventor 2013

“A hard fall means a high bounce... if you're made of the right material.”

A new change in Autodesk Inventor 2013 is how materials and colors are handled.  Instead of being a part of the Styles and Standards libraries, like in previous versions of Inventor.  Now, they're stored in Appearance Libriares (for colors), and Material Libraries (for materials).

The location of the new libraries can be seen by looking at the project file.

The libraries as shown in the Project File
But what if there are old libraries that have been created over time?  We wouldn't want to throw them out and start over right.  So there has to be a way to migrate them, right?

Well, of course there is!  (or else I wouldn't have anything to blog about).

But how are the libraries migrated? 

It's fairly simple, once you know where to look, as I'm so fond of saying,

There are two places to access the Appearance and Materials Libraries.

The first is from the quick access toolbars.


The second, off the Tools Ribbon on the Materials and Appearance Panel.

On the Tools Ribbon
Choosing either icon will bring up the browser for that particular library.  

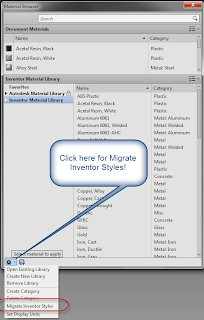
Migrating to both the Material and Appearance Libraries is a matter of clicking on the "gear" icon in the lower left hand selecting "Migrate Inventor Styles".

The dialog for Materials.  The Appearance dialog is nearly identical.

The source (the library to be migrated) is selected, followed by the destination library.

However, there are two destinations to send your migrated folder, one is to create a new library, the other, select an existing library.

So what to do?

There's two theories.  One is to migrate your old libraries to a newly created one, and remove the old Inventor libraries.  This makes sure you have "one truth" for those materials.

The other, is to merge them into the existing library.  The important, custom materials will be there.

Which did I choose?  Personally I used "Create New Library.  For me, it was a little easier to have that "one version" of the truth.  I can remove one library later if I don't want it.


Hit okay, and the migration begins.

Soon, the migrated Material Library is complete.

The best part now, migrating the Color Library to the Appearance Library.  Why is it so good?  It's basically the same steps!  If you've done the Material Library, you can do the Appearance Library.

Naturally, it wouldn't be a blog post without a video.  So here we go!


Do you have input on how you might have migrated your own libraries!  Throw a comment below!

P.S. If you're interested in how to migrate Dimension Styles, Sheet Metal Styles, etc.  Check out last week's blog here! 

Sunday, May 13, 2012

There's Been a Change or Two - Migrating Styles Libraries from Inventor 2012 to Inventor 2013

“Good as it is to inherit a library, it is better to collect one”
Augustine Burrell

When I first started working with Autodesk Inventor 2013, I thought that migrating the Styles and Standards (colors, sheet metal styles, dimension styles, etc), would be exactly the same as in 2012.

I even tried it, and everything worked fine. 

But earlier this week a KETIV colleague, Javier Chavez, asked me a question.

"Have you noticed that the Design Data folder was restructured in Inventor 2013?

I hadn't noticed the change.  But as we looked at Windows folder structure, discussed migration procedures, puzzled, and discussed some more, we found that the folder structure had indeed changed.

Notice the difference between folder structure in Inventor 2013 (left) & Inventor 2012 (right).


"That's going to make migration important."  I understated.

So I deleted my Inventor 2013 Design Data, and tried it again.  Sure enough, the process was different.

In brief, the biggest difference is Inventor 2012 (and earlier), migrated the data in place.  So you copied your old data to a new location, and migrated it there.

Inventor 2013 on the other hand takes your data and copies it to the new location, migrating it during the process. 

Source folder, destination folder, and a waiting migration button!

This was the difference I'd missed the first time.

So before I show you the video, here's one thing to always remember!

Have a backup of your Design Data folder! 

I cannot stress this enough!  If you make a mistake, you can always delete the migrated files, and try again with the backup you created. 

As a matter of fact, I did this several times testing out the migration to make sure what I thought was going to happen, was really what was going to happen.

As I was once told.  "If you think you don't need a backup.  Stop and ask yourself the following question.  When was the last time you regretted having a backup?"

In other words, make the stinking backup.  It takes a few minutes, and can save you hours of having to live in the "Purgatory of Data Recreation".


Monday, May 07, 2012

It's all over! The Planes of Fame 2012 Airshow.

"Is this old airplane safe? Well, my dear, how do you think it gotto be this old?"
Unknown

In my last blog, I said that there wouldn't be much Autodesk Inventor blogging today.

That's because this weekend was the Planes of Fame airshow in Chino, Ca.  It was a great weekend of volunteer work, that was exhausting, and exhilarating all at the same time.

And it always gives me pause to look up at the history in the air, and think of what it must have been like "back then".  I'm glad there are so many working to keep this history alive. 

So for your enjoyment, (if you'd like), here are a few pictures from the show. 

Once I catch up on lost sleep, and the pain of my sunburn fades, I'll be sure to have some more CAD stuff up! 

Until then, enjoy some warbird pictures!

Planes of Fame Airshow 2012

Friday, May 04, 2012

Save and Replace - Autodesk Inventor's Copy Component with a Twist

All the learning in the world cannot replace instinct.
Robert Ley

In my blog post last week, I talked about using Copy Component inside an assembly.  It's a tool I really like, and use frequently.

But if you saw the comments at the bottom of that post, there were some comments by some very astute user that spoke about "Save and Replace Component", and how they prefer it.

Save and Replace.  It's here, but hiding.
Now I'm not hear to tell you how "I'm right and they're wrong".  Why?  Because they're not wrong.  It's a fine tool!

Personally, I like Copy Component where I need to use both the original, and the copy in the same assembly. 

On the other hand, I like Save and Replace Component for those times where I need to create the copy, and swap out the copy with the original. 

The nice part about this tool?  It keeps the constraints intact.  So you don't have to recreate any constraints! 

This is where the real time savings begins.  Not to mention avoiding that monotony of having to recreate the constraints!

So here's a quick video to take a look at.  Let me know what you think about one tool, versus the other!

Have any thoughts on how you might use these tools differently?  Drop a comment!  I'd love to hear your thoughts!


P.S.  It's that time for me as a warbird geek.  This weekend (May 5th & 6th, 2012) is the Planes of Fame Airshow in Chino, Ca. 

I'm setting up Friday and breaking down Monday, so expect that my normal blog posts will be replaced by warbird pictures and geekiness until Tuesday, May 8th, 2012.

I hope you enjoy my "CAD hiatus" for the next few days.  If not, I'll see you next week, when I return to my CAD geeky self!

Until then?  Expect some tweets and maybe even a blog from the airshow! 

This will be my weekend!  Of course I can hardly wait!