Find us on Google+ March 2011 ~ Inventor Tales

Sunday, March 27, 2011

Captain's Log - Migrating from Inventor 2011 to 2012

“desire to migrate is strong.”
Roberto Suro

As I sat staring at the progress bar for my Autodesk Inventor 2012 download.  The words "Download Complete" greet me like gifts under the Christmas tree.

The enthusiastic geek in me wants shout "Saddle up!  Lock and load!", click on the self-executing zip file and bask in tingly feeling that only comes with a new software release.

But this time, something stays my hand.  But how do you want to go about this?  My inner voice asks. 

In a rare deviation from my normal behavior.  I actually listen to my inner voice.  

I can't just dispose of 2011.  I have testing to do, files that still need to remain in 2011.  I can't just throw the switch.

So this is my little journey about I decided to move my personal data over.  I'm not writing this as some sort of decree of the "Best Practice" or "Whitepaper".   I'm not standing on a virtual hill shouting "By order the king, thou shalt migrate thy Inventor data in using the aforementioned process."

This is just what I chose to do, for reasons that I thought would best work with my data.  I hope that you find this helpful as you decide to make you're own migrations.

So what do I need to be able to do with my data when I'm done?
  1. I'm using Vault, so I want to transition the data from Inventor 2011 & Vault 2011, to Inventor 2012 & Vault 2012 ultimately.
  2. Item 1 means I'll need to have a project file for Inventor 2011, & Inventor 2012.  These projects will be looking at the same set of working folders
  3. In need to have Design Data that can be used in both Inventor 2011, and Inventor 2012
  4. I need to have templates that can be used in both Inventor 2011 and Inventor 2012. 
So my first step?  Start copying stuff!  I make copies of my project file, design data folders, and template folders.  Fortunately, I keep my Design Data and Templates in one subfolder, and I locate them via a setting in my project folder, so this is pretty easy

The New Folders Copied
Now with copies made, I first migrate my templates.  I'm going to do that using Task Scheduler.


Then I migrate my design data, using Style Library Manager


Then I change the locations my project is pointing at.  Save that, and I'm ready to go!

Changing the location in my project file

So there we have it.  I've copied my project file, and migrated my templates and design data.  Now I have my original data for use in Inventor 2011, as well as new, migrated data for Inventor 2012!

Tuesday, March 22, 2011

How (Inventor) Suite it is - New Design Suites Released

Word is already getting out, but I thought it best to do my part.

Autodesk has released the new design Suites, giving us some new packages with new tools!

It's going to be a lot to take in, but there's definitely some new things to start playing with!

Click here for the press release.

And here's an intro video from Rob Cohee!

Sunday, March 20, 2011

Setting Virtual Memory Size - Don't Forget the Basics!

“Fundamental progress has to do with the reinterpretation of basic ideas.”
Alfred North Whitehead

Recently, I was returning to my office having retrieved yet another cup of coffee, when Nicole Morris, one of the KETIV team members, said to me. "Virtual memory still matters."

Naturally, this puzzled me for a moment.  Of course the statement seemed "out of the blue", but then Nicole explained her seemingly random statement.

She had been working with someone who was having problems with performance on a really large assembly.  The computer was sluggish for some reason, but the system had 12GB of RAM, plenty of processor speed, and a video card that would have made the typical geek drool like a Labrador Retriever.

The Virtual Memory was set wrong.  Nicole explained that they'd set the virtual memory to 1.5x RAM, and the computer began singing like a song bird.

"No kidding?"  I say, surprised (Okay, I've substituted "kidding" instead of the actually word I used!)

Nicole nods to the affirmative.  She's become accustomed to my exclamations of surprise.

This was what I have come to call "Life Lessons".  I recall being fanatical about virtual memory.  I set it, tweaked it, then tweaked it again.

But somewhere RAM became plentiful, and I rejoiced.  Then 64bit operating systems came out, and I frolicked in the amount of RAM I had at my disposal.

Then I forgot about virtual memory.  With all that RAM, it surely couldn't make the difference it once did, right?

The answer seems to be..... WRONG!

Needless to say, I let myself make an assumption, and get sloppy! 

What's the moral of the story?  Don't forget the basics.  Even with a screaming processor, boatloads of RAM, and a Video card with enough power to dim the lights in the office, shorting your virtual memory can hobble your system!


Setting Virtual Memory in Windows 7


So how do we set virtual memory?  Here's a quick video in Windows 7.  Other operating systems set the virtual memory in a similar way!

Sunday, March 13, 2011

Fine Tuning Object Defaults in Inventor Drawings

“I took the road less traveled by, and that has made all the difference.”
Robert Frost

I've taken another weekend for a "snowboarding retreat" at Mammoth Mountain.

Another Snowy day in Mammoth
So as you can guess, blogging isn't really high up on the list. 

But, true to my geek form, I do have something to share.

I was asked about setting the default dimension styles recently.  Basically, how do I set my default dimension style?

So here's a quick tip on how to set up your default dimension standards.

To set default dimension styles for your drawings, go to Tools>Format Standards.

Getting to the styles and standards screen

Once the Standard and Style Library Editor pops up, select Object Defaults.  Now you can select each dimension type, and set the default dimension style for each.

Setting the Default Linear Dimension
Notice that you'll have to set the default dimension style for linear, angular, radial, and so on.  It's very flexible, but you'll need to make sure you get all the styles you want to change.

Also, notice that dimension styles aren't the only thing you can set here.  You can set everything from text styles, to table styles, to default layers.

It's worth some time to take a look at it.  Getting your defaults set correctly can save a lot of time and headache. 

Tuesday, March 08, 2011

Numbers Don't Lie - Creating a Numbering Scheme in Autodesk Vault

“The numbers speak for themselves. That's a good score.”
Howard Rubenstein

Creating a part number scheme can be quite a challenge.  Getting everyone to follow it can be an even bigger problem.

Getting everyone to reference the book of numbers, trying to get everyone to renumber parts, can be quite a challenge.  

And it's not always the fault of the users.  End users are human, they forget, they feel pressure and skip it because their efforts are needed elsewhere..

So how can we help automate that step?

Autodesk Vault Workgroup, Autodesk Vault Collaboration, and Autodesk Vault Professional all have the ability to create file naming schemes.


These schemes will prompt you to name a file on the initial save.  By eliminating that need to stop what your doing and look up the next available block of numbers from a book, or Excel spread sheet,, this function makes it much easier to keep a unified numbering scheme.

On top of that, it knows when a number has been issued, so all but eliminates the possibility of two users grabbing the same part number!


File naming scheme prompting on save


So how do you do it.  I've got a video for that, but first, a couple of things to be aware of.
  1. You have to be logged in as an administrator to make these changes.  This isn't available to just anyone!
  2. Once you save a file with a naming scheme, that numbering scheme is in use.  You can't delete it, or change it.  You can only disable it.  So it's definitely worth it to take the time and make sure you haven't missed anything before you make it live!
But aside from that, this can be a great tool for helping stick to a part numbering scheme!

Sunday, March 06, 2011

FlexNET Publisher – A License to Network (Part 7) - License Server Schemes


So we come to a close on our “License to Network” series. 

In this final segment, I talk about different licensing server schemes, single server, distributed, and redundant servers, and how it can affect the I.T. department, and the users at the other end.

This blog post will break down the different servers, the differences between them, and the advantages and disadvantages for each. 

That being said, let’s get to the nuts and bolts, what are the different licensing schemes?

Single Server Licensing

This is the system I’ve described the previous steps in this series, and it’s the most common system I’ve encountered in the ‘real world’.  A single license server uses one license file, containing all your licenses. 

What’s the advantage of this system?  It’s simple.  One server maintains one license, so it has one central point to maintain your licenses. 

Of course this is its downside too.  If the server fails, everyone loses a license until the server is brought back up. 

Now granted, servers don’t tend to drop like flies these days, so running this system is fine.  I’ve known many a system that’s happily run on this type of server.

Distributed Server Licensing

If I had to make a compromise between simplicity, and fault tolerance, I’d choose distributed. 

In a distributed system, you’re licenses are split between two different servers.  For example, if you have ten licenses, you could put five licenses on one server, and five on another (although the number of licenses can be divided in any combination between servers). 

In this system the clients acquire the licenses from either one of the servers, as designated by the environment variable ADSKFLEX_LICENSE_FILE = @SERVERNAME1; @SERVERNAME2

The advantage of this system is that you can have one server fall off line, and you’ll only lose the licenses on that server.  You don’t lose the entire pool.  The department can carry on with the remaining licenses in the pool. 

Granted, losing a significant number of your licenses can be no picnic, but it’s better than the whole pool!

Redundant Server Licensing

This is the most complicated, and the rarest licensing system.  I’ll be up front and say I haven’t configured this one personally, so I don’t know every detail of it.  So I can’t say I’m intimate with the functions of the Redundant System.

That being said, I’ve heard enough from the community to not be eager to try this system.

But it does have one advantage.  Three servers share all your licenses.  However, you can lose one server, and all your licenses remain available.

It sounds pretty tempting right?  So what would be the downside?

The downside is you require three servers, but you can only afford to lose one server.  If you lose two, the entire system goes down, and all licenses are lost.

So why have three?

The third server maintains a quorum.  That is, it makes sure the other two agree. It actually doesn’t directly help you access more licenses.

I’ve also heard (but not personally verified), that one of your servers designates itself primary.  The second becomes the secondary, and the last becomes the quorum. 

Should the server designated primary fail, you have to stop and restart the remaining servers to designate a new primary, or the system still goes down. 

The servers also have to be on the same subnet, and I’ve even heard they have to be in close physical proximity. 

Taking all that into consideration, not to mention that most servers are pretty dependable these days, it seems like a lot of work for not much gain. 

So in my humble opinion, if I need fault tolerance, I’ll take distributed. 

But as I said before, I’ve not personally used this system, so if someone out there has used it, and likes it?  Throw a comment; I’d love to hear about your experiences! 

Also, for additional information, check these documents from the Autodesk Website.

Wednesday, March 02, 2011

FlexNET Publisher - A License to Network (Part 6) - Setting up an Options File

I always say don't make plans, make options.
Jennifer Aniston

After getting ahead of an installation this weekend, here's the promised blog on options files.

This is a continuation from Part 5 last week.

First, the necessary definition.  What is an options file? 

In short, an options file is a text file that allows FlexNET (and by extension the CAD Manager), to control access to the licenses under control.  For example, the administrator can

  • Reserve licenses to specific users or groups
  • Set how long a license can be borrowed from the license server
  • Set how long a license can sit idle before it's returned to the pool
And yes, there are many things you can do.

Since there are so many things and variations an options file can control, we'll show this by example. 

Before we'll get started, you'll need to know the Feature Code for the product you wish to control.  In the screen capture below, I've highlighted the feature code for my Vault Professional 2011 license.


The Vault Manufacturing Feature Code


For a full list of Feature Codes for the Autodesk products.  Look to the Autodesk Technical Documents Below

Now that we know the feature we're going to control, let's decide what we want to do.  Let's say we want to do the following

  • Ensure a license can't sit idle for more than 60 minutes
  • Reserve a license for the user "jonathan.landeros" (That's me!)
With that decided, lets go ahead and start a brand new, empty Notepad file and type in the following code

#LIcense can only sit idle for 1 hour (3600 seconds) before being returned to the license pool
TIMEOUTALL 3600

#Reserve 1 license for Vault Professional
RESERVE 1 85588VLTM_2011_0F USER jonathan.landeros

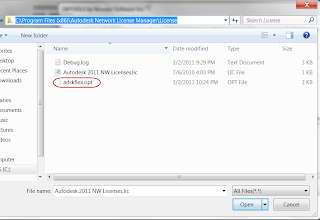
Once you have the license options typed in, save the file under the name ADSKFLEX.OPT and save it in the same directory as you have your license file.

The options file in it's natural environment.

But we have one more really important step.  Make sure to open up LMTOOLS, and on the START/STOP/REREAD tab, click the REREAD LICENSE FILE button.

Hit the reread license file

Now the license file is read in, now switch to the Config Services tab, and click the VIEW LOG button.  Click the close license when done

Log file with license codes
 So those are the basic steps.  But where did I learn the proper codes to type in?  Autodesk has a great technical document on Options Files HERE.  It's absolutely worth it.  It shows you all the different commands you can use.

You can also check the licensing guide, located in the documentation section of your Autodesk Product Install. 

Check the "Read the Documentation" section of your installation

So now we're done.  For now at least.  Next, we'll talk about the different server configurations.