Flying isn't dangerous. Crashing is what's dangerous.
Aviation Proverb
It's out! Last Friday, Autodesk issued Inventor Service Pack 1. Fixing those inevitable little 'random features'.
I installed it last Friday on my Windows 7 64 bit box, and things are humming along normally.
So go ahead and give it a download from the link HERE!
Happy Inventing.
Pages
▼
Monday, August 30, 2010
Sunday, August 29, 2010
Construction Time Again - Inventor Sketches
“The road to success is always under construction. Under construction. That means you're always working. So that's what he's doing.”
Chad Epperson
There's a busy week ahead of me, so this is a shorter blog today.
But I wanted to talk about something that is often taken for granted. Construction lines.
When I'm training, I'll even tell students "They're a good practice, but don't wake up in a cold sweat if you forgot a construction line."
So why do I say they're a good practice?
Well, it is good book keeping. But the single biggest reason is that a construction line is ignored for the purposes of creating a sketch boundary.
Okay, so what does that mean when translated from 'geek speak'.
Here's a rectangle, divided by a line. About as simple as it gets. All lines are standard lines.
But what happens when I extrude the lines? The line running down the middle splits the profile, meaning you have to make two picks to extrude the entire rectangle
But if I make the middle line a construction line, the line is ignored, and the entire sketch can be selected in one click.
You can make the line a construction line by selecting it, and clicking on the construction line button.
Now, with the construction line created, the extrusion only requires a single click to select the entire profile.
So there's the big difference. Do I convert lines to construction lines when necessary? Yes, I do. I find it particularly useful when I have a complicated sketch with a lot of line geometry. I find it makes creating the extrusion a lot easier.
That's it for now. Happy Inventing!
Chad Epperson
There's a busy week ahead of me, so this is a shorter blog today.
But I wanted to talk about something that is often taken for granted. Construction lines.
When I'm training, I'll even tell students "They're a good practice, but don't wake up in a cold sweat if you forgot a construction line."
 |
| Construction lines. Can I just forget they exist? |
Well, it is good book keeping. But the single biggest reason is that a construction line is ignored for the purposes of creating a sketch boundary.
Okay, so what does that mean when translated from 'geek speak'.
Here's a rectangle, divided by a line. About as simple as it gets. All lines are standard lines.
 |
| Nothing special here! |
But what happens when I extrude the lines? The line running down the middle splits the profile, meaning you have to make two picks to extrude the entire rectangle
 |
| Inventor sees two regions here |
But if I make the middle line a construction line, the line is ignored, and the entire sketch can be selected in one click.
You can make the line a construction line by selecting it, and clicking on the construction line button.
 | |
| Make the regular line a construction line |
Now, with the construction line created, the extrusion only requires a single click to select the entire profile.
 |
| Construction line created! |
 | |
| Profile can be selected in one pick |
So there's the big difference. Do I convert lines to construction lines when necessary? Yes, I do. I find it particularly useful when I have a complicated sketch with a lot of line geometry. I find it makes creating the extrusion a lot easier.
That's it for now. Happy Inventing!
Tuesday, August 24, 2010
The Random Software Surprise of the Day
“My software never has bugs. It just develops random features.”
Computer Proverb
Before I get started, I'll put in the standard disclaimer that the images I use aren't the actual assembly. The real assembly was customer data, which I can't post here. Consider it a 'dramatization'.
Today I ran across one of those little random issues that makes no sense, until you try that 'one thing'.
What was that? I encountered an Inventor assembly file that was crashing when placing an angle constraint in an assembly. One time, every time, just like clockwork.
I checked all the initial things. Cleaned up temp space, checked the video settings.
None of it helped.
I tried reproducing the error in a different assembly file. That file works perfect. At least now I know I've narrowed it down to something in that file.
Staring at the file, looking for a culprit, my eyes fall upon two components that were downloaded from a third party site.
Could it be?
For the heck of it, I remove the two third party files from the file and try it again.
I hold my breath for a second. It works perfectly, just as advertised. It seems one of those third party components had a corruption in it that was killing the file.
So what's my big lesson? While I'm a huge fan of third party components, there is some bad stuff floating out there. I'm certain it's not intentional, but every download can't be perfect.
As Damon Runyon put it "Trust but Verify". If an assembly suddenly starts 'acting up'. You might want to remove some of that third party content. A corrupted file might be the cause of your woes.
Computer Proverb
Before I get started, I'll put in the standard disclaimer that the images I use aren't the actual assembly. The real assembly was customer data, which I can't post here. Consider it a 'dramatization'.
Today I ran across one of those little random issues that makes no sense, until you try that 'one thing'.
What was that? I encountered an Inventor assembly file that was crashing when placing an angle constraint in an assembly. One time, every time, just like clockwork.
 |
| Could it be that the Angle constraint was broken ?!? |
I checked all the initial things. Cleaned up temp space, checked the video settings.
None of it helped.
I tried reproducing the error in a different assembly file. That file works perfect. At least now I know I've narrowed it down to something in that file.
Staring at the file, looking for a culprit, my eyes fall upon two components that were downloaded from a third party site.
Could it be?
For the heck of it, I remove the two third party files from the file and try it again.
I hold my breath for a second. It works perfectly, just as advertised. It seems one of those third party components had a corruption in it that was killing the file.
So what's my big lesson? While I'm a huge fan of third party components, there is some bad stuff floating out there. I'm certain it's not intentional, but every download can't be perfect.
As Damon Runyon put it "Trust but Verify". If an assembly suddenly starts 'acting up'. You might want to remove some of that third party content. A corrupted file might be the cause of your woes.
Sunday, August 22, 2010
Making it up in Volume - Uploading Data into Autodesk Vault with Autoloader
“It's not the load that breaks you down - its the way you carry it”
Lou Holtz
The inspiration for my blogs often comes from the challenges I face in my day to day functions at KETIV Technologies. This blog is no different.
I was faced with loading a large amount of data into Vault, and we knew that the data wasn't perfect. So I turned to the Autoloader that's provided with Autodesk Vault.
Being a bit of a control freak, I tend to have a bit of a distrust of anything that contains the phrase 'Automatic'. As far as computers go, I tend to go with the 'if you want something done right, do it yourself' approach.
Needless to say, I approached Autoloader with a bit of trepidation.
But while I did open up Autoloader with a bit of caution, in the immortal words of Obi Wan Kenobi;
"This is the weapon of a Jedi Knight. Not as clumsy or as random as a blaster, but an elegant weapon for a more civilized age."
So I fired up Autoloader, and uploaded some AutoCAD data, and up went the data. Autoloader found some broken links that needed to be fixed, and put the data in with next to no interaction on my part.
In conclusion, while Autoloader isn't the 'magic bullet' for every situation, the control freak in me had acknowledge that my concerns about Autoloader were unfounded. When you need to upload a large amount of data, this is a fantastic tool that you shouldn't hesitate to use as part of your arsenal.
A pictures worth a thousand words, so here's a video on the steps to upload data. Enjoy!
Lou Holtz
The inspiration for my blogs often comes from the challenges I face in my day to day functions at KETIV Technologies. This blog is no different.
I was faced with loading a large amount of data into Vault, and we knew that the data wasn't perfect. So I turned to the Autoloader that's provided with Autodesk Vault.
 |
| Autoloader, ready and waiting |
Being a bit of a control freak, I tend to have a bit of a distrust of anything that contains the phrase 'Automatic'. As far as computers go, I tend to go with the 'if you want something done right, do it yourself' approach.
Needless to say, I approached Autoloader with a bit of trepidation.
But while I did open up Autoloader with a bit of caution, in the immortal words of Obi Wan Kenobi;
"This is the weapon of a Jedi Knight. Not as clumsy or as random as a blaster, but an elegant weapon for a more civilized age."
So I fired up Autoloader, and uploaded some AutoCAD data, and up went the data. Autoloader found some broken links that needed to be fixed, and put the data in with next to no interaction on my part.
In conclusion, while Autoloader isn't the 'magic bullet' for every situation, the control freak in me had acknowledge that my concerns about Autoloader were unfounded. When you need to upload a large amount of data, this is a fantastic tool that you shouldn't hesitate to use as part of your arsenal.
A pictures worth a thousand words, so here's a video on the steps to upload data. Enjoy!
Sunday, August 15, 2010
Yielding to Logic - Extracting Drawing Scale with iLogic
“The logic of words should yield to the logic of realities.”
Louis D. Brandeis
Just this Friday, I was posed what I thought was an easy, five minute, question. "How do I place the view scale into the title block?"
My inside voice said, Pffft! No problem! After all, there's a spot right there for it in the title block already!
So I go into my title block definition, and look for the iProperty that accesses the drawing scale. It should be a slam dunk. All I have to do is choose the property that calls the scale. But as I look, my stomach sinks.
It isn't there. Scale isn't available. I think I know why this is. In many cases, the scale can easily vary from view to view, so which do you call?
I puzzle over this a bit. I bounce it off of Javier Chavez, one of my KETIV team members. He confirms what my eyes see. The scale isn't there.
So, now, as they say, it's time to execute 'Plan B'. Which means, I have to develop a 'Plan B' to execute.
Now I'm pacing about my little office, rubbing my chin, and annoying my coworkers with my heavy footfalls.
After a few moments, I have 'Plan B'.... iLogic!
So I create a new iLogic rule, and enter the following code below (with comments):
'Forces update after rule runs
iLogicVb.UpdateWhenDone = True
'Extracts scale from 'View 1' on drawing sheet' to a field named SCALE
SCALE = ActiveSheet.View("VIEW1").Scale
'Writes scale to a custom iProperty named SCALE
iProperties.Value("Custom", "SCALE") = SCALE
In short, the code extracts the scale of the first drawing view via the API, and writes it to a custom property. With the scale written to a custom property, NOW I have something I can extract for the Title block!
With this field added to the title block, I'm in business.
With that being done, is the rule perfect? Frankly, no. I have work left to do.
This is what's still on my to do list.
1) My triggers don't update completely every time. Just like Rule #2 of Zombieland, I have to 'Double Tap' the update button once in a while. I want to go over it and make sure it updates consistently.
2) The view has to be called 'VIEW1'. If it's not, or if you delete the first view and place another (now called VIEW2) the rule will bark about not having 'VIEW1'. So there's a little work to be done to remedy that.
But I think the backbone of the routine is solid, and I'm willing to take a little time to revel in a small victory, if only for a few seconds. I don't consider myself one of the iLogic 'gunslingers' so sometimes you have to 'Enjoy the Little Things'.
Which by the way, is Rule #32 of Zombieland! :-)
As I learn more, and improve the rule, I'll post updates!
Happy Inventing!
P.S. It's back. Autodesk Manufacturing Academy is back, hosted by KETIV in Cerritos and Oregon. Come see us in October! And check out the videos from last years session HERE!
Louis D. Brandeis
Just this Friday, I was posed what I thought was an easy, five minute, question. "How do I place the view scale into the title block?"
My inside voice said, Pffft! No problem! After all, there's a spot right there for it in the title block already!
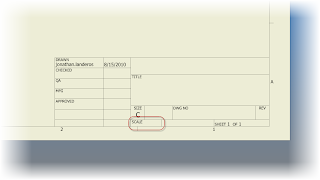 |
| Scale is already there! |
So I go into my title block definition, and look for the iProperty that accesses the drawing scale. It should be a slam dunk. All I have to do is choose the property that calls the scale. But as I look, my stomach sinks.
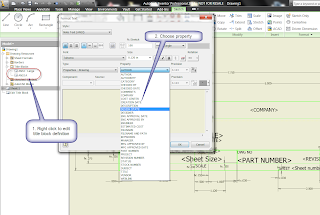 |
| Here they are. All I have to do is choose one. But wait?!? |
I puzzle over this a bit. I bounce it off of Javier Chavez, one of my KETIV team members. He confirms what my eyes see. The scale isn't there.
So, now, as they say, it's time to execute 'Plan B'. Which means, I have to develop a 'Plan B' to execute.
Now I'm pacing about my little office, rubbing my chin, and annoying my coworkers with my heavy footfalls.
After a few moments, I have 'Plan B'.... iLogic!
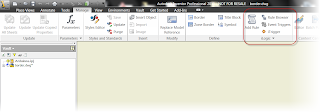 |
| iLogic to the rescue! |
So I create a new iLogic rule, and enter the following code below (with comments):
'Forces update after rule runs
iLogicVb.UpdateWhenDone = True
'Extracts scale from 'View 1' on drawing sheet' to a field named SCALE
SCALE = ActiveSheet.View("VIEW1").Scale
'Writes scale to a custom iProperty named SCALE
iProperties.Value("Custom", "SCALE") = SCALE
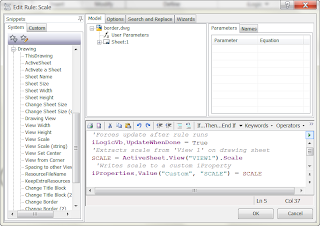 |
| Here's the rule in context of the iLogic editor. |
In short, the code extracts the scale of the first drawing view via the API, and writes it to a custom property. With the scale written to a custom property, NOW I have something I can extract for the Title block!
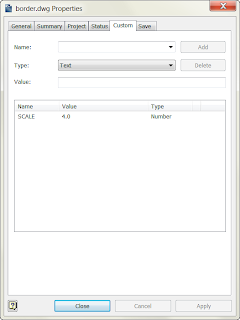 |
| SCALE custom iProperty |
With this field added to the title block, I'm in business.
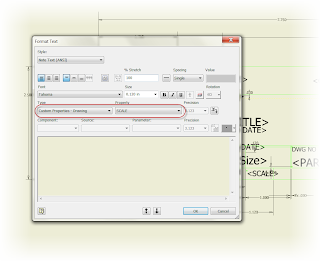 |
| The custom iProperty |
With that being done, is the rule perfect? Frankly, no. I have work left to do.
This is what's still on my to do list.
1) My triggers don't update completely every time. Just like Rule #2 of Zombieland, I have to 'Double Tap' the update button once in a while. I want to go over it and make sure it updates consistently.
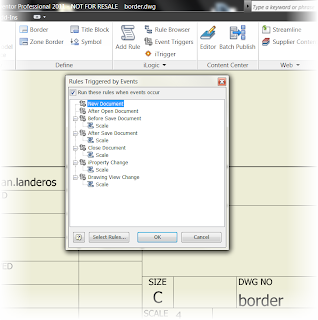 |
| Still have to work on the triggers some more |
2) The view has to be called 'VIEW1'. If it's not, or if you delete the first view and place another (now called VIEW2) the rule will bark about not having 'VIEW1'. So there's a little work to be done to remedy that.
But I think the backbone of the routine is solid, and I'm willing to take a little time to revel in a small victory, if only for a few seconds. I don't consider myself one of the iLogic 'gunslingers' so sometimes you have to 'Enjoy the Little Things'.
Which by the way, is Rule #32 of Zombieland! :-)
As I learn more, and improve the rule, I'll post updates!
Happy Inventing!
P.S. It's back. Autodesk Manufacturing Academy is back, hosted by KETIV in Cerritos and Oregon. Come see us in October! And check out the videos from last years session HERE!
***UPDATE 20-March-2012 ***
After some hunting around, and help from a friend or two, it looks like teh direct update can't be triggered right when the view scale changes. But if an event trigger is set to run "Before Save Document". The rule scale will update when you save. I tried it in Inventor 2012, and it works!
 |
| Here's the ticket! |
Sunday, August 08, 2010
What's Done is Undone - Editing Properties in Autodesk Vault
“My life needs editing.”
Mort Sahl quotes
In a perfect world, a file would go into Vault once. It would never be edited, corrected or ever adjusted. We'd look happily at out Vault, with no version ever larger than one.
Then we'd walk outside to a beautiful, sunny day, and the birds would be chirping, our neighbors would wave, and all would be right in the world.
What a wonderful world it would be indeed, but as we insert the sound of a needle screeching across a record, reality gets in the way.
The truth is, mistakes happen. You get distracted, you forget, you're tired because you couldn't sleep that night. The reasons go on and on.
One of the common things I often do in Vault, is forget to update all the properties before I check in.
In a perfect world, I'd enter them in Inventor's iProperties, then check in the file.
But I sometimes miss that step when I'm placing these in Vault.
Fortunately, I can change them after the fact. Vault provides us some property edits that allow us to change the properties once their in Vault. All you have to do is choose the part, go to Edit>Edit Properties, and follow the wizard.
There's a couple of nice little tricks to the wizard, so here's a video to follow up those steps!
Happy Inventing!
Mort Sahl quotes
In a perfect world, a file would go into Vault once. It would never be edited, corrected or ever adjusted. We'd look happily at out Vault, with no version ever larger than one.
Then we'd walk outside to a beautiful, sunny day, and the birds would be chirping, our neighbors would wave, and all would be right in the world.
What a wonderful world it would be indeed, but as we insert the sound of a needle screeching across a record, reality gets in the way.
The truth is, mistakes happen. You get distracted, you forget, you're tired because you couldn't sleep that night. The reasons go on and on.
One of the common things I often do in Vault, is forget to update all the properties before I check in.
In a perfect world, I'd enter them in Inventor's iProperties, then check in the file.
 |
| This is where I should get them |
But I sometimes miss that step when I'm placing these in Vault.
Fortunately, I can change them after the fact. Vault provides us some property edits that allow us to change the properties once their in Vault. All you have to do is choose the part, go to Edit>Edit Properties, and follow the wizard.
 |
| Salvation. Editing properties in Vault |
Happy Inventing!
Wednesday, August 04, 2010
AEC Exchange - Now More than Ever
“A doctor can bury his mistakes but an architect can only advise his clients to plant vines.”
Frank Lloyd Wright
AEC Exchange has been around for a little while now. I've been fortunate to watch it start taking hold within the last year or so, as resources like Autodesk Seek the resources created inside Autodesk Inventor available in a format easily used inside of Autodesk Revit.
Imagine taking Inventor model that you've designed for a building, and being able to easily send those models into Revit.
It's be a dream a long time coming.
Since a picture is worth a thousand words, here's a video of AEC exchange in action. A special thanks to the guys at Autodesk for providing the data set!
Happy Inventing!
Sunday, August 01, 2010
Project Photofly - The Next 'Thing' for You and Your Camera?
“All photographs are there to remind us of what we forget. In this -- as in other ways -- they are the opposite of paintings. Paintings record what the painter remembers. Because each one of us forgets different things, a photo more than a painting may change its meaning according to who is looking at it.”
John Berger quotes
I finally had a chance to try out Project Photofly from Autodesk Labs. I really wanted to try it out on my own stuff, and not just pull down just the sample data.
Before anything else, what is Photofly?
Photofly is a software that will allow you to take several pictures from a standard digital camera and stitch them together into a 3D image. You can even apply a known distance to the image and use that to figure out other dimensions.
As if this weren't intriguing enough, it's done over the cloud. That's right, you upload the files to Photofly's servers, and the stitching is done offsite in that ether-world known as 'The Cloud'.
The cool part, is that your computer resources aren't hit for this. I actually put Photofly on my 6 year old desktop with a mere 2GB of RAM, 128MB video card, and a 3.4 GHz single core Pentium 4.
The hardware didn't matter, it was only a vehicle to interact with Photofly, although I'll admit I was wishing for a better video card after I'd downloaded the image. Even then, the product was very usable.
The first thing I did was pull out my BlackBerry and take some pictures of my 3DConnexion SpacePilot Pro. My results were pretty good for a first time, I thought!
Next, I thought I'd try something a little tougher. So I headed down to Planes of Fame again and tried taking pictures of the FJ Fury there.
These were a little tougher. I was hampered by the fact that I couldn't see the top of the plane, and I really couldn't get good pictures of the back.
And I do think there's still some user error that needs to be worked out! :-)
First just a regular picture
And the other angle.
My first impressions? This is pretty cool stuff. The ability to take a 3D picture, and possibly even get measurements off it could be a real boon when you've got something your trying to get into a 3D program.
But there's two of things that I've already learned in just this brief little journey.
For more info, check out Project Photofly here. There's also some instructional videos I'm going to be going through myself! I've just scratched the surface.
There all on the link above, but here's the first embedded in the blog!
Enjoy!
John Berger quotes
I finally had a chance to try out Project Photofly from Autodesk Labs. I really wanted to try it out on my own stuff, and not just pull down just the sample data.
Before anything else, what is Photofly?
Photofly is a software that will allow you to take several pictures from a standard digital camera and stitch them together into a 3D image. You can even apply a known distance to the image and use that to figure out other dimensions.
As if this weren't intriguing enough, it's done over the cloud. That's right, you upload the files to Photofly's servers, and the stitching is done offsite in that ether-world known as 'The Cloud'.
The cool part, is that your computer resources aren't hit for this. I actually put Photofly on my 6 year old desktop with a mere 2GB of RAM, 128MB video card, and a 3.4 GHz single core Pentium 4.
The hardware didn't matter, it was only a vehicle to interact with Photofly, although I'll admit I was wishing for a better video card after I'd downloaded the image. Even then, the product was very usable.
The first thing I did was pull out my BlackBerry and take some pictures of my 3DConnexion SpacePilot Pro. My results were pretty good for a first time, I thought!
 | |||
| The first 3D Picture I created with Photofly |
Next, I thought I'd try something a little tougher. So I headed down to Planes of Fame again and tried taking pictures of the FJ Fury there.
These were a little tougher. I was hampered by the fact that I couldn't see the top of the plane, and I really couldn't get good pictures of the back.
And I do think there's still some user error that needs to be worked out! :-)
First just a regular picture
 |
| The FJ Fury sitting at Chino. I'll give anyone 3 guesses what plane the Fury is based on. |
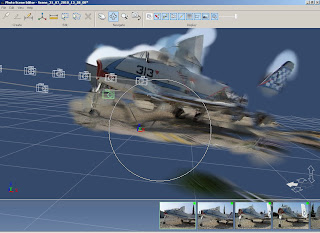 |
| Here's the first side of the FJ Fury |
And the other angle.
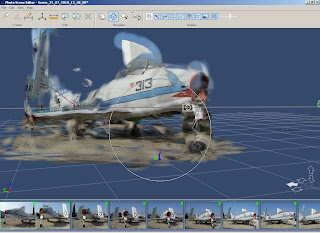 |
| Side 2 |
My first impressions? This is pretty cool stuff. The ability to take a 3D picture, and possibly even get measurements off it could be a real boon when you've got something your trying to get into a 3D program.
But there's two of things that I've already learned in just this brief little journey.
- This shouldn't really be surprising, but watch your lighting. Bad lighting can cause Photofly to have problems putting everything together.
- Get plenty of pictures. When I took pictures of the FJ Fury, I started on one side, took a picture, walked 3 paces, and took another picture, and repeated. I only did this at one level (about eye level), I should have taken another 'ring' of pictures at a lower level, to have more images to stitch. If I could have, I also should have taken a 'ring' higher than eye level.
For more info, check out Project Photofly here. There's also some instructional videos I'm going to be going through myself! I've just scratched the surface.
There all on the link above, but here's the first embedded in the blog!
Enjoy!
