Albert Einstein
I'm back from my snowboarding trip, and it was a great trip. But alas, all good vacations must end.
With Christmas now over, many of us wait calmly for New Years to come around. In my case, I started reflecting on some of the challenging questions I was asked over 2009.
Here's an interesting one.
"How can I batch publish still images from Showcase?"
I had to think about that one a bit. I've never tried it. I tend to be a 'shot at a time' type of guy.
There isn't a button like File>Batch Render, or similar, so the head scratching began.
It turns out, that there is away, although it's not 'in your face obvious'
You can create a series of stills by using the Save As Movie option!
At first, it might be a little non-intuitive. After all, a movie implies motion, not stills. But a movie is just a series of stills moving so quickly that there's an illusion of motion. This is where we can take advantage of some Showcase settings.
The first thing you want to do, is create shots at the angles you want to see. Create as many as you need.
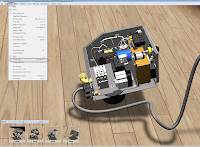
(Click to Enlarge)
This will get the proper shots, but watch out, the number of stills created is based on these things.
1) The type of transition between shots. I can't say I know all the ins and outs of this one, but if the shot has a transition set to use any type of animation, you'll get extra frames there as well.
2) The frame rate rate the movie is set for.
If you have Showcase set to animation frame rate, you'll get a still for each frame. For example, if your frame rate is set at 25 frames per second, you'll get 25 stills for each shot! Obviously, that's going to increase your render times dramatically.
To address item 1, right click on each shot, and choose 'Properties'.
 (Click to Enlarge)
Once in properties, change the Transition setting to 'Cut to Shot'. This will eliminate extra shots created by the transition.
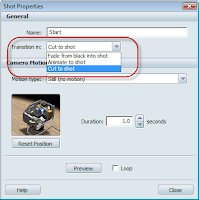
Now the renders can be saved out as stills. Go to File>Save Movie As. The following screen pops up.
Notice that the frame rate has been reduced to just 1, and that 'Image Sequence' is selected. Also, the 'Create movie of' option is set to 'All Shots Separately'.
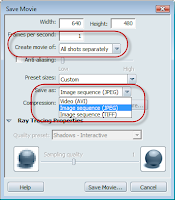
Now when you choose 'Save Movie', you'll get the following in your destination directory.
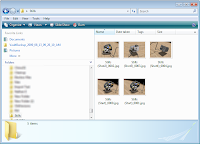
Notice that you'll still get an extra shot. There's an extra shot for the beginning of the sequence. I haven't yet found a way to eliminate that one.
But if you need to generate several renders that might take a while, such as big images with ray tracing. You can let your computer work away while you're out doing other things.
Like what? For me, that either means snowboarding or heading out to Planes of Fame for a little volunteer work after Christmas.
While I was there, I grabbed a picture of the Museum's P-26 Peashooter with my cell phone.
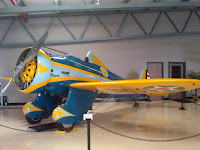
Built in teh 1930s, it boasted innovations like all metal construction. About 150 were built. Now only two are left. One is in the Smithsonian, and the other is in Chino, California.
Only the one in Chino (pictured here) is flyable.
That's it for now!
Happy (almost) New Years everyone!

(click to enlarge)
Now the renders can be saved out as stills. Go to File>Save Movie As. The following screen pops up.
Notice that the frame rate has been reduced to just 1, and that 'Image Sequence' is selected. Also, the 'Create movie of' option is set to 'All Shots Separately'.

(Click to Enlarge)
Now when you choose 'Save Movie', you'll get the following in your destination directory.

(Click to Enlarge)
Notice that you'll still get an extra shot. There's an extra shot for the beginning of the sequence. I haven't yet found a way to eliminate that one.
But if you need to generate several renders that might take a while, such as big images with ray tracing. You can let your computer work away while you're out doing other things.
Like what? For me, that either means snowboarding or heading out to Planes of Fame for a little volunteer work after Christmas.
While I was there, I grabbed a picture of the Museum's P-26 Peashooter with my cell phone.

(Click to Enlarge)
Built in teh 1930s, it boasted innovations like all metal construction. About 150 were built. Now only two are left. One is in the Smithsonian, and the other is in Chino, California.
Only the one in Chino (pictured here) is flyable.
That's it for now!
Happy (almost) New Years everyone!

No comments:
Post a Comment