Pages

Monday, December 28, 2009

I'm ready for my close-up. Generating Stills from Autodesk Showcase.

“I am enough of an artist to draw freely upon my imagination. Imagination is more important than knowledge. Knowledge is limited. Imagination encircles the world.”

Albert Einstein


I'm back from my snowboarding trip, and it was a great trip. But alas, all good vacations must end.

With Christmas now over, many of us wait calmly for New Years to come around. In my case, I started reflecting on some of the challenging questions I was asked over 2009.

Here's an interesting one.

"How can I batch publish still images from Showcase?"

I had to think about that one a bit. I've never tried it. I tend to be a 'shot at a time' type of guy.

There isn't a button like File>Batch Render, or similar, so the head scratching began.

It turns out, that there is away, although it's not 'in your face obvious'

You can create a series of stills by using the Save As Movie option!

At first, it might be a little non-intuitive. After all, a movie implies motion, not stills. But a movie is just a series of stills moving so quickly that there's an illusion of motion. This is where we can take advantage of some Showcase settings.

The first thing you want to do, is create shots at the angles you want to see. Create as many as you need.
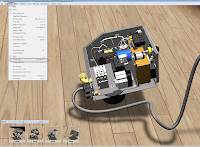

(Click to Enlarge)

This will get the proper shots, but watch out, the number of stills created is based on these things.

1) The type of transition between shots. I can't say I know all the ins and outs of this one, but if the shot has a transition set to use any type of animation, you'll get extra frames there as well.

2) The frame rate rate the movie is set for.

If you have Showcase set to animation frame rate, you'll get a still for each frame. For example, if your frame rate is set at 25 frames per second, you'll get 25 stills for each shot! Obviously, that's going to increase your render times dramatically.


To address item 1, right click on each shot, and choose 'Properties'.

(Click to Enlarge)

Once in properties, change the Transition setting to 'Cut to Shot'. This will eliminate extra shots created by the transition.
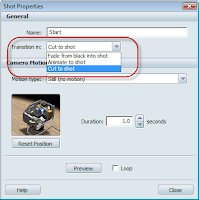

(click to enlarge)

Now the renders can be saved out as stills. Go to File>Save Movie As. The following screen pops up.
Notice that the frame rate has been reduced to just 1, and that 'Image Sequence' is selected. Also, the 'Create movie of' option is set to 'All Shots Separately'.
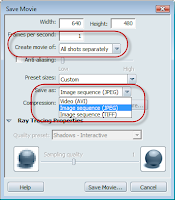

(Click to Enlarge)

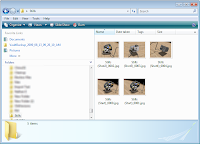
Now when you choose 'Save Movie', you'll get the following in your destination directory.


(Click to Enlarge)

Notice that you'll still get an extra shot. There's an extra shot for the beginning of the sequence. I haven't yet found a way to eliminate that one.

But if you need to generate several renders that might take a while, such as big images with ray tracing. You can let your computer work away while you're out doing other things.

Like what? For me, that either means snowboarding or heading out to Planes of Fame for a little volunteer work after Christmas.

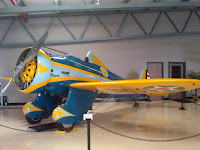
While I was there, I grabbed a picture of the Museum's P-26 Peashooter with my cell phone.

(Click to Enlarge)

Built in teh 1930s, it boasted innovations like all metal construction. About 150 were built. Now only two are left. One is in the Smithsonian, and the other is in Chino, California.

Only the one in Chino (pictured here) is flyable.

That's it for now!

Happy (almost) New Years everyone!


Saturday, December 19, 2009

Happy Holidays!


“Celebrate the happiness that friends are always giving, make every day a holiday and celebrate just living!” Amanda Bradley


Today, there's no big post on Inventor, Showcase, or Vault.

Today, I'm packing up and heading for Mammoth Mountain for some snowboarding!


(click to enlarge)

I'll be back Christmas Eve, in time to do the holiday thing with the family.

Look for some blogs after that!

Happy Holidays!


(click to enlarge)

Tuesday, December 15, 2009

Addendum: The Importance of Being Earnest (about Autodesk Vault Backups).


“Trust, but verify.”

Damon Runyon


Sometimes you need a little help from your friends.

One of our applications engineers, Mike Carlson, sent me an e-mail reminding me of two more switches that can be added to your Autodesk Vault backup scripts, discussed in the blog 'The Importance of Being Earnest" here.

Here are the additional switches he sent me.

  • -VAL Validates the backup. Errors are recorded in the specified log file.
  • -INC Performs an incremental backup. Tells Vault only to backup files that have changed.
Thanks for pointing that out, Mike!

Thursday, December 10, 2009

The Importance of Being Earnest (about Autodesk Vault Backups).


Rule: 13 Always have a plan.
Rule 13.1 Have a back-up plan, because the first one won't work.

Marine Corps saying

I have to confess that I'm about as guilty of this as anyone. But when is the last time you verified that you were backing up your data. Really? Seriously?

This could be your personal photos, bank records, or engineering data. Think for a moment. What would happen if the hard drive in your computer suddenly ground to a halt?

The thought is pretty scary, isn't it?

We should always be backing up our computers. Always. It could be as simple as going to Best Buy, getting an external hard drive, and copying files to the drive every week.

In this document, I'm going to talk about backing up your Vault. It's a little more advanced than just copying and pasting the files from one place to another, but once dialed in, it's very robust.

And if you want to make sure your data can survive any unforeseen issues, it's necessary.

The most straight forward way is to open up the Autodesk Data Management Server (it will be located on the computer hosting your Vault, and performing a manual backup through the graphical user interface (AKA GUI).


Step 1: Locate the Backup and Restore tools
(click to enlarge)

Step 2: Choose backup.
(click to enlarge)

Step 3: Choose your backup destination
(click to enlarge)

This can be pretty effective, however, it also relies on the user being diligent about kicking off the backup. If you want to automate the process, you can use a script similar to the one below.

This particular script creates what is called a cascading backup. That is it keeps two versions of the backup. For example. If you're running a backup every night, the backup in folder 'A' is the most current backup. The backup in folder 'B' is one day old.

When the backup runs again, the following process happens.
1) Folder 'B' is purged
2) Folder 'A' is renamed to Folder 'B'
3) A new Folder 'A' is created with the most recent backup.

In this way, the backups cycle through, keeping two versions on at all times. In addition, these files can (and probably should) be automatically copied to another storage device external to the machine. This ensures another level of protection should the server hosting the data have a catastrophic failure.

Here's an example of the script I use. My comments are in red. The script is in green.

@ECHO OFF <=Turns off command reporting on screen
REM DELETE B AND CASCADE A BACKUP SUBDIRECTORIES
RMDIR /Q /S "C:\Backup\Vault\B" <= Removes old Folder "B"
REN "C:\Backup\Vault\A" "B" <= Renames Folder "A" to Folder "B"
REM CREATE A NEW DIRECTORY FOR THE BACKUP


MKDIR "C:\Backup\Vault\A\" <=Creates new Folder "A"
REM START THE BACKUP PROCESS (THIS IS ONE LINE OF TEXT)
"C:\Program Files\Autodesk\ADMS Manufacturing 2010\ADMS Console\Connectivity.ADMSConsole.exe" -Obackup -B"C:\Backup\Vault\A" -VUadministrator -VP -DBSC -S

Here are the switches defined.

Connectivity.ADMSConsole.exe <= Vault Executable

-OBackup <= Tells Vault this is a backup operation "C:\Backup\Vault\A" <= Tells Vault backup location

-VU <= Key for Vault Admin username (in this case "Administrator)

-VP <= Key for Vault Password (in this case no password is used)

-DBSC <= Tells Vault not to backup standard content center libraries. This makes for a faster backup taking up less disk space. You can always add your libraries from the installation disks if you need to restore.

-S <= Runs silently. No dialog boxes are shown when this switch is included.

More information on the script can be found by going into the Autodesk Data Management Console help system, and searching for "Command Line Backup".

Save this as a file with a *.bat extension, and run it as a scheduled task in Windows. Different operating systems vary slightly, but here's a link to how to set one up in Windows XP.

Last but not least. Once the script starts running, make sure to verify that it runs correctly and backs up data! Please!

Some of the things I've seen:
  • The Vault backup script seen listed in scheduled tasks. Not recognizing it, it's removed without verifying what it's used for. No backup is made for around 6 months!
  • The VaultAdministrator password is changed. However, the -VP switch in the script is not. No backup created!
  • The backup location runs out of disk space. This isn't caught.
  • Vault is upgraded and moved to a new directory. The script is forgotten and isn't upgraded.
The moral of the story? Verify your backups periodically. It takes a few minutes, and can save countless hours of headache, and heart ache.

If possible, you can even restore the backup on a second machine, just to ensure your backups are valid and there are no corruptions during the backup.

You might call me paranoid, but as a good friend in IT once asked me, "Have you ever wished you hadn't made a backup?"

Sometimes, a little paranoia can be a good thing!

Monday, December 07, 2009

Autodesk Manufacturing Academy - Looking Back


“The Internet is becoming the town square for the global village of tomorrow.”

Bill Gates


I did something this weekend I rarely do. I took a vacation! Since I was on a snowboarding trip at Mammoth Mountain, there isn't much on the tech tip side.

But, there is something that is worth talking about.

With Autodesk Manufacturing Academy finished, the team here as been busy creating recordings of the lessons taught there for download by those who attended.

But..... For a limited time.... From the KETIV Technologies news desk..... The Sheet Metal videos are available for download for everyone!

You can read the press release HERE. The link is on the release. Be sure to check the archives! That's where the files are located!


A picture from the AMA site. Look in the Archives section
(click to enlarge)

Take a look! We're really excited about it.

Oh, and as for that snowboarding trip.... The snow was icy, and the wind was howling so badly that we only were able to go up one day.

Here's a picture of the aborted day two. You can definitely see why we avoided that one!


It wasn't actually snowing. This is ALL the wind!
(click to enlarge)


Wednesday, December 02, 2009

Greetings from KETIV at Autodesk University.


It's rather like attending a university seminar where you are talking to a few gifted specialists who deliver a paper to an audience of their peers. That's one way of making music.

Gavin Bryars


Nothing major going in this blog, but a big thanks to Mike Carlson of KETIV for taking these pictures from Autodesk University in Las Vegas!

I wasn't able to make it this year, but I'll be making it up with a weekend snowboarding trip to Mammoth Friday!

Here's an engine and propeller that were created in a 3D printer. (Wish I could look at that up close!)


(click to enlarge)

And in another note, Inventor turns 10 years old this year. it's hard to believe it's been that long. That was last millennium! When I actually had hair!

Of course there has to be cake!


(click to enlarge)

As AU2009 draws to a close, I hope everyone who made it had a great time and learned a ton!