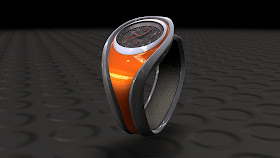
One of my new adventures in 2009 is Autodesk Showcase, and while a grip of fun, has been challenging too.
First of all, what is Showcase anyway, and what does it do?
Showcase is a rendering tool that allows you to take 3D CAD models (even non-Inventor models!) and not only create photo-realistic renderings of them, but will also give you the ability to change colors, camera angles, and visibility in real time. You can literally see what your design is going to look like before it's even left your computer.
So what is the challenge for me?
I'm a mechanical engineer by degree. By definition that makes me the guy who things in a Cartesian coordinate system of X.Y.Z, with a tolerance of plus or minus .005.
Now for the Showcase world, where you hear things like 'that looks better if you move it a smidge'.
What the heck is a 'smidge' anyway? Is that some sort of constant that wasn't in my Dynamic Systems Analysis Course? I don't remember that one!
After deciding a smidge was smaller than a 'nudge' and bigger than a 'little bit', I carried on.
Things are a bit more subjective in the Showcase world, but once I shelved my '+/- .005
brain, I began to see what was possible.
I would have loved to have had this back in the days when I was designing enclosure hardware. It would have saved us days in presentations and trying to make SLA prototypes look real. Not to mention the catalog work we could have gotten done without having to build prototypes for photoshoots!
But the past is the past.
And this is the grips of fun part... making something that works... look good too.
There's a lot that can be talked about in Showcase, so I'll keep the basic steps concise. I thought that before I went in and started talking about 'tips and tricks', I'd just show the basic steps to get from CAD model, to rendering As I 'blog' on, I'll get into more depth in the steps and show you some of the things I get to work on!
First, you import your model


Next, get your model oriented.

Next, apply your materials and insert it into a scene.

With a scene and materials done, you can now calculate the ambient shadows. Once the materials and scene are in, you now have a rendering that you can rotate, modify etc!
True enough, there are subtleties, nuances, and tricks that you can use to make things look even better. It's also true that this is a pretty condensed process described here, but I'll add more soon. I promise!
Happy Friday everyone!

No comments:
Post a Comment