Time for the first 'what's new' in R2009.
The first thing is the view cube, which is located in the upper right of the screen (although it can be turned off). If you click on the picture below, you can see it indicated in the red circle.
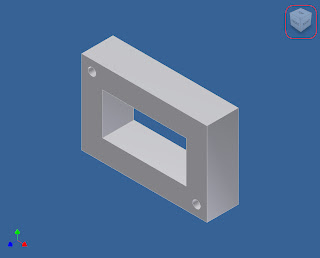
Pretty much the same tool as in the DWF Viewer, it supercedes the 'glass box'. By clicking on different portions of the box, you can rotate your view to look at the model from different angles.
At first, this fell into the 'Well, that's cool, but I'll never use it' category. Especially since I'm using a Space Traveller from 3D Connexion (www.3Dconnexion.com).
Well, that perspective changed pretty quickly. After spending a couple of hours using it, I found that I was using it quite a bit more, particularly for looking straight down at narrow edges (especially sheet metal).
So much for that first impression. I think I'll be using this quite a bit more than I initially expected!
One last note! The 'Isometric View' is now called 'Home View'. Not a big change, but it might through you off a bit the first couple of times.
We'll see what a little more seat time shows!
Monday, March 31, 2008
R2009 A different View
Labels:
General Inventor Topics
Tuesday, March 25, 2008
It's that time again!
Yes, it's that time of year again!
The 2009 releases are here! I'll be trying to point out as much of the new stuff as I can in the next couple of weeks, but it's going to be a rush to take it all in!
Feel free to take a look at the Autodesk website here!
Specifically, the Inventor what's new is here.
AutoCAD Electrical is here
.
The 2009 releases are here! I'll be trying to point out as much of the new stuff as I can in the next couple of weeks, but it's going to be a rush to take it all in!
Feel free to take a look at the Autodesk website here!
Specifically, the Inventor what's new is here.
AutoCAD Electrical is here
.
Labels:
General Inventor Topics
Tuesday, March 18, 2008
I get by with a little help from my friends.
Yes, as I quoted the Beatles on this one. I guess that means I'm getting old. :-)
As I'm working some new tips (it has been a little crazy lately), I wanted to mention that I've added a link to a new Inventor/AutoCAD Electrical/Data Management blog on my links section.
Among the other Blogs, please check out Steve McCarthy's Cadgneto blog here!
Feel free to bookmark it, or just pick it from the 'blogs' section of the page!
And feel free to cruise by some of the other blogs on that section!
Friday, March 07, 2008
It's not copying, it's 'reverse engineering'.
Today, I'm putting out a Vault tip that everyone may find useful. Copy Design.
Copy design is a way of taking an assembly, and all the parts and drawings that go with it, then reusing the parts that are reused, and making copies of parts that are new.
For this example, we have a part for a wood coffee table that needs to have a section cut from it (referred to as a 'Cloud Lift')
However, from previous designs, we know that there's a jig that already does this for a different part.
The basic jig is the same, we're using the same clamps, handles, and stops. But the base of the jig (where the router bit will actually ride), will need to be shortened for the new jig, since the part it's cutting is shorter than the current one.
Here lays the rub. We're still making this stretcher, so the current jig must remain available.
Here's where copy design can help.
First open Vault Explorer. Then locate your jig (cleverly named 'Cloudlift Fixture'). Right click on it, and choose 'Copy Design'
Once Copy Design comes up, you can choose which parts you want to reuse (designated by the yell0w '+' symbol), or which you want to copy (designated by the Cyan '++' symbol).
In this case, I'm copying the assembly file, the base, and any drawings that go with it. Once I've done this, I click OK.
Once this is finished, I can go edit the new assembly in Inventor, and make the changes I need.
In this case, I shortened the base to fit the new part, moved the clamps and handles to the correct position, then updated the drawings.
The good news, I didn't have recreate any of the assembly, or create any new drawing files (although I did have to create a couple of new views for the design).
The second jig took about half the time to create than the first (maybe even less, but I wasn't very scientific in my tracking).
Still, it can be a huge help in reusing data, preventing duplicate files, and reducing the chance for errors (and lost time), down the road.
Happy Friday!
Labels:
Autodesk Data Management Topics
Subscribe to:
Posts (Atom)